# Managing the Endpoint from the Web Interface (Control Panel)
Features found in the control panel correspond with the settings that can be directly set from the endpoint. Learn more about the features and recommended settings in the Setting Up and How to control TrueConf Group sections.
Web-based management brings several advantages:
Configure and use the endpoint remotely outside the meeting room
Enjoy advanced conference management features
Download conference recordings
View detailed technical information
Manage the endpoint from the convenience of the keyboard and mouse (as compared to remote control management).
To access the control panel, enter the IP address displayed at the top of the screen into the browser's address bar.
To control the endpoint using the control panel, you should first configure HTTP access.
Для удобства использования в разных ситуациях панель управления предлагает адаптивный интерфейс, который оптимизирован в том числе и для мобильных устройств (смартфонов и планшетов).
# Configuring HTTPS connection
To enable access to the control panel via HTTPS, go to the Settings → HTTP → HTTPS settings section:

Download a certificate file with an .crt extension. If your certificate format is different, you can convert it.
Download a private key file in .key format.
Specify the password if it was set when generating the key.
При необходимости задать HTTPS-порт, отличный от стандартного 443, укажите его и нажмите ниже кнопку Apply.
Click the
button to the right of the Use HTTPS: line to apply the settings.
There are three ways to generate a certificate file:
Create a self-signed certificate.
Generate a free Let's Encrypt certificate.
Buy a commercial certificate.
You can add certificate and key files only in the control panel, but you can also enable or disable HTTPS access in the endpoint’s settings menu. To do this, go to Configuration → Network → HTTP and change the required option.
# Quick Access Toolbar
For quick access to audio devices and displaying chat messages, you can use a special panel with the following buttons:
: Disable/enable camera
: Mute/unmute microphone
: Disable/enable speakers
and
: Decrease/increase speaker volume
: Open on-screen controller
: Send a message to the endpoint. Click the button and enter a message (up to 257 characters) and click Send. The text will be displayed on the endpoint screen and will remain there until someone presses OK on the remote control. If when the message is sent the endpoint participates in a meeting, other participants will not see this message. This feature can be useful if someone uses the endpoint in the meeting room, and you need to send an important message to this user only.
You can manage audio devices connected to the endpoint in the Settings → Audio section as well.
# On-screen controller
You can find a remote control emulation in the control panel, which can be useful (e.g. when entering the control panel from the mobile device).
To open the on-screen controller, press the button in the quick access toolbar. Here you have access to all management features as if you are using a real remote control, as described in the How to control TrueConf Group section.
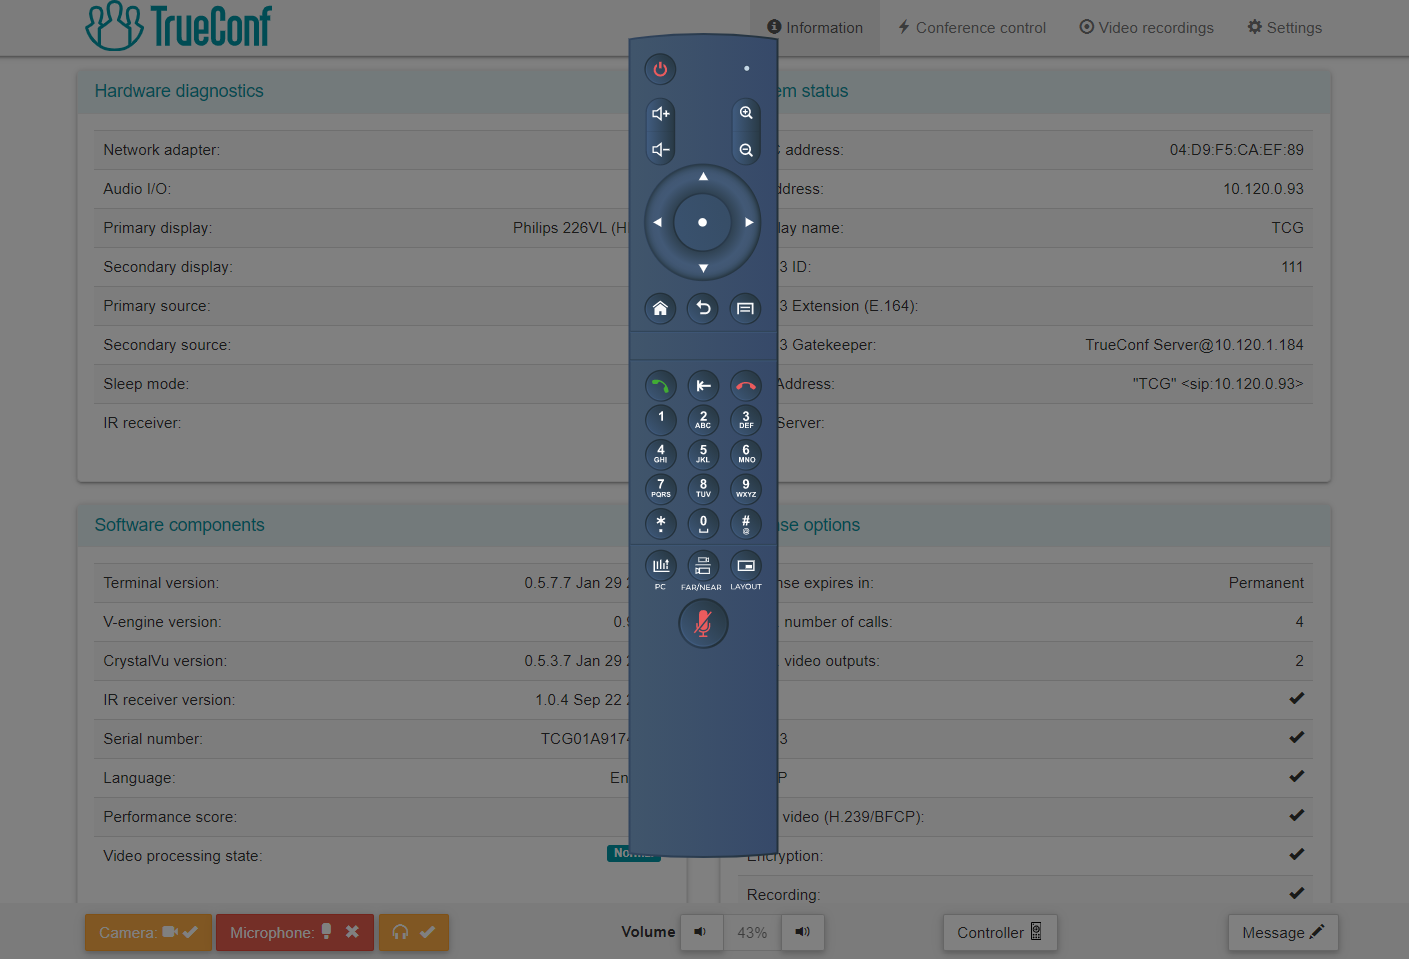
# Information
In this section you can check the current settings of the endpoint and test if it is ready for work:
Network connection and connected devices status in the Hardware diagnostics section
IP, MAC, and SIP/H.323 addresses in the System status section
Software data in the Software components section
Information about the license and available features in the License options section.
# Making and Managing Video Calls
To access the settings of the camera connected to the endpoint and view active video session parameters, go to the Conference control tab.
Depending on the parameters of the network that is used to connect the endpoint to your device, the video from your camera, as well as conference feed may be delayed.
If the PTZ camera image is freezing or if changing video layout takes longer than it should, it does not mean that the system is malfunctioning. Most likely, other meeting participants do not experience any issues.
# Camera Settings
There are two blocks for displaying feeds at the top of the page:

In each block, you can choose the following options in the drop-down list:
In the Primary source unit, you can view the image from the camera connected to TrueConf Group (self-view).
Presentation source: Preview content to be shared
Conference layout: Choose the current layout and control mixing settings for group conferences (available only when MCU module is enabled)
Main display: Display the layout on the screen connected to the endpoint and control the video feed from the endpoint camera
Video from <participant name>: Display the selected user’s video feed and control their PTZ camera.
Disable preview – очистить данное окно предпросмотра.
You can also control the PTZ camera connected to the endpoint and configure its presets in this section:
Choose Primary source in one of the drop-down lists.
Click the camera control button
.
In the control panel that opens, you can adjust the camera position and image scaling using the corresponding buttons:
To switch to the preset saving mode, click Memorize.
In Scenes list click any number to save the chosen camera settings under this number.
Поддерживается сохранение пресетов для разных камер, если их подключено несколько к терминалу.
# Вызов абонента
To call a user (or for this user to join ongoing group conference), use Dial out, History and Address book tabs in Contacts block:

Go to the Address book menu.
Выбрать список абонентов в выпадающем списке:
Local – локальный список на терминале;
NDI – доступные в локальной сети NDI потоки, при выборе происходит их автоматический поиск;
TrueConf MCU – загруженные контакты из TrueConf MCU при интеграции с ним;
LDAP – при интеграции со службой LDAP;
TrueConf Server – контакты из TrueConf Server при интеграции с ним;
TrueConf Group – другие терминалы TrueConf Group, доступные в локальной сети, при выборе данного пункта происходит их автоматический поиск.
2. Переключиться на отображение групп контактов для выбранного списка. Редактирование групп для всех вариантов кроме локальной адресной книги будет недоступно.
3. Если выбран загруженный из стороннего сервиса список (например, при интеграции с TrueConf Server), то можно сохранить любой контакт в локальную адресную книгу терминала с помощью кнопки .
# View and edit the address book
Если выбрана адресная книга терминала, то доступно создание, редактирование и удаление
абонентов. Аналогично после активации переключателя Display by groups доступно добавление, редактирование и удаление групп контактов.
Для каждого контакта можно назначить до 5 адресов любого типа, и при этом указать предпочтительный (на него по умолчанию будет идти звонок с терминала) с помощью кнопки .
Контакты на странице отображаются по 10 штук, если их больше, то внизу будут кнопки для перехода по списку.
# Content Sharing
To share a document or content captured through HDMI during a conference, you need to pre-upload it:
Choose Presentation source in the list above.
Specify the content source in the Presentation source list:
чтобы выбрать загруженный ранее на терминал файл, в списке выберите пункт View file;
для загрузки нового файла нажмите кнопку Change или в списке выберите пункт Upload..., и в открывшемся окне выбора файла укажите нужный;
To stream content from a source connected to the capture card, choose one of the HDMI inputs.
чтобы передать RTSP или VNC поток, выберите нужный из списка (он формируется из локальной адресной книги терминала);
для передачи доступного в сети NDI потока выберите его из списка, который будет формироваться автоматически как и для адресной книги;
для показа контента со второй камеры выберите её из списка.
В случае если подключено несколько камер, указать, какую из них использовать для передачи видео, вы можете при настройке устройств захвата изображения. Тогда любую из оставшихся можно будет выбрать для показа контента.
Теперь вы можете начать показ выбранного контента своим собеседникам, нажав кнопку Share. Если в настройках вызовов была выбрана отправка презентации при подключении источника, то показ начнётся сразу после выбора контента.
To scale and move around the image, click above the preview window. In the control panel that opens, you can scale and move the image using the corresponding buttons.
Просмотр контента из любого источника доступен и вне сеанса видеосвязи.
# Switching Layouts
In the group conference mode, you can manage users' video layouts. To do it choose Conference layout or Main display in one of the feed displaying blocks in the drop-down list.
In the preview unit that appears, you will see a preview of the current video layout. To choose a new layout, click Change layout and choose one of the layouts in the list.
Learn more about layout types in the "Endpoint Operation" section.
# Mixing settings
When using the MCU module, you can adjust the mixing settings of the video streams on the go during a video call. To do it, choose Conference layout in one of the feed displaying blocks. There are several available options in the MCU setup drop-down list:
Restrict receiving presentations
Control the volume indicators displayed in users’ video windows
Change mixing mode
# List of Participants
You can view the list of users connected to the endpoint in the Participants block on the Conference control tab. This list automatically appears during a video call. To end a call for all, use the Hangup all button. You can also disable the MCU module in this section (if it was activated earlier).

You will see the following information about each video call participant:
Username
Call direction (incoming/outgoing)
адрес, может быть SIP, H.323, RTSP, VNC, NDI;
иконка
если участник отображается в приоритетном видеоокне в раскладке;
блок кнопок для управления участником (отбой, просмотр информации о подключении, дополнительное меню для тонового донабора и отображения в приоритетном окне).
To send a DTMF command to the participant, press the button and enter your command using the pop-up numeric keypad:

To view detailed information about how to connect to a user, click . Connection information will appear at the bottom of the page with detailed data on the connection protocols used, as well as incoming and outgoing video and audio streams. To hide this information, click
again.
At any time during the conference, you can manually assign the priority video window to a specific user. To do it, press the button next to the user’s name.
To assign the larger video window to the endpoint, choose Primary source and press the button in one of the feed displaying blocks in the drop-down list.
To disconnect a specific user from the video call, press the button .
# PTZ Camera Control
To control a PTZ camera connected to the endpoint:
To switch to previously saved camera preset, choose Primary source and press the corresponding number in the Scenes list in one of the feed displaying blocks in the drop-down list.
Otherwise, take the following steps to set a new position:
Click
in the Primary source unit
In the camera control window you can pan, zoom in, and zoom out the image using the corresponding buttons.
To control PTZ cameras connected to TrueConf Group:
In one of the feed displaying blocks choose the user you need from the drop-down list.
Press the
button above the video window of that user.
In the camera control window that opens, you can adjust the camera position and scale the image using the corresponding buttons.
# Recording and streaming
At the bottom of the Conference control page you can see the buttons to control recording and streaming:

Use these buttons to start or stop video recording or streaming via RTMP, SAP, and NDI protocols. In this case, you can only use those streaming options that were previously configured using the remote control or in the Settings → Recording and streaming menu of the control panel.
In this case, you can start recording or streaming not only during video meetings. You can also start streaming or recording video from the camera connected to the endpoint before the video meeting (for example, for preliminary testing of video and audio quality, recording any video message, etc.).
# Video Recordings
Video recordings tab stores conference recordings and brief information about each file: creation date, duration, and size.
To watch the recording, click on a row in the table. To hide the video window, click on that recording in the list again.
Во время проигрывания видео доступно дополнительное меню по кнопке . Там вы можете вынести проигрыватель в отдельное окно выбрав пункт Picture in picture, чтобы одновременно продолжить пользоваться панелью управления. Также доступно увеличение скорости просмотра видео.
To download or delete a recording, use and
buttons respectively.
This list also offers bulk actions: you can check several boxes and download all of them at once or delete them using the corresponding buttons above the list.
Learn more about how to set up conference recording in the Setting Up section.
# Settings
To access the endpoint parameters, go to Settings tab at the top. The content of almost all sections is similar to the sections of the interface that is directly accessed from the control panel and described in Setting Up section.
Here are several sections that are specific to the web interface or offer advanced features.
# Date and Time Settings
In the Date and time section of the control panel, in addition to the settings you can configure using the remote control, you can use a convenient calendar widget. It can be displayed by pressing the button:

Use the widget buttons to:
: Choose current date
: Go to the time settings
: Delete current date and time
: Close the calendar widget
The widget also offers an interactive time zone map where, by hovering the mouse over each of the city circles, you can see its current time. To choose the desired time zone, simply left-click on the city:

Для сохранения настроек используйте кнопку Apply.
# Power Control
In the Power supply section, you can set up sleep mode (similar to remote control settings).
Power control also offers additional options:
Put the endpoint into sleep mode
Complete shutdown
Restart the endpoint
Restart video conferencing software without rebooting the OS.
# Software Administration and Upgrades
In the Maintenance section you can:
Upgrade firmware and license
Export/import settings
Go back to default settings.
To upgrade your firmware, you need to obtain the update file by contacting TrueConf managers. Choose this file in the Upgrade software:. You will see a warning about restarting the video conferencing system, and in a few seconds you will be able to work with the new software version.
Before updating the software, make sure that TrueConf Group is connected to a reliable power source so that the device does not suddenly shut down during the update. Please check that you have a stable network connection to the endpoint so that the control panel access is active.
To renew your license:
In the Licensing unit, click Download in Export hardware info:.
Contact the TrueConf managers and provide the saved configuration file. In response, you will receive your license file.
Choose it in the Upload license:.
In the Maintenance unit you also can:
Export/import TrueConf Group configuration and its address book, e.g., to transfer data between several endpoints
Upload the call history in JSON format (this can be useful when analyzing data using third-party utilities)
очистить журнал вызовов или адресную книгу (учтите, что данное действие необратимо).
# Performance Diagnostics
To check the status of the endpoint subsystems and view operation log files, go to the Diagnostics section.
Subsystems state section displays detailed statistics on TrueConf Group resource usage:
CPUblock displays the endpoint CPU load graph in real time:
System log block contains endpoint log files. Please provide them when contacting TrueConf technical support.
In the Ping block, you can check whether a specific video conferencing server is available via IP and SIP/H.323 protocols. To that end, enter its IP address or DNS name (without specifying the protocol, e.g.,
video.company.com
) in the Address field and click the Check button:Чтобы проверить маршрут прохождения пакетов до некоторого сервера или терминала, в блоке Traceroute укажите его IP-адрес или DNS-имя и нажмите кнопку Check.
In the Network log unit you can record network traffic passing through the endpoint and analyze it using Wireshark (opens new window). Also, you should provide traffic recording files when contacting TrueConf technical support.