# What is TrueConf MCU?
# Purpose
TrueConf MCU is a software-based video conferencing server designed for holding multipoint conferences. It provides standard MCU server functionality and ensures integration with SIP/H.323 video conferencing endpoints by Polycom, Cisco and Lifesize, Huawei, and others. TrueConf MCU is also compatible with software video conferencing solutions such as Polycom Real Presence Desktop/Mobile.
So, TrueConf MCU is a software alternative to such solutions as Polycom RMX, Polycom RealPresence Collaboration Server, Cisco Meeting Server, Avaya Scopia, Pexip Meetings, or Poly Clariti.
You can found more information about the features of TrueConf MCU in our webinar:

To use TrueConf MCU, you must have a physical server or a hypervisor that meets the system requirements.
# Work Scheme
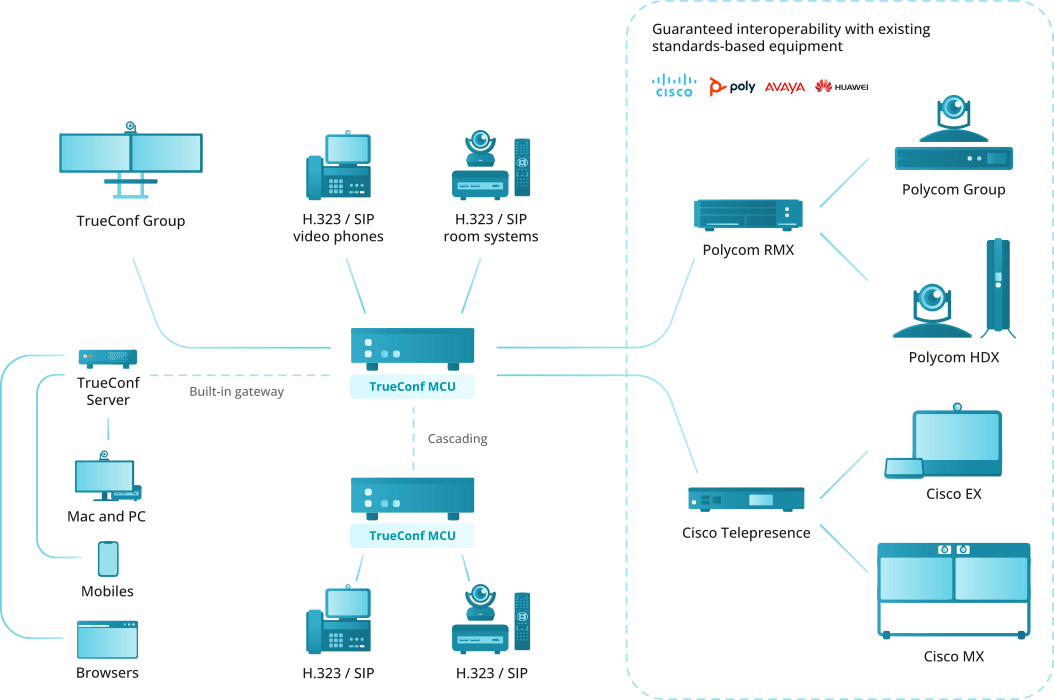
# TrueConf MCU features
# Supported protocols
H.323 video calls, including H.221, H.225, H.231, H.239, H.241, H.242, H.243, H.245, H.281, H.283, H.350, H.460, H.460.18, H.460.19 protocols support
Video calls via SIP, including ICE, TURN, BFCP, RFC 2833 support
Video calls via RTSP protocol
Conference participation from a browser (via WebRTC)
Remote camera control (FECC, H.224, H.281)
TCP/IP, SRTP, TLS, Static IP, DHCP, IPv4, IPv6, DNS
Support for management via SSH, WEB (HTTP, HTTPS) and NTP
NTP time synchronization.
MTU modifiable size
QoS support: DSCP, DiffServ
# Supported video codecs
- H.261, H.263, H.263+, H.264 Baseline Profile, H.264 High Profile, H.265 Main profile
# Supported audio codecs
- Opus, AAC, G.711, G.719, G.722, G.722.1, G.722.1c, G.723, G.726, G.728, G.729
# Features
Conferences of the "everyone on display" type with up to 250 participants and Ultra HD (2160p) video quality.
Schedule conferences or create virtual rooms, enjoy a number of scheduling options for recurring meetings (set a number of repetitions, repeat every day, every week or every month)
Real-time monitoring and management of active conferences
Set up a conference ID (either automatically or manually)
Lock conferences from new participants (they can be added only by the administrator)
Display conference participants' names in the layout
If the connection failed, a participant will be prompted to reconnect to the meeting after the connection is restored
View participant’s video, content and layout in use
Set up and manage participants' devices
Move participant from one conference to another on the fly. Participant's camera and microphone can be turned off if needed
Set both general layout for all participants or an individual layout for each user (including an active spear) and create a layout specifically intended for recording and streaming
Configure a type of every video window in the layout: empty window, autofill, fixed participant, active speaker, participant shuffle, or content window
Switch to the layout with a priority window in one click for each participant
Select a video scaling mode with or without cropping or select an automatic mode (TrueConf MCU will automatically determine the best scaling mode)
Remove a participant's self-view from the automatic layout to save up screen space
Create overlay layouts displaying a full-screen window with thumbnail windows laying on top of it
Create audio channels with attendees (able only to receive audio) and presenters (able to sent audio)
Remove non-video participants from the layout to free layout windows for other users
Select audio and video codecs, maximum resolution, fps and video bitrate when creating a conference
Display volume level in the video windows
Stream conferences to external RTMP sources
Show media files such as images and videos during a conference (they can be displayed in the primary and secondary video streams)
Stream from VNC servers during a conference
Use built-in noise cancellation and automatic gain control individually for each participant
Address book where you can add new users, edit existing ones, and form groups
Record conferences
Configurable main and sub stream encoding profiles for adjusting the balance between frame rate and image quality depending on the channel bandwidth
Connect IP cameras and view IP streams via RTSP
PTZ camera control
Control participants' devices with DTMF commands
Authorize to log into TrueConf MCU control panel
Integrate with TrueConf Server via cascading
Compatible with Polycom, Cisco, Lifesize hardware endpoints, as well as Polycom RealPresence desktop and mobile software
Compatible with Debian
Support for Oracle VM VirtualBox, VMware ESXi, KVM hypervisors, Microsoft® Hyper-V, Xen.
Works in LAN/VPN without internet access
# Administration features
Real-time monitoring and system data tracking
Export system logs and call history
Check connection to any video conferencing server directly from TrueConf MCU web interface without the need to call the endpoints registered on it
Traffic recording and downloading in the .pcap format.
Adjust settings for storing, viewing and searching though media files
Specify the maximum size of file storage
Set up network connection (TCP/IP ports, NAT passing)
Set up call parameters (protocols, their priority and order of calls)
Set up a SIP/H.323 gateway
Second channel bandwidth limitation in percentage ratio
Set a tine interval for shuffling or alternating participants in the layout
Change video layouts skins
Customize participant's display name styles
Add user avatars for address book contacts
View information about TrueConf MCU license and software module versions
Update TrueConf MCU
Import and export the built-in database
Import and export the address book
Server shutdown, MCU or OS restart directly from the web interface
Assign each user a specific role with corresponding permissions: administrator, operator.
# System requirements
| Basic configuration | Recommended configuration | |
|---|---|---|
| CPU | Intel(R) Xeon(R) Silver 4210 CPU @ 2.20GHz | Intel(R) Xeon(R) Gold 6230 CPU @ 2.10GHz |
| CPU sockets | 1 | 2 |
| RAM (DDR4) | 32 GB | 64 Gb or more |
| Effective RAM speed | 2400 MHz | 2933 MHz or higher |
| Peak memory bandwidth | 19200 Mbps | 23464 Mbps or more |
| Disk space | 512 GB (SSD is preferred) | 512 GB or more (SSD is preferred) |
| Network | 1 Mbit/s in both directions for 720p@30fps | 2 Mbit/s in both directions for 1080p@60fps. If a virtual machine or server is used, Ethernet 1 Gbit/s is recommended. |
| Ports | The list of ports that need to be opened for correct operation of TrueConf MCU → | |
| Operating system | Dedicated or virtual Debian 10/11 | |
| Supported hypervisors | Oracle VM VirtualBox, VMware ESXi, KVM, Microsoft® Hyper-V, Xen | |
| Maximum number of participants displayed in the layout for standard and preferred configurations * | ||
| A general layout (1080p) used for all participants | 30 | 64 |
| Individual layouts (1080p) used for all participants | 6 | 15 |
| Individual layouts (720p) used for all participants | 12 | 30 |
| * Testing conducted with H.264 codec used for all participants | ||
Please note that TrueConf MCU can support up to 250 participants.
# Improved performance when working with TrueConf Group
If the TrueConf Group endpoint is connected to TrueConf MCU, the streams sent between them are optimised thanks to the exchange of additional data. For example, if the layout window with the video from the endpoint is made smaller on the MCU, the server will request and receive a video stream with a smaller resolution from the device. This leads to reduced CPU load for the MCU and makes it possible to connect a larger number of TrueConf Group endpoints simultaneously than other hardware endpoints of other vendors.