# TrueConf Room deployment
# Server deployment
Any video conferencing system includes not only client applications, but also a video conferencing server that facilitates data exchange between these applications. Before setting up TrueConf Room, you should start with the server side of the system.
As a video conferencing server TrueConf Room can use either TrueConf Online cloud service or the corporate video collaboration platform TrueConf Server (including its free version TrueConf Server Free).
All TrueConf Server instances are based on SVC (scalable video coding) architecture, enabling efficient video transcoding between different devices.
Your video meetings can be joined not only from conference rooms, but also from PCs and mobile devices.
In addition, TrueConf Server has a built-in gateway for meetings with video conferencing endpoints (via SIP and H.323 protocols) and IP cameras (via RTSP).
If you are going to use TrueConf Online cloud-based service, you only need to sign up on our website and then use your personal account for authorization.
Below you can find information on how to connect to TrueConf Server licences.
Take the following steps to get started with TrueConf Server:
Download TrueConf Server or TrueConf Server Free. Learn more about the benefits of the paid version on our website.
Install and launch the server by following the guide on our website.
Create an account for each meeting room. If you are planning to connect participants' personal devices (PCs, smartphones) to conferences or share content during a conference, you should create an account for each of these devices. The number of accounts is unlimited.
Test connection to the server by connecting to it from a client application. If you want the server and TrueConf Room to be in different local networks or communicate via the Internet using a router or NAT, configure appropriate addressing in the server local network and test connection to the server from outside the network.
# Installing TrueConf Room on Windows
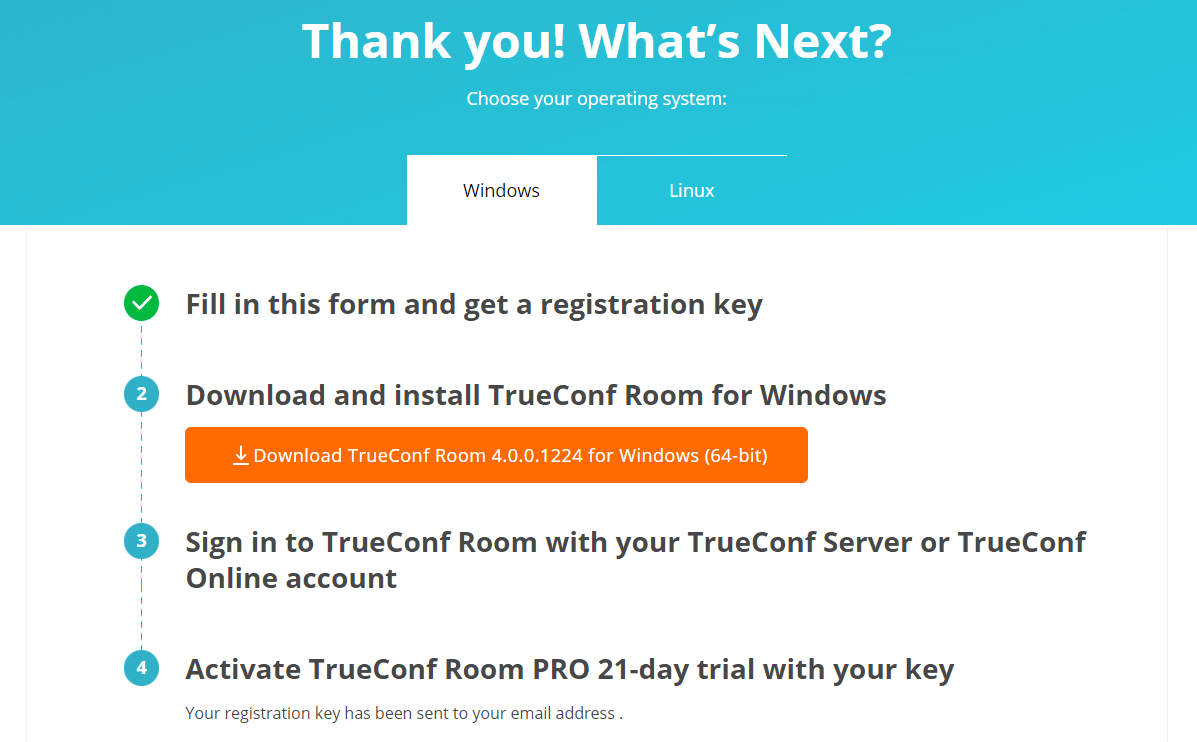
On the TrueConf Room page, click the Download for free button and fill out the registration form. After that, click the Download TrueConf Room button.
In the Windows tab, download the TrueConf Room installation file by clicking on the corresponding button and then run this file:
When installing TrueConf Room:
Check the box Run automatically in the Autorun options window if you want TrueConf Room Service to be added to the OS startup. In its turn, the service will start the TrueConf Room endpoint automatically.
Select the resolution for the background image displayed in sleep mode.
In the port selection window, you can also specify a different port for accessing the control panel to avoid using the port that is already occupied by other software. This will not be necessary if no third-party software other than TrueConf Room is installed on the PC (recommended usage).
In the last window of the installer, uncheck the Launch TrueConf Room box and click Finish. This way, the endpoint window will not interfere when additional configurations have to be made.
After the endpoint is installed, additional OS configuration may be needed if touch panels will be used.
If you install TrueConf Room using a Windows OS user account without administrative rights and leave the box Launch TrueConf Room checked in the final window of the installer, the link on the main screen (which leads to the control panel) will not be clickable when the application is launched for the first time. In this case, you simply need to restart TrueConf Room, and the link will become active, or you can uncheck the Launch TrueConf Room box.
# Installing TrueConf Room on Linux
Step 1
Go to the Linux tab on the page opened after the form was filled out. There you will find further instructions.
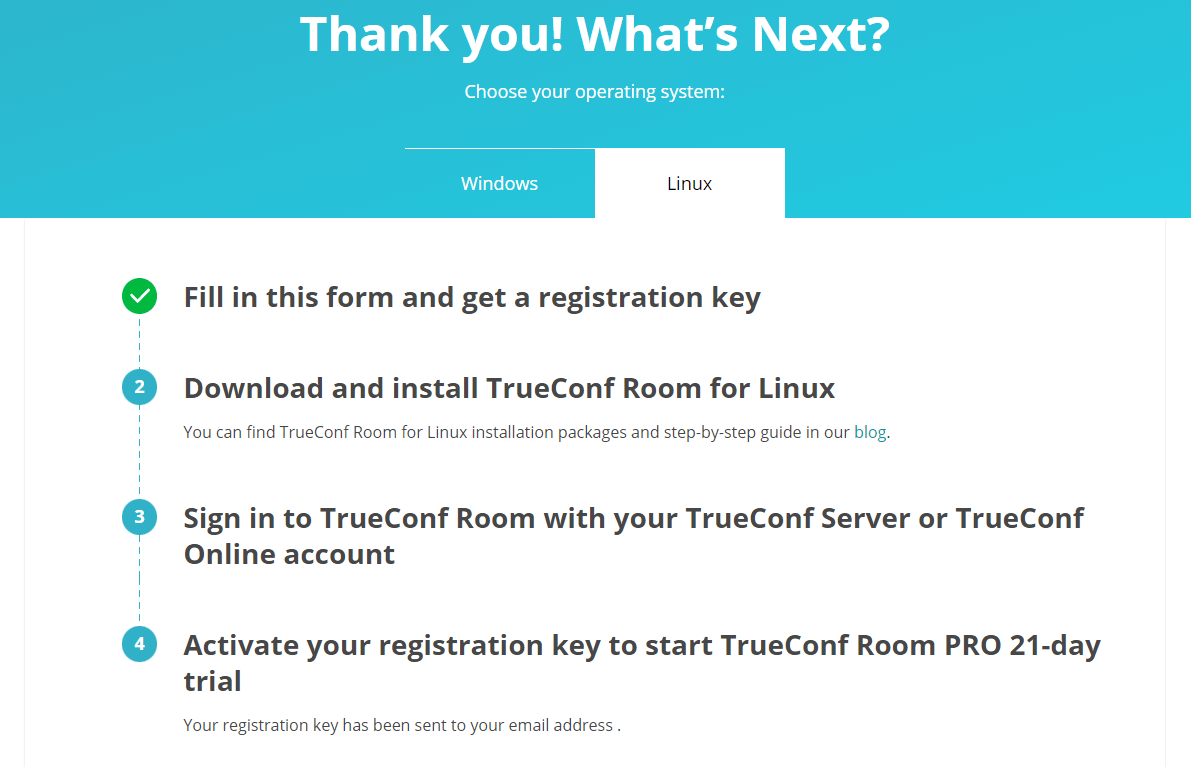
Click the link in the second option to check the detailed guide in our blog on how to install TrueConf Room on Linux. There, you can find how to install the application from a repository or manually from a file. Below we will discuss the second method.
Step 2
Download the distribution for your OS.
Step 3
Go to the directory with the downloaded installation package and run the command as an administrator:
apt install -yq ./trueconf-room-name.deb
where trueconf-room-name is the file name.
During the installation you will be able to:
Specify a different port for accessing the control panel to avoid using the port that is already occupied by other software
Select a resolution for the video that will be displayed when the endpoint is in sleep mode
Add TrueConf Room to the automatic startup.
Step 4
The trueconf-room-web web server will be added to the OS. It will start automatically after the installation.
Access the TrueConf Room page from a different computer in your local network. You will need to use the following address http://[ip]:[port] where [ip] is the IP address of the computer with Linux while [port] is the port set during the previous step.
To check the IP address in Linux, run the ip a command.
To access the control panel, use the port specified during the installation. If you cannot access the panel via this port, you will need to set a different port manually.
To view the address and port for accessing the control panel, you can also launch TrueConf Room and check its main screen.
# Configuring the endpoint without a touch panel
If TrueConf Room is installed on a PC that does not have a touch panel allowing users to control the endpoint, no additional actions are required.
Immediately after installation you can use the control panel which is accessible:
By IP or QR code from any browser, including mobile browsers
From the TrueConf Room Discovery application for Android.
# Configuring the endpoint with a built-in or USB-connected touch panel
TrueConf Room can be installed on PCs with a USB-connected or built-in touch panel. For example, it is possible to mention Lenovo ThinkSmart Hub PC. In this case, the endpoint control panel will be automatically launched on the touch panel, while the endpoint window will be displayed on a large screen in the meeting room.
In this case, in addition to a PC, you will need:
A touch panel connected to a PC via USB, such as Lenovo ThinkSmart Controller or Logitech Tap. The USB bus is also used to control the touch panel built into a PC, for example, on Lenovo ThinkSmart Hub. There are also panels that connect simultaneously to a USB port for control and to a video output for video display.
A monitor or TV panel connected to a video output (e.g., HDMI or DisplayPort) intended for displaying the main screen of the endpoint.
A keyboard and mouse are needed for the setup and configuration of TrueConf Room. Then, they can be disconnected.
Carefully follow the steps listed below; otherwise, the correct operation of TrueConf Room with automatic start-up and proper screen allocation is not guaranteed.
# Configuration on Windows
# OS configuration
Since the touch panel is identified as a display by the OS, you will need to take these steps to ensure the correct work of TrueConf Room:
Press Win + P to switch from dual-screen mode to extended display.
Select the touch panel as the primary monitor. To check:
right-click on the desktop
select Display settings
To determine which monitor is which, click the Identify button; as a result , 1 and 2 digits will be displayed on the monitors
make sure that the touch panel is selected as the primary display. For example, if 1 is displayed on the touch panel, then select Display #1 and check the box Make this my main display if it is not active.
3. On Windows 11, when the physical keyboard is detached, the touch keyboard will be automatically displayed, when you tap on a text field. On Windows 10, additional configuration is required to display the touch keyboard:
Go to the Start → Settings → Devices menu
Select the Typing section
Activate the switcher Show the touch keyboard or handwriting panel when not in tablet mode and there's no keyboard attached.
# Setting up TrueConf Room Service
After installation, go to the Windows Start menu and find the TrueConf Room Service folder in the list of installed programs. Launch the Settings program:

In the opened window, specify the following parameters:
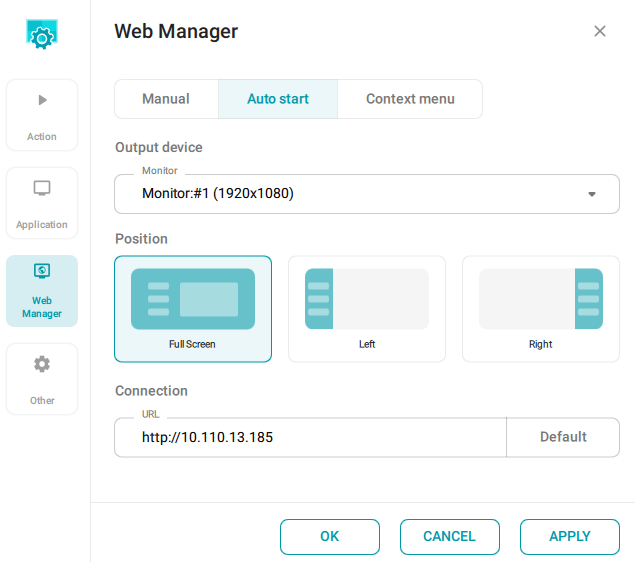
To configure the launch of the TrueConf Room control panel, select the Web Manager section and set the following parameters:
check the Auto start box
select the touch panel set as the primary monitor in the operating system in the drop-down list Output device, for example, Monitor #1
select Full Screen as the value of the Position parameter.
2. Go to the Application section and select a different monitor in the Output device drop-down list, for example, Monitor #2. You could learn the number of the additional monitor when setting up the operating system.
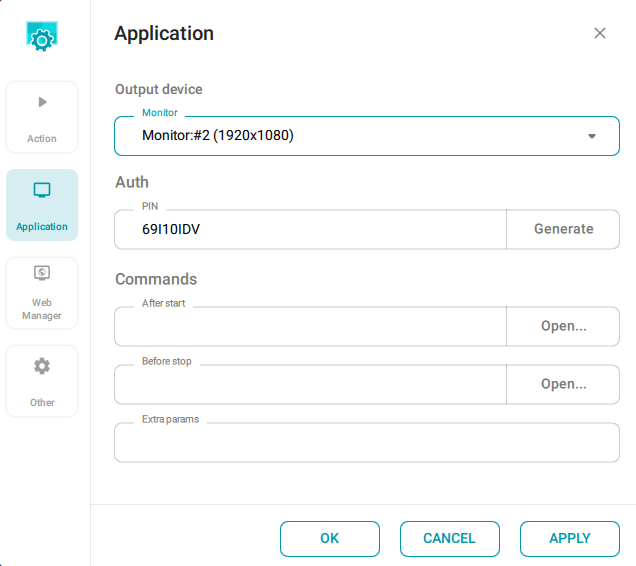
3. Click the OK button and restart your PC.
If everything is set up correctly, the endpoint control panel will automatically launch on the touchscreen, once the PC is started, and the main window of TrueConf Room will appear on the display, and you will be able to start its configuration.
# Configuration on Linux
# OS configuration
Let us consider Ubuntu as an example.
Since the touch panel is identified as a display by the OS, you will need to take these steps to ensure the correct work of TrueConf Room:
Press Win + P to switch from dual-screen mode to extended display.
Select the touch panel as the primary monitor. To check:
right-click on the desktop
Select Display settings
Make sure that the upper panel with menu and clock (Dock panel) is displayed on the touchscreen. It indicates that the touchscreen is selected as the main monitor. Otherwise, select a different display in the drop-down list from the Primary Display option.
3. Add the command trueconf-room-service install to the auto start using any convenient method. For example, create a file ~/.config/autostart/start-room-service.desktop with the following text:
[Desktop Entry]
Name=Start Room Service
Exec=trueconf-room-service install
Type=Application
Hidden=false
If your clicks on the touch panel are registered on a different display, you will need to set up a correct mapping between input and output devices:
- To find out the ID of the input device (touchpad), run this command:
xinput --list
2. Memorize the id of your device in the Virtual core pointer section. If you can't identify the touch panel by name in this list, execute the command twice: first when the touch panel is disconnected and second when it is connected. Pay attention to the new device displayed on the screen. For example, if you received two lists:
⎡ Virtual core pointer                    id=2    [master pointer  (3)]
⎜   ↳ Virtual core XTEST pointer             id=4    [slave  pointer  (2)]
⎜   ↳ ELAN0504:01 04F3:312A Touchpad         id=22    [slave  pointer  (2)]
and
⎡ Virtual core pointer                    id=2    [master pointer  (3)]
⎜   ↳ Virtual core XTEST pointer             id=4    [slave  pointer  (2)]
⎜   ↳ ELAN0504:01 04F3:312A Touchpad         id=22    [slave  pointer  (2)]
⎜   ↳ Touch Device pointer          id=20    [slave  pointer  (2)]
then your device is Touch Device pointer. Memorize its id (in this example, id=20).
3. To find out the names of output devices, run the command:
xrandr
4. Identify your output device and memorize the name of the corresponding interface (it will be one of the two marked as connected). If it is difficult identify the touch panel with full certainty, follow the same procedure as in step 2: disconnect the touch panel, run the xrandr command, reconnect the touch panel, and run the command again. The new device that will be displayed is the result you are looking for.
For instance, you received the output
Screen 0: minimum 320 x 200, current 1920 x 2160, maximum 16384 x 16384
HDMI-A-0 connected 1920x1080+0+0 (normal left inverted right x axis y axis) 344mm x 194mm
...
DP-1 connected primary 1920x1080+0+1080 (normal left inverted right x axis y axis) 527mm x 296mm
and judging by physical dimensions determined that the touch panel is connected to HDMI-A-0.
5. To configure mapping (opens new window) between the input and output areas, take the following steps:
xinput --map-to-output <input_device_id> <output_device_name>
where <input_device_id> is the input device (see step 2), and <output_device_name> is the output device (see step 4).
In our example, the command will look like this:
xinput --map-to-output 20 HDMI-A-0
6. Make sure that the UI in your touch panel responds when you tap on it.
# Configuring the virtual keyboard
Additional packages need to be installed on Linux to use the virtual keyboard in the control panel displayed on the touchscreen.
On Debian 10, the use of a virtual keyboard together with TrueConf Room is not available.
- Install the
libqt5virtualkeyboard5package:
Ubuntu, Debian 11/12
sudo apt-get install libqt5virtualkeyboard5
2. Install the virtual keyboard:
Ubuntu, Debian 11/12
sudo apt install onboard
# Setting up TrueConf Room Service
Go to the list of installed programs on Ubuntu OS and launch the Settings TrueConf Room Service utility from there. In the opened window, configure the settings exactly as shown above for Windows OS.
# Android-based tablet
An Android-based tablet can also be used as a touch control panel connected to the same corporate network as the PC with the endpoint. To ensure better connection, we recommend specialized tablets with an RJ-45 port for a wired network connection, and not to use wireless Wi-Fi connection.
In this case, the endpoint is controlled over the network with TrueConf Room Discovery application.
Install TrueConf Room on Windows or on Linux and do not add any new settings in the OS.
Connect the tablet to the same corporate network as the PC with the installed endpoint.
Launch TrueConf Room on your PC.
In your tablet browser, go to the endpoint control panel. To do it, use the address displayed on the endpoint main screen.
In the upper left corner of the control panel, tap the button
 to go to settings, and install TrueConf Room Discovery from the APK file as shown in this section.
Launch TrueConf Room Discovery and wait a few seconds until your instance is added to the list of endpoints.
Tap on your endpoint in the list. You will be able to control it with the same control panel interface that is available in the browser.
# Changing the port
If after the installation you have to change the port needed for accessing the TrueConf Room control panel, follow the instructions below.
# For Windows
Go to the
C:\Program Files\TrueConf\Room\httpconf\conf\folder and open the listen.conf file with any text editor (you have to open the file as the administrator).Change the port number in the
Listen <port number>parameter, e.g.,Listen 8888. Then, save the changes.Restart the TrueConf Room Web Manager service or restart the PC where the software endpoint is installed.
# For Linux
Go to the
/opt/trueconf/room/etc/webmanager/conf/directory as the superuser and open the listen.conf file with any text editor.Change the port number in the
Listen <port number>parameter, e.g.,Listen 8888. Then, save the changes.Restart the web server by running this command:
systemctl restart trueconf-room-web