- How to use TrueConf Room
- Getting started
- Sharing content via HDMI
- How to make calls
- How to join a meeting
- How to create a conference
- During a conference
- How to interact with a list of participants
- Adding participants
- Changing video layout
- Changing the priority window
- Selecting devices
- Dragging video windows to a different screen
- Sharing content and slides
- PTZ camera control
- Send DTMF command
- Notification center
- Managing and changing participants’ audio and video devices
- Sending and receiving content via NDI
- How to call a device by IP/number
- Using command line parameters
# How to use TrueConf Room
You can find the preliminary instructions in this section.
Below you can learn how to use an already installed, connected and authorized application. The display shows the main screen of TrueConf Room.
# Getting started
To use TrueConf Room, you need to open the control panel on your device:

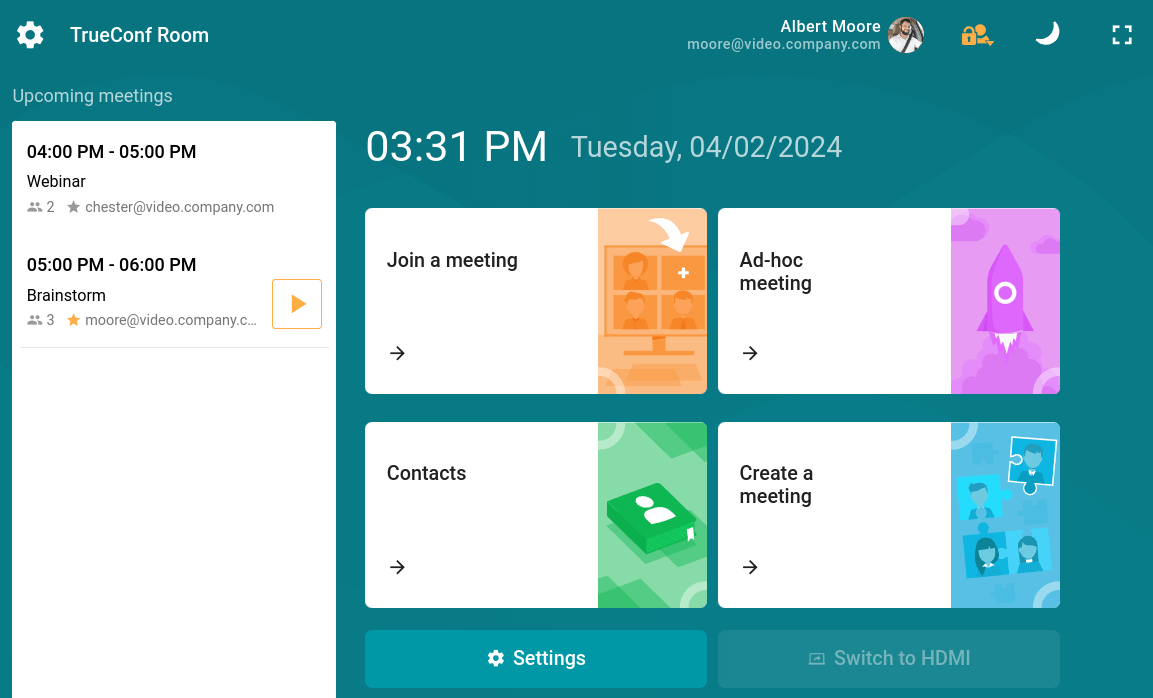
When you enter the control panel, the monitor of a PC with TrueConf Room installed will exit the sleep mode.
If there is no link on the screen, ask the TrueConf Room administrator to provide it.
# Sharing content via HDMI
If the computer, where TrueConf Room is installed, has a capture card, you can share content from a laptop via HDMI. To do it, you will need to:
Use an HDMI cable to connect the capture card of TrueConf Room to the device that will be used for content sharing.
Go to the control panel and click on the Switch to HDMI button. If multiple capture cards are used, you will see a dialogue window where you can select the capture card.
You can share content during a conference in a similar way.
# How to make calls
How to make a video call:
Click the Contacts button.
Select a user from the address book or enter TrueConf ID.
If necessary, you can add a new user to a meeting. In this case, the call will be automatically transformed into an "all on screen" conference.
Please read below to learn more about calls to phones and third-party devices.
# How to join a meeting
To join a meeting, enter the control panel and click the Join a meeting button.
Next, you will see the following options to join a meeting:
Joining with a conference ID
Joining a virtual room or scheduled conference
Calling a conference previously added to the address book

# With a QR code
To use this feature, you will need to enable QR code scanning.
Follow these instructions to join a conference with a QR code:
Open the conference page on your mobile device.
Tap on the QR code button.
Bring the image close to the TrueConf Room camera.
# How to create a conference
You can create a conference on the fly, configuring a minimum of settings. Click the Ad-hoc meeting button to be taken to a new conference in the all on screen mode.
It is possible to create a conference with additional parameters, e.g., with a PIN. You can do it in the user personal area. To open it, go to Settings → Account and click on the Go to personal area button.
To create a conference in regular mode:
Click the Create a meeting button.
Enter a name and select a conference mode.
Add conference participants in the Conference participants section.
Check the Automatically approve conference join requests box to have participants join a conference without confirmation.
You can also add video conferencing endpoints, IP cameras and other devices to the list of conference participants.
6. Click Start in the lower right corner.
You can save the settings of a conference as a template (e.g., you can save its mode, list of participants and settings for automatic join requests). Later, you can use this template to create a new conference. Conference history is displayed on the left.
Done! In are now in the conference. In the control panel, you can see quick panel designed for managing your event. Just wait for the others to join it.

# During a conference
During a conference, its name, buttons to disable the microphone, camera and speakers and end a call will be available at the top of the window.
Besides, in the TrueConf Room control panel you can do the following:
You can control conference layout and other participants’ devices only if you are the conference owner or have operator rights.
Show windows of individual participants and shared content on additional screens.
Adjust the volume using the
and
buttons.
Share a link to a conference by copying it at the bottom of the window or by displaying a QR code using the
button to share a conference from a mobile device.
During a conference, you can also view information about the system by clicking on the System info button in the lower right corner.
# How to interact with a list of participants
To open a list of all participants during an event, click the Participants button. The following features are available:
Viewing a list.
A moderator can use the
and
buttons to disable/enable the camera and mute/unmute the microphone. By clicking the
button, a moderator will open the context menu which will enable him/her to broadcast a participants’ video as an NDI stream, view information about this user, appoint the participant as a moderator, and send DTMF commands. Besides, it is possible to remove a participant from a conference by clicking on the
button.

# Adding participants
To add new participants, take the following steps:
Click the Add participants button in the conference control panel.
In the pop-up window, you will have access to several tabs to add a user or device to a conference.

You can also invite users to join your conference by going to the list of participants and clicking the Add button.
# Changing video layout
To select a video layout, you need to:
Click the Change layout button in the conference control panel.
In the panel below, click the Layout type button and then select how to position participants’ video windows.
You can also broadcast the conference layout as an NDI stream in the local network.

If you are the conference owner or its operator, you can select how to position video windows for its participants (see the personal account description in the TrueConf Serveruser manual. To this end, click the Real-time management button in the conference control panel.
# Changing the priority window
To select the priority window, go to layout settings and double click the video window of a conference participant. It will get larger than the rest of the windows. You can also enable the automatic change of the priority window. To this end, click the Active speaker mode button and select Enable.
Please note that the Active speaker mode feature is not available when the Gallery view layout has been set.
# Selecting devices
You can connect several video and audio capture sources to TrueConf Room.
To switch to another device, click the Audio and video settings button and set up the parameters as shown above.
# Dragging video windows to a different screen
TrueConf Room can work with multiple screens.

If there are several monitors connected to the computer with TrueConf Room installed, and some of them should not be displayed when selected, you can hide unnecessary ones using the -ignore_monitor [monitor_number]
command line parameter, where monitor_number
is the OS monitor number. For example, use the following key when launching an application via console:
TrueConfRoom.exe -ignore_monitor 2
This will be useful when connecting the Logitech Tap touch controller to use the TrueConf Room control panel.
To show one of the conference participants or shared content on a separate display, you can use one of the following options.
# Option 1
Click the Change layout button in the conference control panel.
Drag a separate window to your second display.

To return the video window to the main monitor, drag the window back to the main layout area.
# Option 2
Click the Change layout button in the conference control panel.
In the pop-up window, click the participant’s video window you want to drag to a separate display.
You will see a pop-up menu with a list of available monitors. Select the item that matches the required display.
# Sharing content and slides
With TrueConf Room, you can show slides during video conferences.
TrueConf Room supports the following formats to be used for the slideshow: jpg, jpeg, and png. You can also import ppt and pptx slides. It is also possible to import the slideshow in the special slides format (these files have to be saved in the TrueConf client application).
You can upload an image or a slideshow in several ways:
Before a conference. Go to the Tools → Slideshow section of the settings sidebar.
During a video conference. Click the Slideshow → Slide management → Add slides button in the conference control panel.
After that, you will see a window with the added slides:

List of slides
Steps: Add slides and Clear all.
Start button for slideshow
Buttons to change the slide displayed: thumbnails and ** one full-screen slide**
You can change the order of uploaded slides by dragging them.
To start the slideshow, click the button at the bottom of the screen. The slides will expand to full screen:

When viewing thumbnails, the shared slide has an icon in the upper right corner. If you return to the conference control panel, a similar icon will flash on the Slideshow button.
With TrueConf Room, you can share content from a video capture card connected to your device. To this end, click the Slideshow button in the conference control panel and select Switch to HDMI. If more than one capture card is used in the system, a dialog box will appear to select the required one.
You can also switch to content sharing in the hardware control menu by choosing a capture card instead of your webcam.
# PTZ camera control
If you have selected a camera that supports remote control, then the PTZ camera control button will become active in the conference control panel; click that button to open the camera control panel.

# Controlling participant's camera
To start camera control, press the Change layout in the control panel and click the video window of a participant whose camera you would like to control. Next, in the pop-up menu, select Remote camera control. Once you have gained access, a video window with a camera control panel will pop up.

# Send DTMF command
With TrueConf Room, you can send DTMF commands to DTMF-compatible devices in RTP EVENT (opens new window) and SIP INFO (opens new window) modes right from the conference control panel. To learn more about the transmission of such signals, please read the documentation provided by the manufacturer for each device.

There are two options to send DTMF commands:
# Option 1
Add conference participants in the Participants section.
Click the
button next to the name of a participant and select Tone dialing.
# Option 2
Add conference participants in the Change layout section.
Click the video window of a participant to whom you want to send a DTMF command and select Tone dial.
To test DTMF signaling, you can use Public SIP URI of The Test Call (opens new window) website: #sip:thetestcall@getonsip.com
. When DTMF commands have been sent, the robot reads out the digits you enter.
# Notification center
During a conference, you can receive the request to record your video window. If you are a moderator, you can receive podium requests or notifications about new participant joining your meeting. You can see all requests in the upper right corner in the notification center. Click the button to view your current notifications.

Besides, pending requests from other users are displayed in the list of conference participants.

# Managing and changing participants’ audio and video devices
During a conference, the owner and operator can remotely control the participants’ devices. To this end, click the Real-time management button in the conference control panel.

To learn more about how to interact with real-time meeting manager, please read our documentation.
# Sending and receiving content via NDI
You can stream the entire conference layout or a separate video window via NDA in the local network. It is possible to broadcast multiple NDI streams in parallel.
It is not possible to broadcast a video window with shared content as a separate NDI stream.
# Streaming the general layout
To stream the conference layout with audio, you will need to:
Click the Change layout button in the conference control panel.
Click on the NDI button in the lower part of the screen.
Click on the Enable button to confirm that you want to send a mixed stream via NDA.
# Streaming a participant’s video window
To stream a participant’s video window with audio, you will need to:
Click on the Participants button in the meeting control panel.
Click on the
button which is right next to a participant’s name. Then select the Enable NDI option.
The participant will have the
status: it indicates that NDI has been enabled.
# Receiving an NDI steam
To capture an NDI stream and send it to the conference layout, go to device settings and select the stream instead of the camera and/or microphone.
Please note that you will not be able to share video and audio from your camera and microphone when capturing an incoming NDI stream.
# How to call a device by IP/number
If you want to call a user or add a participant to the conference, you will see a number of tabs for selecting an appropriate type of device.

When you switch between tabs in the search field, the prefix of the string identifying the user will change, and you will only need to enter the number and/or IP. The major examples of these strings are presented below.
If you can’t reach the user, first of all check call string format in the TrueConf Server documentation or consult with your system administrator. In addition to what is described in this section, the correct format may have subtle aspects or depend on server settings.
# Video conferencing endpoints
You can call video conferencing endpoints by their IP address or number (if the alias has been specified in the settings of the video conferencing server). However, if you assign default SIP/H.323 servers in the TrueConf Server gateway settings, entering the IP address is optional.
In a particular case, call string formats can be the following:
#sip:[user_id]@[server_ip]
#h323:[user_id]@[server_ip]
For more information, please read TrueConf Serverdocumentation.
# Phones
If you want to call phones, just enter a user number after the prefix, e.g., #tel:332
.
You can call phones only if this feature has been enabled in TrueConf Server settings.
# IP cameras
If you want to call IP cameras (via RTSP), just enter the link to the camera after the prefix, e.g. #rtsp://10.100.123.100/axis-media/media.amp
.
# Using command line parameters
TrueConf Room supports command line parameters just like the client application. Read more about this feature in our article.