# TrueConf Server Security Admin permissions
To enable limited access to the TrueConf Server control panel, a local TrueConf Server Security Admin user group on Windows and tcsecadmins on Linux is automatically added to your operating system during the server installation process. TrueConf Server administrators can add to this group the accounts of admins with view-only rights that should not be allowed to access TrueConf Server settings. Security admins only have the permissions to view:
# How to add a Windows account to the TrueConf Server Security Admin group
To create a new local Windows account with necessary rights:
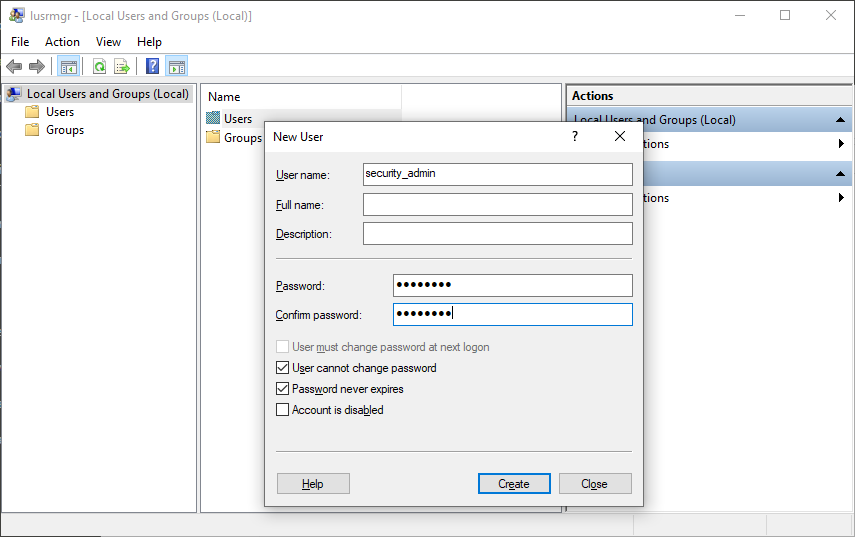
Go to the Local Users and Groups section. To do this, press the Win+R key combination and execute the
lusrmgr.msccommand in the appeared window.Right-click on the Users list and select New User....
Fill in the required fields and configure the password change settings.
Go to the Users list.
Right click on the created account and select Properties.
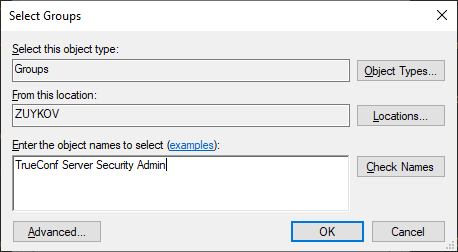
Click Add... on the Member Of tab.
Enter TrueConf Server Security Admin as the name of the selected object and click OK.
The user accounts imported from Active Directory/LDAP can also be added to the local TrueConf Server Security Admin group.
# How to add an account to the "tcsecadmins" group on Linux
The commands listed below need to be executed with superuser privileges or using sudo (e.g., sudo command). Please note that sudo may be unavailable by default in your operating system. You can check its availability using the sudo -V command.
For Debian
- Run the following command:
adduser --ingroup tcsecadmins [new_admin]
where [new_admin] is the username of the admin.
2. Enter your password in the corresponding field and confirm it.
3. Optionally, provide additional information for the admin (full name, phone number, etc.).
You can add a user to the TrueConf Server administrator group and provide them with full access to the control panel in the same way. To do this, replace tcsecadmins with tcadmins in the commands listed above.
# How to configure rights for an existing user
You can also assign the appropriate access level to a user already existing in the OS.
For Windows OS
You just need to go to the Local Users and Groups tool and complete the steps 4-7 from the section describing how to add an account.
For Linux OS
The usermod command is used to configure account settings. For example, to add [user] to the group tcsecadmins, run this command as a superuser or with the help of the sudo program.
usermod -aG tcsecadmins [user]
On Linux, one can view the list of user's groups or check if the user is actually available by running a single command:
groups [user]
If the account [user] is included in the system, you will see the list of its groups; otherwise there will be a notification indicating that such a user has not been found.
Further instructions are intended for the administrators, whose accounts are added to the TrueConf Server Security Admin user group on Windows and tcsecadmins on Linux.
# How to access TrueConf Server control panel
Open the TrueConf Server guest page. Please contact your server administrator to obtain your guest page URL.
Click the Administrator login button at the bottom of the page.
Enter your username and password and click Enter.
# Server status
Current status of your TrueConf Server performance is displayed in the upper right corner of the control panel. It shows server status and registration information.
When TrueConf Server operates in the standard mode, running, registered status is displayed. If there are any issues when running or registering TrueConf Server, you will see the corresponding red message. In this case you should contact your server administrator or submit a ticket to our technical support.
# Configuring preferences
By clicking on System → Preferences... section in the upper right corner, you can configure the following settings for your account:
Language displayed in the TrueConf Server control panel.
Time zone. This setting affects the event time specified in all reports.
Settings for exporting logged data to a csv file: encoding and field delimiter.
# Server log
To open detailed logs about TrueConf Server operation, go to the System → Server log section. It stores events and errors related to the launch of server services, connection to the registration server, license activation, etc.
You can save the log to a txt file using the  button. TrueConf Server logs are the best resource for determining the root cause of the problem, which is why we recommend sending the txt file to our technical support when submitting tickets.
# Access settings
To view information about TrueConf Server control panel access settings, proceed to Web → Security section:
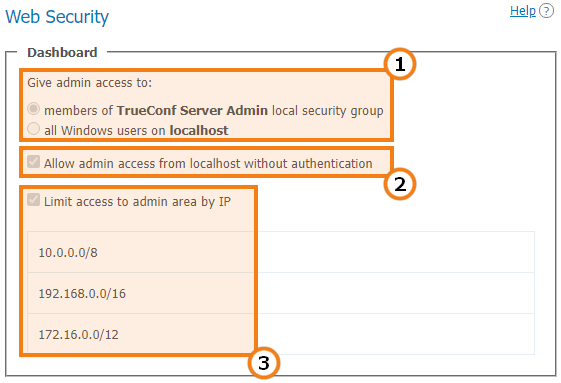
Operating system users that have full access to the control panel.
If this option is enabled, the user does not need to be authorized to perform administration when accessing the server from the following IP addresses.
This option means that administrative access to TrueConf Server control panel is limited only to the IP addresses specified in the list.
Security Admins are not allowed to change the settings described above; only TrueConf Server admins with full access rights can manage these settings.
# Reports
The Reports section contains all the event logs related to changing server settings, connecting to it, as well as holding video calls and meetings on it.
All reports are tabular data where the time of each event is displayed according to the time zone selected in preferences.
Fields for data filtering are displayed above all tables except for information about connections to the server. You can also save any report in csv format except for the conference recording and endpoint lists by pressing the  button.
Clicking on any column in the table will sort the rows by that column in descending or ascending order. The current sorting direction will be marked with an arrow next to the column name.
Below you will find a brief description of the reports. You can learn more about TrueConf Server logs in the administrator guide.
# Events
In the Events section you can view the history of changes of the TrueConf Server users user status, as well as the server status. If you select an event in the table, detailed information will be displayed on the right side of the page.
# Call History
To display the list of previous and ongoing conferencing sessions, go to the Call History section.
Here you can view information about each video conferencing session: ID, start and end time, duration, number of participants, TrueConf ID of the owner, conferencing mode, as well as meeting ID.
Click on the session ID to open the list of invited participants in a new tab. Press the  button to open chat history.
# Chat Messages
The Chat Messages section displays the history of all messages between TrueConf Server users, including group chat history.
# Configuration Changes
To open TrueConf Server configuration history, go to the Configuration Changes section. When the server administrator creates/deletes/edits group conferences, all changes are also displayed in this section.
# Conference Recordings
In the Conference Recordings section, you can view the list of video recordings stored on the server with detailed information about each of them.
To download or playback (available only for .MP4 video format) a recording file, use  and
and  buttons respectively.
# Endpoints
To view the details of connections to your TrueConf Server instance, go to the Endpoints section. There you can see information about all connections to the server using client applications or via a browser using WebRTC technology.
To learn more about the connection selected, click on the corresponding line.