# Installation
# System requirements for TrueConf Server
| Basic configuration | Recommended configuration | |||
|---|---|---|---|---|
| CPU |
Intel Core i3-8100 @ 3.6GHz
Intel Core i5-7400 @ 3.0GHz Intel Xeon E-2234 @ 3.6GHz Intel Xeon W-2223 @ 3.6GHz or any other CPU with at least 4 logical cores and PassMark® CPU mark 7000+ |
Intel Core i7-10700 @ 2.9GHz
AMD Ryzen 7 2700 @ 3.2GHz Intel Xeon E-2288G @ 3.7GHz Intel Xeon W-2245 @ 3.9GHz or any other CPU with at least 16 logical cores and PassMark® CPU mark 14000+ | ||
| Typical configurations capabilities |
|
| ||
| Plus | ||||
|
| |||
| Other examples of typical configurations → | ||||
| GPU-based hardware acceleration | With NVIDIA Quadro P2000 (or a comparable graphics card), you can add 20 individual layouts for SIP/H.323 participants without changing other hardware. | |||
| Operating system |
Dedicated or virtual 64-bit operating system:
| |||
| RAM | 16 GB | 32 GB+ | ||
| Hard drive | 20 GB of free space | |||
| Network | Ethernet 1 Gbit/s | |||
| Ports |
| |||
| IP | A static IP address is required for the server to work properly | |||
| Supported hypervisors | Microsoft® Hyper-V, Xen, KVM, Oracle VM VirtualBox, VMware Workstation and ESXi. | |||
# Registration key validation
Before installing TrueConf Server, please make sure you have the registration key. You have probably received a registration key when downloading the installation file from our official website or when purchasing it from one of our partners. In this case, skip this step and start TrueConf Server installation. Otherwise, you will need to receive the key as it is described in the "Registration" section.
# Installation
TrueConf Server is distributed as a software installation package that contains the server side components and client applications for Windows PC. TrueConf client applications for other popular platforms are available on TrueConf website (alternatively, you can find the download links on the guest page).
If you are installing TrueConf Server behind the firewall, in order to complete the registration process you should open TCP port 4310 to allow access to our registration server located at reg.trueconf.com.
# For Windows
After filling out the form, open the Windows tab and press Download TrueConf Server.
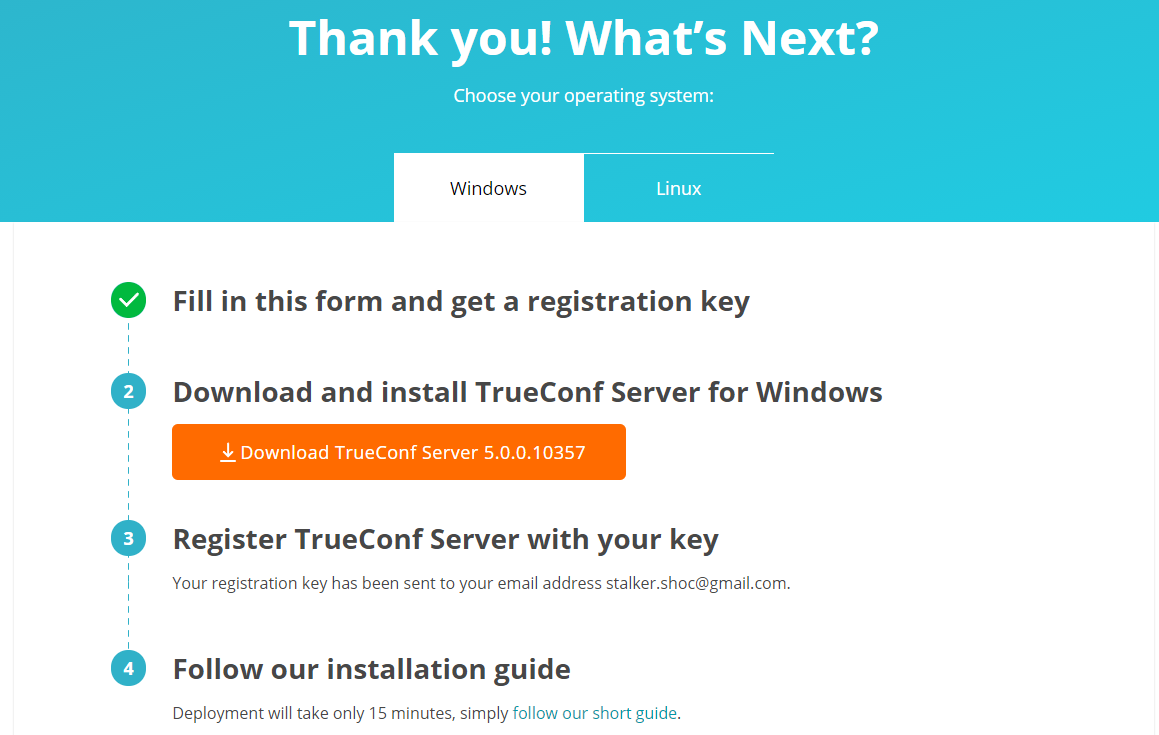
Download and run the distributive to start the installation. The installation process will take not more than a minute.
During the installation you can specify:
Web TCP port for accessing control panel over HTTP
TCP port of the database for server reports.
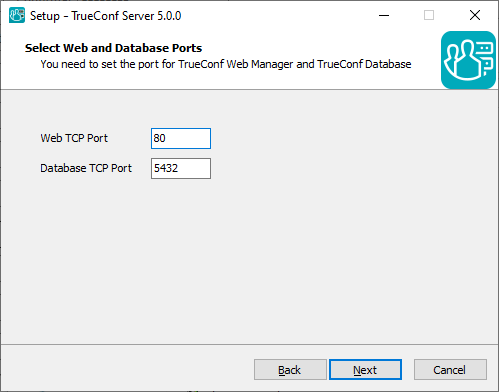
Database port for server reports is set to 5444 by default. It is selected during the installation process and cannot be changed afterwards (to change it you will need to re-install TrueConf Server). The control panel is given port 80 or 8888 (if port 80 is unavailable). If both port 80 and 8888 are unavailable, you will need to specify it manually during the installation process.
If control panel port is not 80 (HTTP) or 443 (HTTPS), you need to specify it manually in the host name after the colon in the browser URL bar (e.g. http://localhost:8080).
Can I install TrueConf Server on a PC with a web server already installed?
Yes. The installer will either automatically select available port, or give you the option to assign the port manually.
Your browser will automatically open TrueConf Server control panel after installation.
# For Linux
TrueConf Server contains its own web server. To prevent any possible conflicts or clashes, please deploy TrueConf Server on a computer running on Linux without a pre-installed web server.
Step 1.
Add the user who will install TrueConf Server and get access to the TrueConf Server control panel to your OS. You can use the account that was created when installing your OS.
Check the full installation guide in our blog to learn how to create a user in Linux (see Step 2).
Step 2.
After filling out the form, open the Linux tab and proceed to our step-by-step guide on how to install TrueConf Server for Linux.
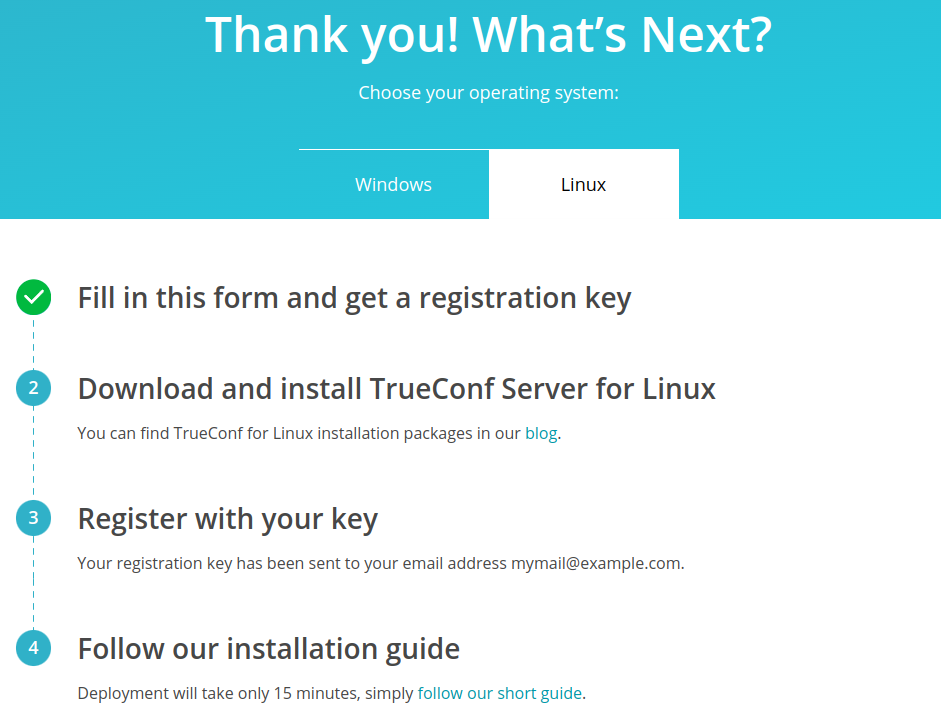
Read our step-by-step guide to learn how to download and install TrueConf Server for Linux.
Step 3.
Download your preferred Linux distribution.
For each operating system, there is also an option to install TrueConf Server from the repository. You can find a detailed description on how to do that in the corresponding section of our article.
Step 4.
If you want to deploy TrueConf Server manually, open the directory with the downloaded installation package. Depending on your operating system, run one of the following commands as administrator, where trueconf-server-name is the file name.
For Debian:
apt install -yq ./trueconf-server-name.deb
For CentOS:
- To make sure that TrueConf Server works correctly on CentOS, you will need to disable SELinux, the system can control the process access to the OS resources. To do it, run the following command as the administrator:
sed -i 's/^SELINUX=.*/SELINUX=disabled/g' /etc/selinux/config
2. It is also necessary to connect the EPEL repository:
dnf install epel-release
3. Right after that, you can install TrueConf Server:
dnf install -y trueconf-server-name.rpm
Step 5.
While installing TrueConf Server on Debian, you will see a field where you will be able to enter user accounts that will have admin access to the TrueConf Server control panel. Enter the user account you’ve previously created.
Step 6.
The following TrueConf services will be added to the OS: trueconf-web web server, the main trueconf server service, the service of the manager needed for working with the database and trueconf-manager settings files. The web server and manager will start automatically after installation.
Use another computer in your LAN, open your web browser and type the IP address of the Linux-based computer with TrueConf Server installed. To find your IP address in Linux, run ip a command.
The control panel is given port 80 or 8888 (if port 80 is unavailable). If both port 80 and 8888 are unavailable, you will need to specify it manually during the installation process.
If control panel port is not 80 (HTTP) or 443 (HTTPS), you need to specify it manually in the host name after the colon in the browser URL bar (e.g. http://localhost:8080).
Check Step 6 in our knowledge base article to learn how one can access the control panel from outside the local network (e.g., when installing the software on a cloud server).
Since TrueConf Server is not registered yet, an admin login page will be displayed instead of the guest page. Sign in with the user account you have previously created to start TrueConf Server registration.
# How to change the port to access the control panel without reinstalling TrueConf Server
For Windows OS
Go to the TrueConf Server installation directory (
C:\Program Files\TrueConf Serverby default).Open the
\httpconf\conf\listen.conffile using a text editor (administrator rights required).Change the port number in the
Listen <port number>parameter (e.g.Listen 8888) and save changes.Open the
\manager\etc\manager.tomlfile as an administrator and specify the same port in the parameter:
[web]
connection = "http://127.0.0.1:80"
For example, you can replace 80 port with 8888:
[web]
connection = "http://127.0.0.1:8888"
5. Please reboot the computer on which TrueConf Server is installed.
For Linux OS
If you use Linux, you cannot specify ports to access the TrueConf Server control panel during the installation process. If necessary, you can only change this port after the installation.
Go to the
/opt/trueconf/server/etc/webmanager/directory with superuser rightsOpen the
httpd.conffile with any text editor.Change the port number in the
Listen <port number>parameter (e.g.Listen 8888) and save changes.Open the
/opt/trueconf/server/etc/manager/manager.tomlfile with any text editor and specify the same port in the parameter:
[web]
connection = "http://127.0.0.1:80"
For example, you can replace 80 port with 8888:
[web]
connection = "http://127.0.0.1:8888"
5. Please restart the web server service using the following command:
systemctl restart trueconf-web