# Conference management
# Real-time meeting management
You can change the video layout and control participants’ devices during an ongoing conference right in your personal area. To do it, use the real-time meeting management tool.
This feature is available in one of the following cases:
You are the conference owner.
You are a conference moderator.
You have the operator rights which means that you automatically become a conference moderator.
In the last two cases you have to be connected to the conference from a browser (via WebRTC) or in your client application and added to the list of invited participants before the start of the meeting; otherwise, this event will not be displayed in your personal area.
To go to the real-time meeting management section, select a conference in the Meetings or Virtual rooms section and click Conference manager in the panel that will be opened on the right side.
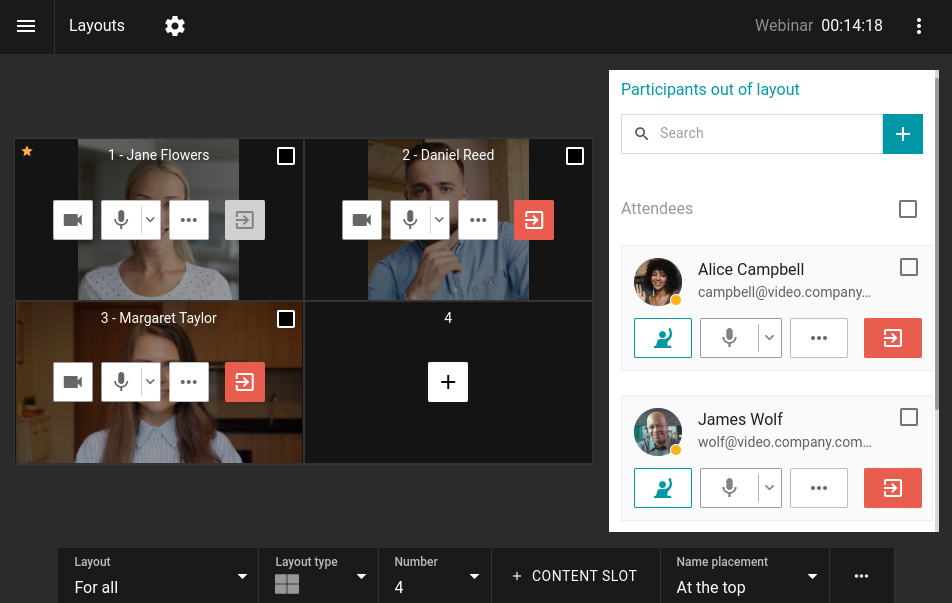
On the new browser tab, you will see the real-time meeting management tool, namely, the layout management page. In the upper right corner, one can check the conference name and its current duration. The button  opens the menu where a user can find the list of participants while the button
  leads to additional settings (PIN, ID, etc.).
# Changing video layouts
The order of participants’ video windows in the layout (all participants in “all on screen” mode and presenters in a moderated role-based conference or a smart meeting) is determined in the following way by default: the windows are displayed in the order in which participants joined the conference. The layout is filled from left to right and from top to bottom starting from the upper left corner.
In case of a smart meeting, it is impossible to manage layouts since the group of presenters displayed in the layout is formed automatically. So, you will immediately see the list of participants with buttons for managing their devices.
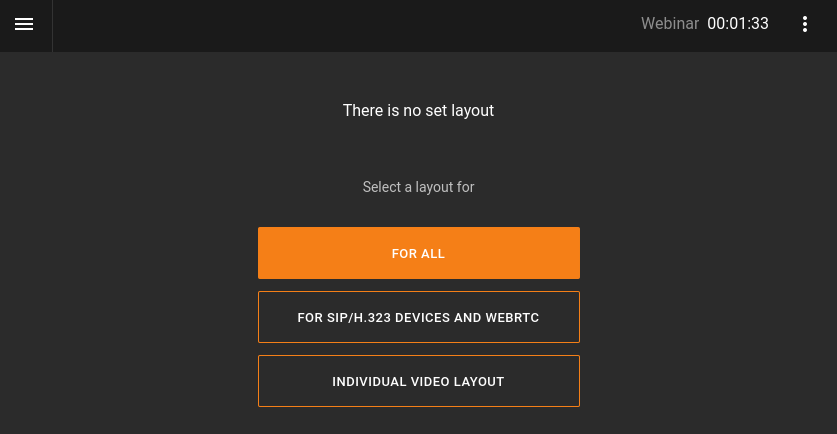
If layouts have not been configured yet, you will see the list for adding them after accessing the real-time meeting management section. Select the layout mode that you want to apply:
for all participants
for SIP/H.323 and WebRTC users
individual video layout for a specific meeting participant.
Layout management is unavailable in video lecture and smart meeting modes.
After that you will proceed to the layout control panel.
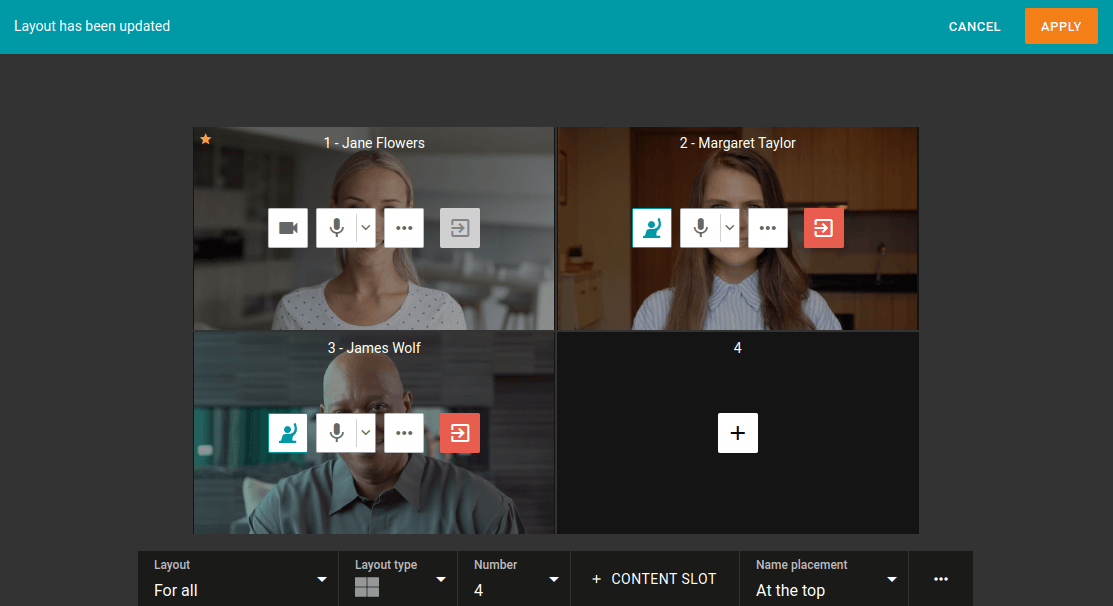
Click on the
 button to fill video windows. You can move the video window of the selected participant and spotlight this window by double-clicking on it.
Select the type of layout at the bottom of the window.
Specify the number of video windows in the layout.
If you want to show content in the conference, you can add a separate content window for it by clicking + Content slot.
Choose the location of the video conference participants' names in their video windows: at the top, at the bottom, or choose not to display them.
Click
 to open advanced settings:
forbidding users to change the video layout
filling in the layout automatically
clearing the layout (the number and location of video windows will not be changed)
deleting the layout.
After setting participants' video windows and changing their position in the layout, click on the Apply button. In case of a moderated role-based conference, the participants added to the layout will be automatically invited to the podium.
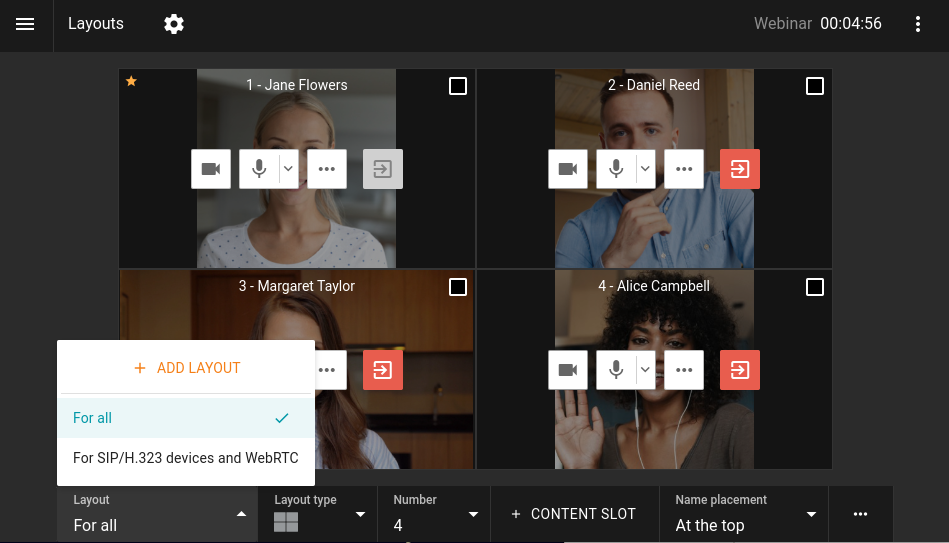
To switch between layouts or add a new one, click on the Layout button in the meeting control panel:
If you want to enable meeting participants to decline the layout you have applied, select Enable users to change layout in the additional settings when creating the video layout.
# How to rename a participant
You can change the name displayed in the video layout for any participant. This change will apply only to the current layout and will not affect the user’s name in the address book.
Click on the
 button in the participant’s video window to access the additional menu.
Select the Change display name option.
Enter the new name in the pop-up window and click Save.
Renaming is also possible when a participant is replaced in the video window.
# How to add a content window
To add an additional video window where your content or slides will be displayed, click + Content slot when creating the layout.
# Managing participants' audio and video devices
You can control participants’ devices right after adding them to the layout with these buttons:
 — enable/disable camera
 — mute/unmute microphone
 — increase/decrease microphone gain (displayed when clicking on the arrow icon which is on the right side of the microphone)
— open the additional menu where you can:
remove a participant from the podium or invite him/her to the podium (available only in a moderated role-based conference)
rename a participant in the layout
replace a participant in the video window with a different one
set up audio and video devices (choose and set up camera, audio capture and playback devices, adjust microphone sensitivity)
assign a moderator
set an individual layout for a participant
spotlight a video window or make it smaller (in the layout with a spotlighted window)
clear the video window.
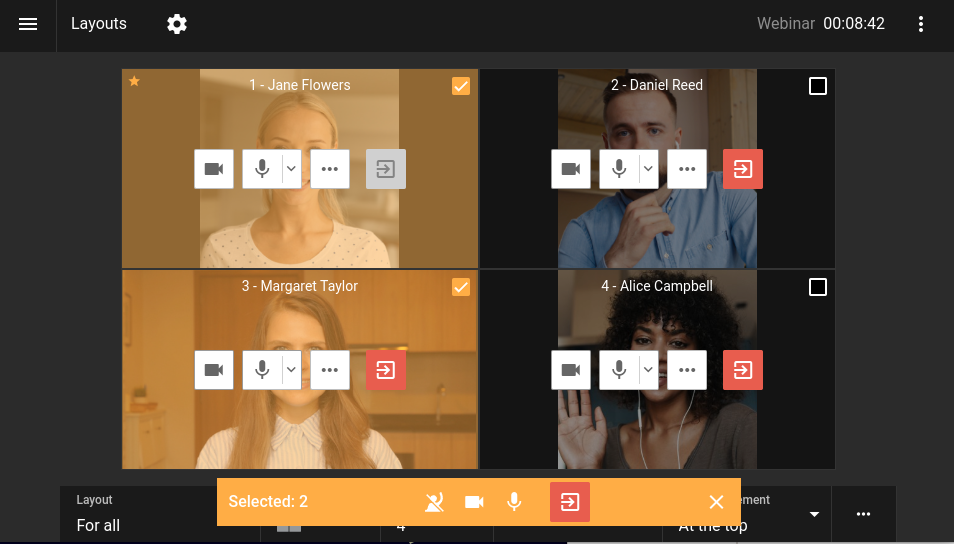
To select multiple participants, check the box in the upper right corner of the video window for each participant. In the toolbar at the bottom of the screen, you can turn off cameras and microphones of multiple meeting participants and remove them from the conference. In a moderated role-based conference there will be an additional button for removing the participant from the podium.
Click  next to the conference name if you need to hide participant management buttons or display the list of users who were not added to the layout. You will be able to use the following options for managing each participant:
You can also go to the full list of participants by clicking the button and selecting the Participant List option. To go back to the layout management section, click the button and select the Layouts option. In a moderated role-based conference mode you will see the buttons for inviting a user to the podium  and removing him/her from the podium
  .
.
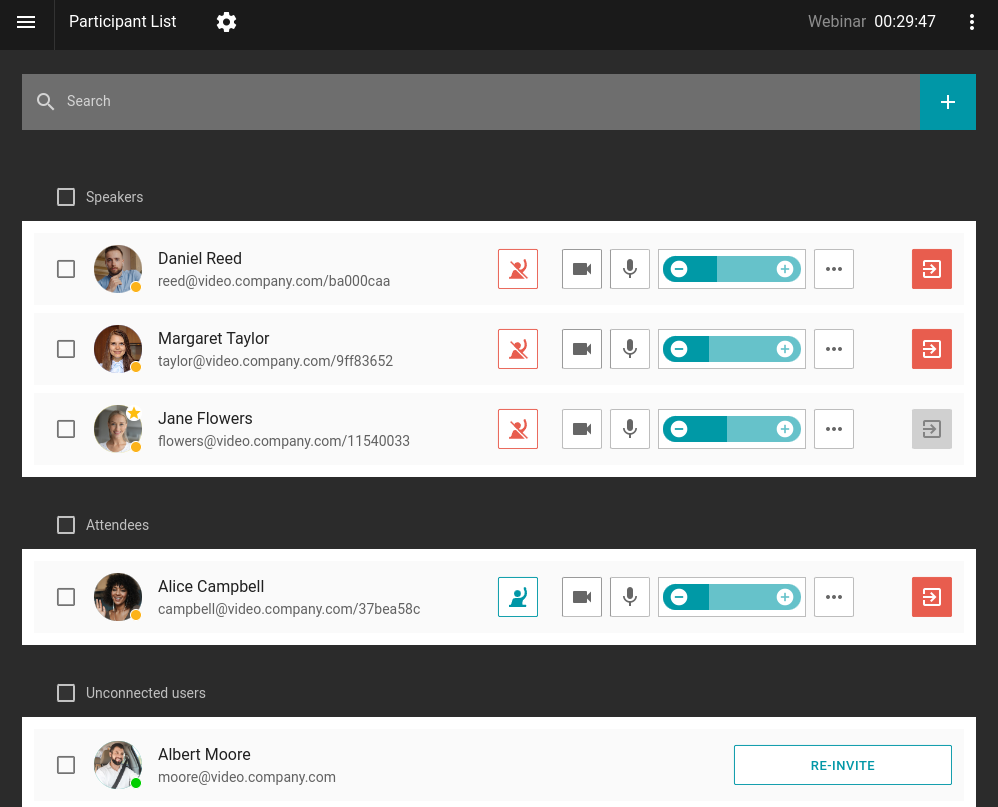
By clicking the button , you will open the menu for changing the display mode: as a list or as tiles.
# Add a new participant to a conference
You can invite users to an ongoing meeting. To do this, open the list of participants and press the  button to the right of the search bar.
The window for adding users will open. There you can select users in the same way as you would when creating a conference.
One can also invite users to the conference in the layout management window, if participants, who are not added to the layout, are displayed.
# Conference information
In the real-time meeting management section you can check information about the conference by clicking the button and selecting the Conference details option. A new menu will open: here, one can view detailed information about the event and end it with the corresponding button.
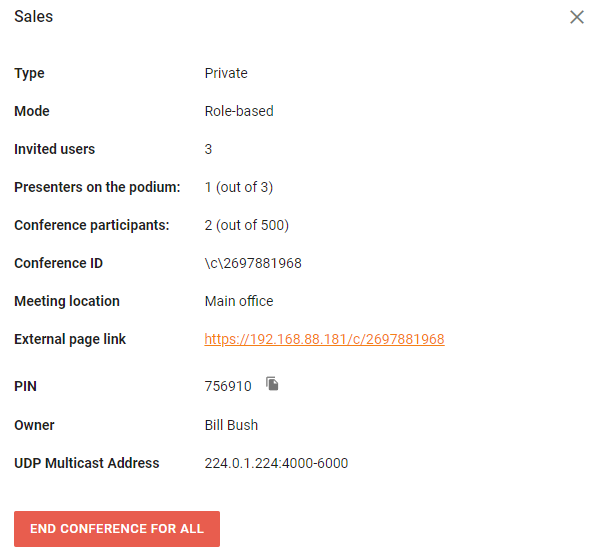
UDP Multicast address and RTSP streaming are displayed only if the corresponding settings were configured when creating a conference by the administrator in the TrueConf Server control panel. The HTML code of the widget is additionally displayed for public conferences to embed it in your website.
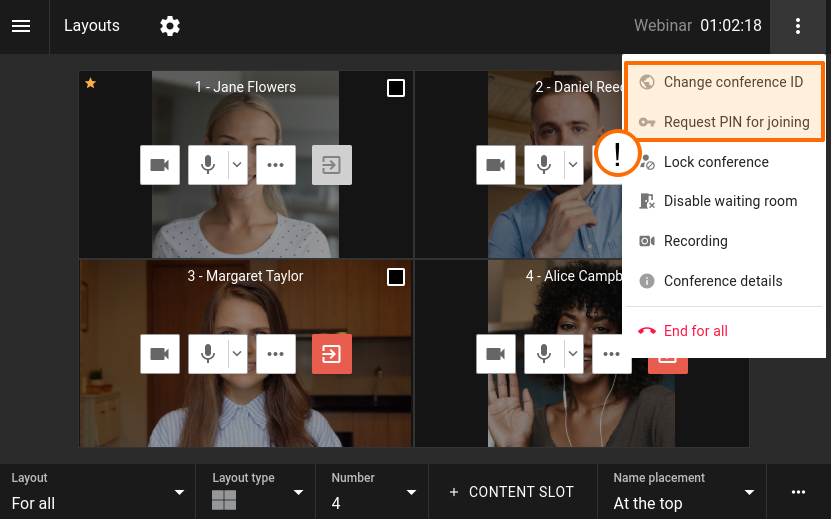
# Changing the conference PIN and ID on the fly
It is possible to change the PIN (needed for joining the meeting) and ID (unique identifier) of an ongoing conference. For example, when all invited participants have joined the conference, you can protect this meeting against unwanted connections. This feature is available in the same cases when the real-time meeting management section is available.
To change PIN or ID:
Go to the real-time meeting management section.
Click on the button
.Select one of the options and specify the new value of PIN or ID. One can also generate a PIN automatically or set a new one if it was not specified before.
The owner can also set the PIN code in the conference card in the list of scheduled meetings or virtual rooms.
# Locking a conference
A moderator can lock a conference for new participants either temporarily or up until its ending. The conference can be locked in one of these ways:
Select an ongoing conference in the list of meetings in your personal area, and click Lock conference in the card of this conference.
Go to the real-time meeting management section, click the button
and select Lock conference.
When a conference is locked
it can be joined by:
Moderators (including the owner)
Users who will be explicitly added by the moderator (including those who were previously invited, but did not join).
it cannot be joined by:
Authorized server users who were not explicitly invited by the moderator after the conference was locked
Users who were added to the list of invited participants before the conference started, but did not join before the conference was locked
Guests (in case of a public conference).
Each time when a conference ends, it automatically becomes unlocked which is the default status.
One can make a conference accessible to new participants in the same section where the conference can be locked. Select the option Unlock conference in the conference card or in the real-time meeting management section.
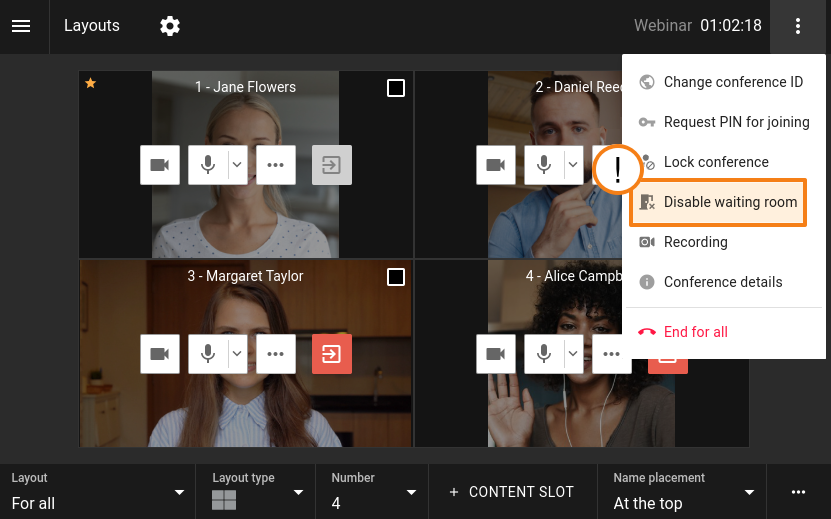
# Waiting room management
A conference moderator can control the waiting room (enable or disable it) during the meeting. To do it:
Go to the real-time meeting management section.
Click on the button
.Depending on the current state, select Enable waiting room or Disable waiting room.
When the waiting room is disabled, you will see a pop-up window where one can choose the actions for the participants in the waiting room: they can be invited to a conference or removed from it.
Each time when a conference is ended, the status of the waiting room is reset to the value specified on the Advanced tab before the start of the conference.
# Conference recording
As the owner, you can start video recording not only when creating or editing a conference, but also when this meeting has already started. To do it, take these steps:
Go to the real-time meeting management section.
Click on the button
.Select the Recording option.
In the opened window start or stop recording (if it was started previously).
If recording has already started, click the button
 which is next to the conference duration timer.
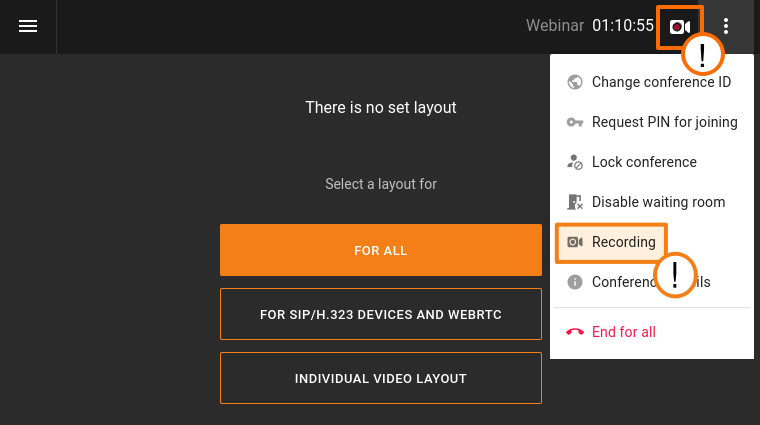
A conference can be recorded only if this feature was previously activated by the administrator of your TrueConf Server.