# Content sharing
# Slideshows
During video conferences, participants can not only hear and see each other, but also share content or show slides.
If a participant permits video recording in the application settings, his/her slideshow will also be recorded.
Importing slideshows from ppt and pptx files is available only in TrueConf for Windows and requires Microsoft PowerPoint preinstalled on your computer.
TrueConf for Android for Android and iOS users can share content instead.
# Supported formats
You can import slideshows in the following formats: ppt, pptx, odp, slides and pdf file pages.
Importing presentations in .odp format requires LibreOffice to be installed on your computer. You can check for the required software by going to Settings, then to the Tools section and finding the Document management line. If the path to the editor is empty or if you see an error message below, press the Detect Automatically button in the Path to ODP file editor line. If the path cannot be detected automatically, you can specify it manually.
You can also create a slideshow from your pictures right in the application or add some pictures to the list of the slides imported from a slideshow or a PDF file. For images, you can use jpeg, png, gif, .jpe, jif, jfif, jfi, bmp, png, gif, webp formats.
Please note that when using images with gif extensions, only the first frame will be utilized.
# How to show slides
During a call, click on the  button in the meeting control panel. Go to the Slideshow tab. Here, you can check the Share audio box. In this case, you can show slides and stream audio from your OS at the same time.
Please note that the audio will be streamed from your OS and not from the slideshow. Your presentation can be accompanied by the background audio from any other application. You can activate audio streaming when the slideshow has already started. To do it, click on the button. In the new window, check the Share audio box. Audio streaming is also available when sharing content. This feature can be enabled in the same way.
To add a new slideshow, click on the Create a slideshow, enter its title in the input field, and click on the Create. Next, the slideshow will be opened in the editing mode:
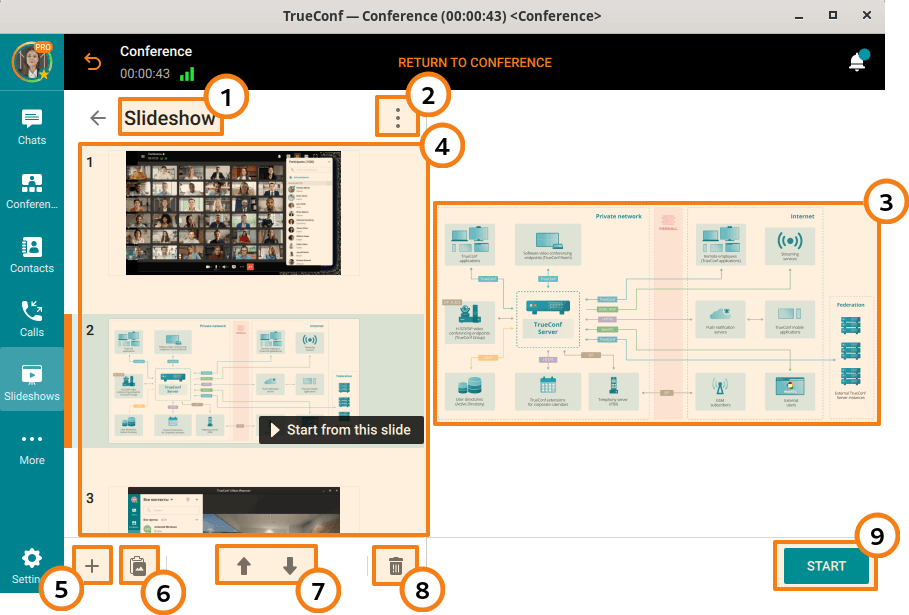
Slideshow description
In this menu, you can:
Rename the slideshow
Save the slideshow locally on your computer with .slides extension
Delete the slideshow
3. Selected slide preview
4. List of slides
5. Adding files to the list
6. Pasting a file from the clipboard
7. Moving files up and down on the list (you can drag files to change their order)
8. Removing slide
9. Starting the slideshow (available only when the conference is ongoing)
When images are added to the slideshow, click Start to begin the presentation (starting from the first slide). To start the slideshow from any other slide, select the slide and click on the button Start from this slide.
To make your slides visible for SIP/H.323 endpoints, switch BFCP and H.239 protocols on the server. To learn how to do it, read our article.
You can always pause the slideshow. To do it, click on the button  which is in the slideshow control widget.
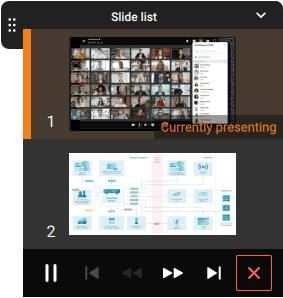
One can resume the slideshow in a similar way: click on the button  .
.
# How to upload and save a slideshow
In the menu, select Slideshows to create a new slideshow, import slides from a previously saved one (in .slides format) and open a PDF file.
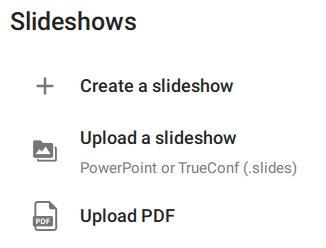
Click Create a slideshow, enter its name and add slides to the list. You can now use the slideshow in a conference.
Exit edit mode by clicking ![]() at the top of the application. You now have the list of all slideshows you've added:
at the top of the application. You now have the list of all slideshows you've added:

You can edit the slides, save them locally on your device and show them during a conference.
# Opening a PDF file
# Preliminary settings
This setting is only available in TrueConf for Windows.
PDF file import is available by default in TrueConf for macOS client applications thanks to the PDFKit system library. Please note that PDFKit is available only in macOS 10.4+ versions. If you are using an earlier version of macOS, you will not be able to import PDF files in the application.
In TrueConf for Linux client applications, this feature is also available by default, because all the necessary libraries will be installed along with the application.
If case of any problems or additional questions about this feature, please contact our technical support.
To use PDF files, you must have the Ghostscript plugin installed in the system.
If the TrueConf Server administrator has configured all the required settings, the  button will be displayed in the Slideshows section of the main menu.
If there is no button for importing PDF files, you can configure this feature. To do it, take the following steps:
Contact TrueConf technical support and request the archive with pre-compiled Ghostscript libraries.
Unpack the archive.
Copy the file for your OS (
GSDLL64.dllfor 64-bit version andGSDLL32.dllfor 32-bit version) to the%localappdata%\TrueConf\Clientpath.Rename the file to
gs.dll.
# PDF file import
To import PDF file pages into a slideshow, click on the button when creating it.
If the administrator had configured all the required settings on the TrueConf Server side, but the plugin is not installed, you will see the Framework settings pop-up when trying to import a file. Click on the Install button to automatically download the plugin.
The plugin is installed from your video conferencing server. If there is any download problem, please contact your server administrator.
# Desktop sharing
During conferences and video calls, you can use a client application to share your screen or separate application windows (including browser windows).
The content will be seen by all participants connected via TrueConf client applications and browsers (via WebRTC). Besides, the content shared during a conference can be recorded (only if the participant who is presenting the content had previously given the corresponding permission in the Tools section of the application settings).
Only maximized windows are correctly displayed during content sharing. Minimized windows will not be shared.
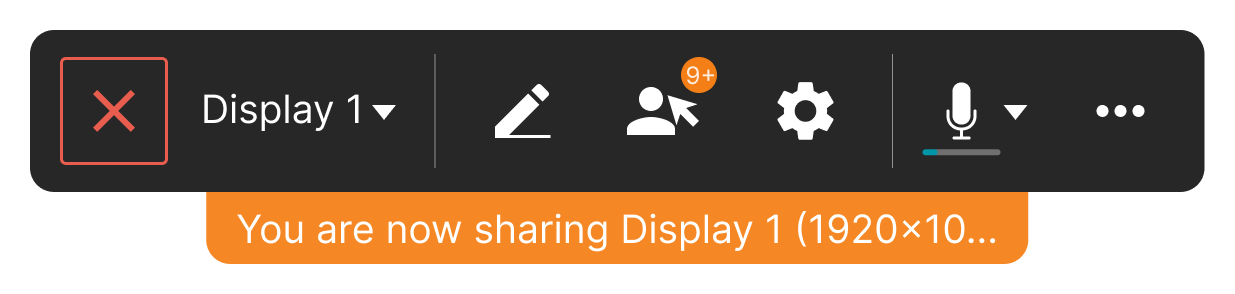
To switch to sharing content during a video call or group conference, click on the button in the control panel.
In the new menu, select the screen or application window that you want to share. If you want to stream audio, check the Share audio box. Next, click on the Start sharing button.
When you will be sharing content, audio will be streamed from the OS and not from the selected window. As a result, the content will be accompanied by the background audio from other applications. Audio streaming can be activated when content sharing has already started. To do it, click on the button. Then, check the Share audio box. This feature is also available during a slideshow. It can be activated in the same way.
Then, the application window will be minimized and the stream control widget will be displayed in the upper part of the screen. It will be displayed on top of other windows all the time while the content is shared. Other meeting participants will see your self-view instead.
The translation control window contains the following elements:
The title of the shared screen/application will be displayed in the lower part of the window.
 button to minimize/expand the widget.
 button to disable content sharing: when clicked, the minimized window of TrueConf client application will be maximized.
the button where the name of the content source is displayed (check
 on the screenshot): select the content source, enable/disable audio streaming
 button for annotating over the shared content (to learn more about this feature, check out the [corresponding section](#demonstrated-content-drawing)
 button to view the list of participants who gained [remote control over your desktop](../remote-desktop-control/#desktop-control-settings) during a conference (here you can disable this option)
 button for adjusting the settings of content sharing (select if content should be shared in the user’s video window or in the separate stream) and video area display
The widget video area can also be hidden, just hover the mouse over it and click on the Hide link in the center.
 button to select and configuring the microphone
 button to make an audio reply (available only if the microphone is muted in any conference except the smart meeting)
 button to switch to the additional conference controls.
By clicking on the button and selecting Show my video and content in separate windows, you can share content with conference participants as a separate stream. This way, the shared content can be viewed on third-party video conferencing endpoints (via BFCP/H.239 protocols).
# Webcam feed broadcasting while sharing the desktop
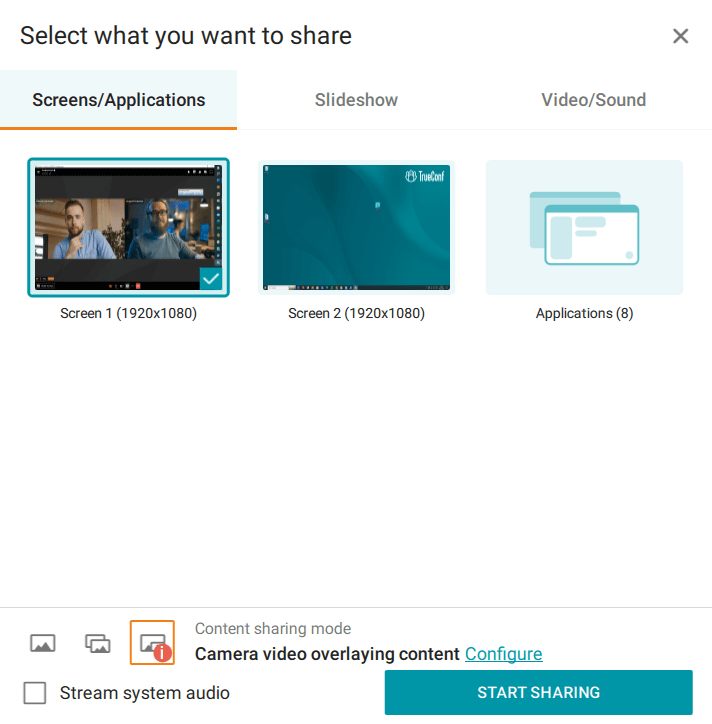
During desktop sharing, you have several options for transmitting the image from your webcam. The mode selection bar can be found at the bottom of the Select what you want to share window.
There you will find three buttons, each responsible for selecting a mode:
button
 Only content;
button
 Camera video and content in separate windows;
The button
 Camera video overlaying content — when this option is selected, an additional link Configure will appear, which allows you to select the size and position of the overlaid webcam picture (self-view) in a separate window. Additionally, there is a checkbox Hide my background that enables you to remove the background from your self-view.
After selecting the desired broadcasting mode, press the Start sharing button.
# Annotations over shared content
You can always make annotations over the shared content. This will make your presentation more vivid and interesting. To start annotating, click on the button in the stream control panel.
Content annotation tools can be accessed only when the entire screen (not just one of the application windows) is shared in the user’s video window. If content is shared in the separate stream, annotation tools will be unavailable.
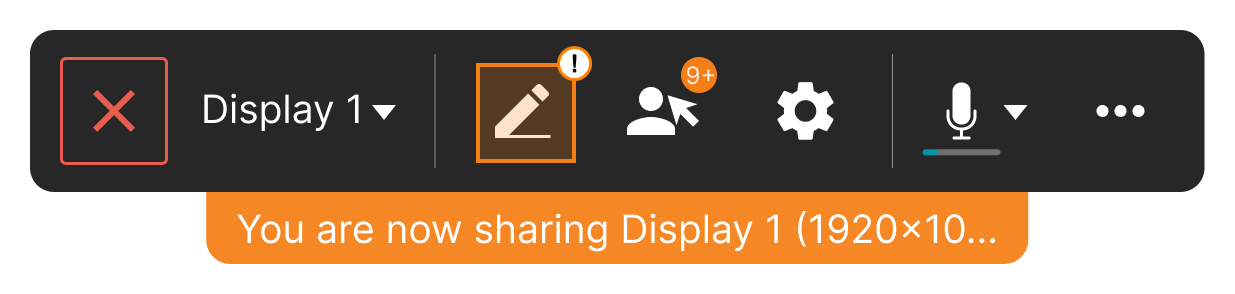
The panel with drawing tools will be displayed in the left part of your screen.

This widget includes the following buttons:
 button that enables a user to switch to the OS mouse cursor (needed for switching from annotation tools to the OS control mode).
 to drag annotations. Click on this button, point the mouse to the selected object and drag it to the new location.
 button for drawing. By clicking on the arrow next to the marker icon, you will open the menu for selecting brush width.
 button to create text blocks. To change the size of a text block and font size, click on the button , select an area on the shared screen, and start typing.
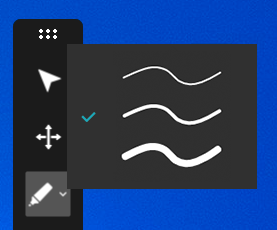
 button to add standard figures like
a rectangle, square, or star.
 button to activate the pointer which helps to draw the audience’s attention to a specific part of the screen.
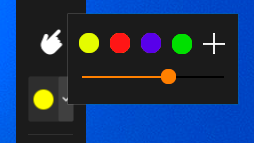
 button to select the color of drawings and text. Four colors are available by default: yellow, blue, red, and green. It is also possible to add a color by clicking on the button
  . When you click on this button, a new window will open. Here, you can select the required color. To set the color transparency, use the orange slider which is displayed above color circles.
buttons
 and
and 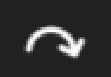 to undo and redo the last action respectively.
 button to delete created objects. To delete an object, just left-click on it (the tool should be preliminary selected). You can also delete all objects. To do it, click on the arrow which is next to the eraser icon and select Clear all annotations in the context menu.
 button that opens the menu with additional options. Here, you can change the panel orientation (vertical or horizontal) and save a screenshot of the shared window.
To close the annotations panel, click the button  which is in the lower part of the sidebar.
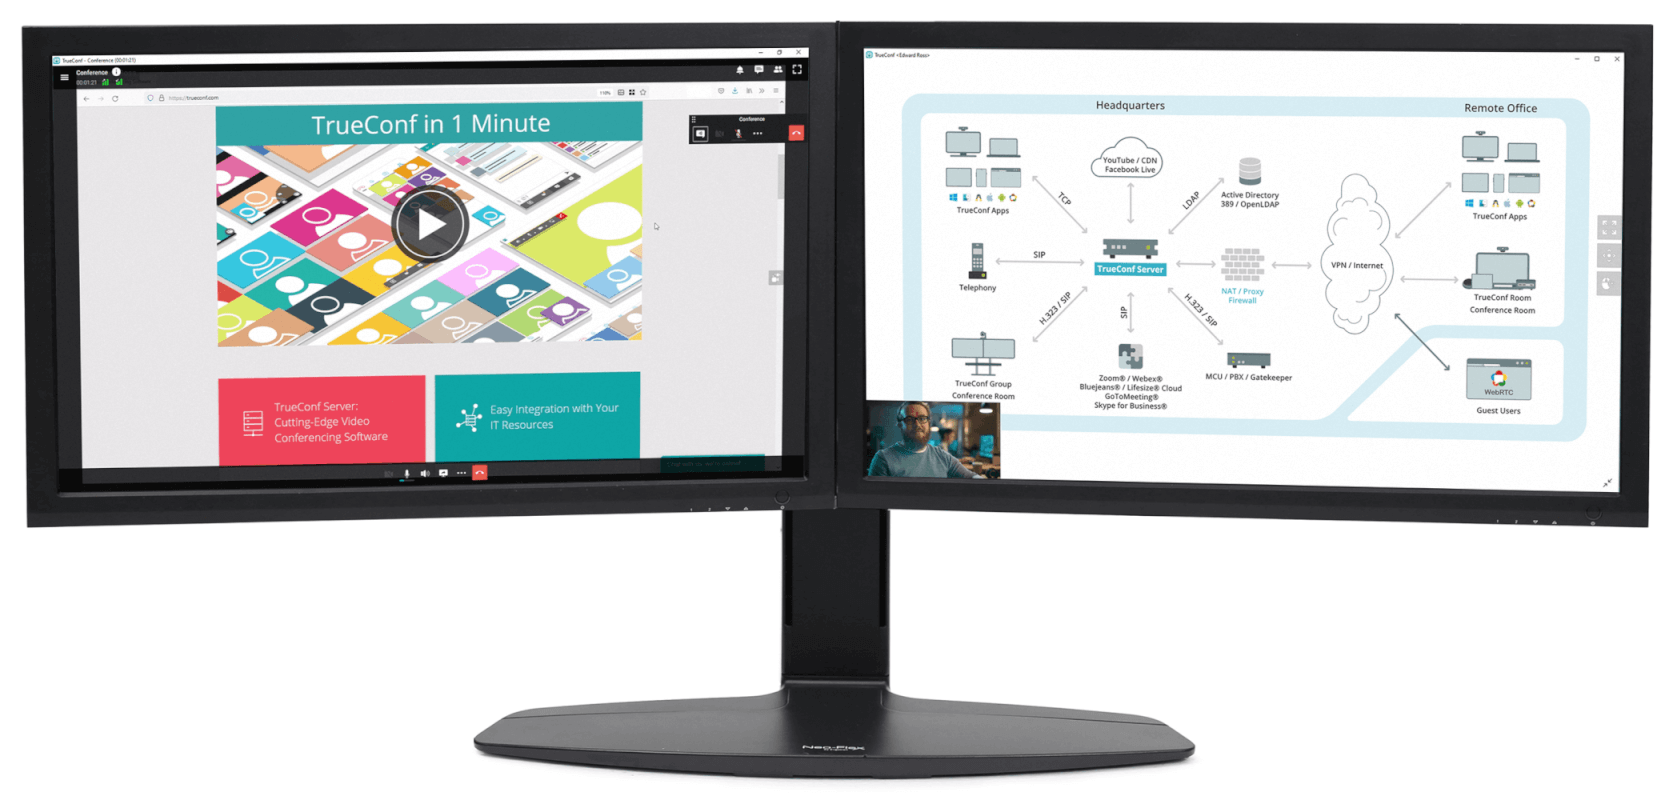
# Sharing multiple screens
During a meeting, multiple speakers may share their screen or separate application windows. In this case, participants have a useful option to switch between the screens or move the video window to an additional monitor so that they don't miss a single detail.
# How to switch between multiple contents and slideshows
If multiple participants simultaneously start content sharing or a slideshow in a separate window, you can select the stream that you want to see. To do it, take the following steps:
In the conference window, click the
Content button that appears in the lower right corner (not to be confused with the content display button on the real-time meeting management panel):
In the context menu, select the name of the user whose content you want to see.
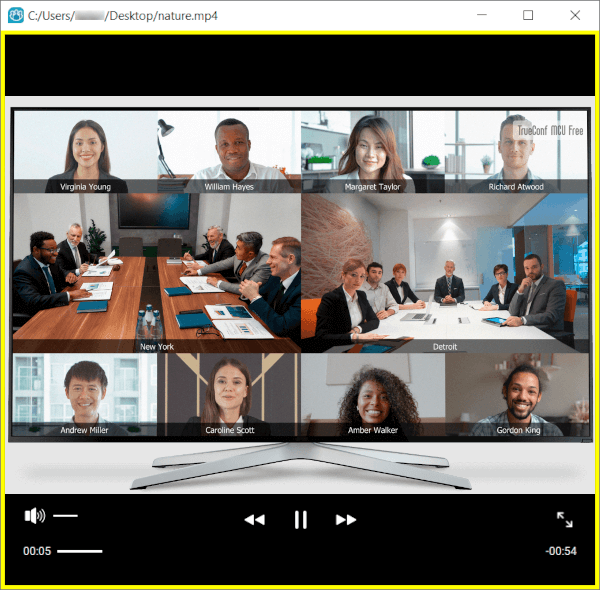
# Streaming video files
You can also stream video files during a conference. To do it, take these steps:
The following file formats can be used for streaming: avi, mkv, mp4, and webp. Video and audio streams in the file must be encoded with supported codecs.
Supported video codecs: h264, h265, vp8, h263, h263+, h263++, h261.
Supported audio codecs: pcm, opus, aac, mp3.
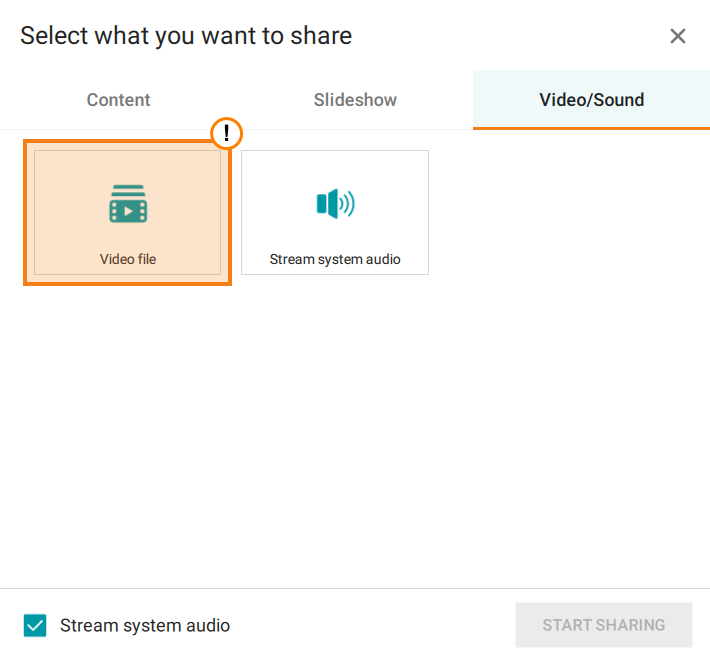
Click on the button
in the meeting control panel.Go to the Video/Sound tab in the pop-up window.
Select Video file in the opened tab:
The file explorer will open on your OS; here, you need to select the file that will be streamed.
Then in the Video file section, you will see the name of the uploaded file. Additionally, there will be the button
 . By clicking on it, you can select a different file for streaming.
The box Stream system audio will be checked by default. If you uncheck this box, meeting participants will not be able to hear the audio track from the video file.
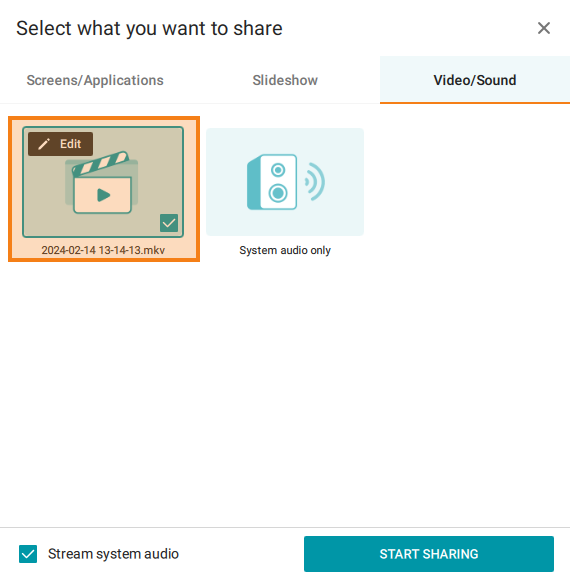
Click on the button Start sharing.
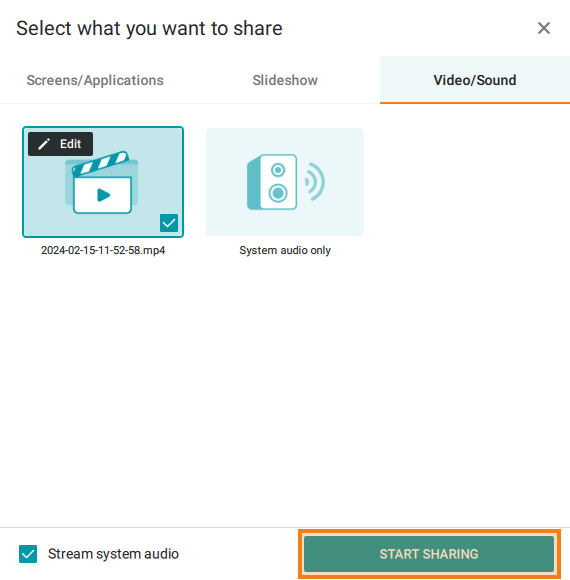
Video file streaming will begin. There will be a separate window for managing this stream. When the video is over, it will be replayed.
To end streaming, close the stream management window.
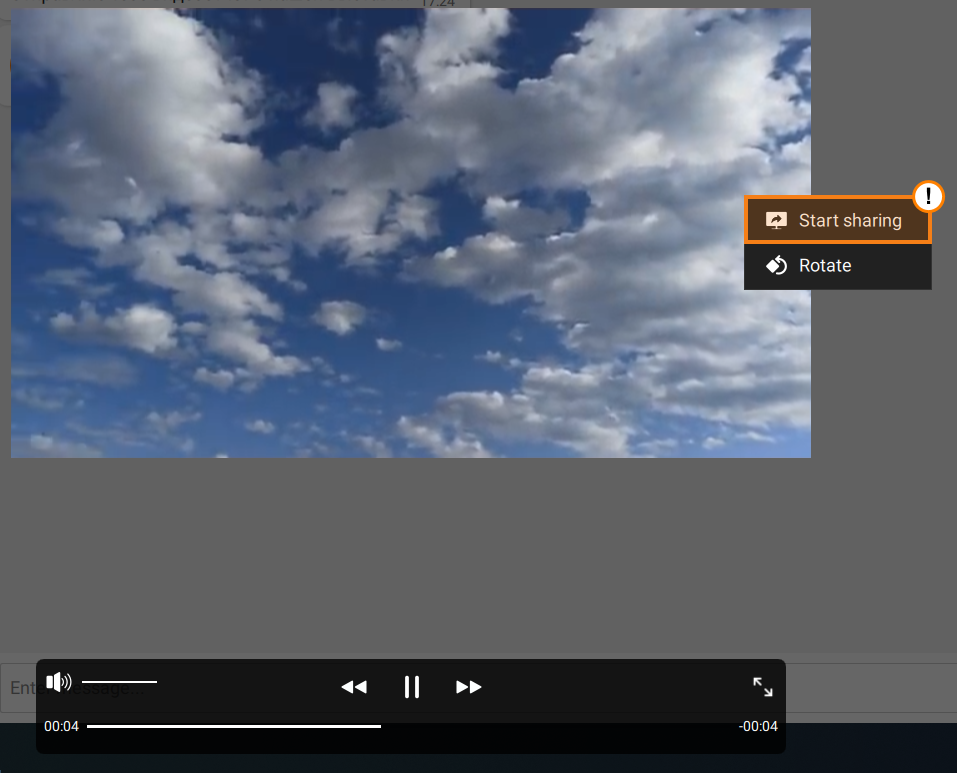
You can also start streaming right in your private messages. To do it:
During a conference, go to the chat with the file that you want to stream.
Click on a file to open the video with the built-in media player.
Right-click on the video and select the Start sharing option in the context menu.
Similarly to video files, you can start streaming any conference recording that had been saved previously (go to the Recordings section of the main application menu).
# Streaming system audio
You can stream the audio from your operating system without sharing video. For example, you can play a sound track in the media player for your colleagues. To do it:
Click on the button
in the meeting control panel.Go to the Video/Sound tab in the pop-up window.
Select System audio only in the opened tab.
Each of the conference participants will hear all sounds played at the system level, including audio from media players, browsers, etc.