# How to Use TrueConf Weathervane
The use of application goes through three stages:
Preliminary configuration. Set up the connection with the digital discussion system and TrueConf Room and make general settings
Presets configuration. Select cameras, matrix switchers, and their configurations that will be switched between.
Active usage. Switch between presets in response to various events.
# Preliminary Settings
In the main window, select Tools → Settings which opens the settings window.
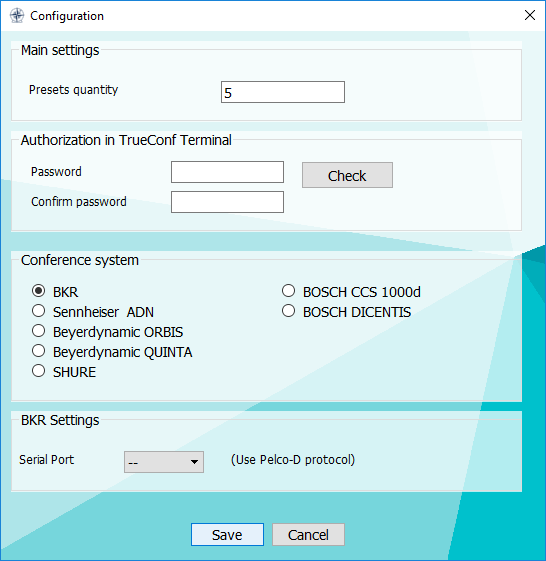
Enter field values:
- Presets quantity is the number of presets to switch between.
For your information
When a conference system is used, the number of presets should be one point greater than the number of microphones because the first preset is used when none of microphones is on, e.g. when you need to capture a general view or display a screensaver.
- Password and Confirm password are the fields where you enter the password to log into TrueConf Room as admin (if it is supposed to be used);
- Conference system is the menu for selecting the digital discussion system that will be used (if it is supposed to be used).
The last settings block contains data for connecting to a digital discussion system. Depending on the model you’ve selected, you will have to fill certain fields. The list of such fields is provided below:
- BKR: Serial Port;

- Sennheiser ADN: IP;

- Beyerdynamic ORBIS: Serial port;

- Beyerdynamic QUINTA: IP или Serial port;

- SHURE: IP;

- BOSCH CCS 1000D: IP, User name and Password.

- BOSCH DICENTIS: User name and Password.

# Table of Presets
The application main window features a table of presets to switch between.
Each preset includes:
Matrix switcher and its configuration (Matrix)
Camera that will be controlled or broadcast to TrueConf Room (Camera)
We guarantee that the system runs flawlessly with up to 10 cameras being used simultaneously.
PTZ camera connection method (PTZ Control)
PTZ camera position (Position).

All fields are optional and compatible with each other, i.e. you can combine them in any way you like. For example:
If you don’t select a PTZ camera in the Camera field, there is no need to fill such fields as PTZ Control and Position. The app will function correctly with a selected camera.
If you select both a camera and a matrix switcher in a preset, both configurations will be applied when you switch to this preset—the camera you’ve selected will be displayed on the TrueConf Room screen while matrix switcher inputs and outputs will be adjusted according to the selected position.
If you select a matrix switcher configuration in a preset and a PTZ camera connected to one of switcher inputs, then both configurations will be applied when you switch to this preset. The selected PTZ camera will be positioned according to the preset while matrix switcher inputs and outputs will be adjusted according to the selected position.
If the application is closed down correctly, any preset configurations that have been selected will be saved and restored when you run the app again.
# Configuring Presets
# How to Select the Positions of PTZ Cameras
When you click on the small crossed arrows icon, the PTZ camera control window opens. Here you can set the camera rotation, tilt, and zoom coordinates.
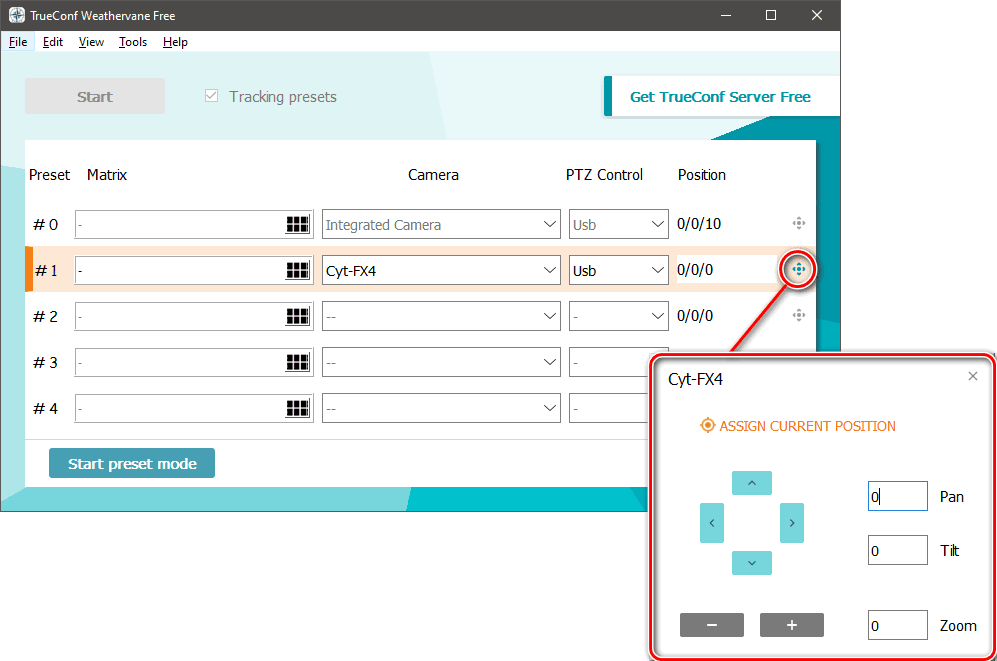
Pan, Tilt и Zoom fields will be set according to the current position of a camera.
# Matrix Switcher Operation
To select a matrix switcher for a preset, click on button in the right side of the desired Matrix. The switcher configuration window will pop up.
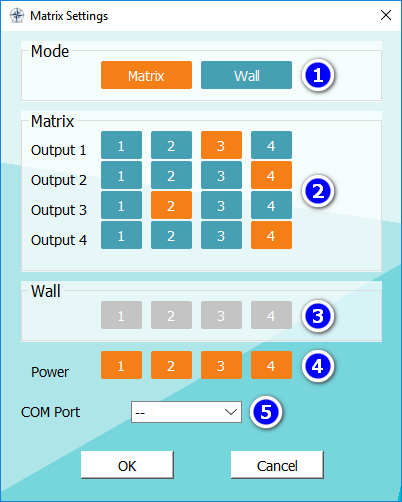
Select an output type of a matrix switcher
Matrix is needed for the simultaneous use of several outputs with an arbitrary permutation of input streams
Wall is needed to display one of inputs on the entire video wall
Set the connection between inputs and outputs (available only in Matrix mode). Outputs are arranged in rows while inputs are arranged in columns. Our example shows that input #1 does not correspond to any output, and input #4 extends to two outputs.
Select an input to be displayed to your video wall. (For Wall mode only)
Select active switcher outputs.
When you select Wall mode, it is advisable to keep all outputs on.
5. Switcher connection port (which lets the app detect a switcher). This port should be selected for each preset that involves the use of a switcher.
# Preset Mode
When you are working with digital discussion systems, setup processes can be made even more automated thanks to Preset mode.
Proceed as follows:
In the settings (Tools → Settings, see above for details), select the preferred number of camera positions (number of microphones + 1) and connect to a conference system. If you are going to use TrueConf Room, connect it as well.
Select cameras corresponding to each microphone (remember that microphones are numbered from one, while preset #0 is meant for the case when all microphones are off). If you are using a matrix switcher without TrueConf Room at this stage, you also need to select switcher configurations for each preset.
Click on the Start preset mode button (it is at the bottom of the screen) and wait for the application to connect with a digital discussion system.
Turn the first microphone on and TrueConf Weathervane will highlight a row corresponding to this microphone in the table.
If a PTZ camera is selected for this microphone, set it to a desired position.
Turn off your microphone. When it is done, data about the current position of the camera will be automatically saved for a selected preset.
Repeat steps 4, 5, and 6 for each microphone.
Once you’ve set all the presets, click Stop preset mode.
# Getting Started
- Launch TrueConf Weathervane.
If you use TrueConf Room and PTZ cameras controlled under VISCA protocol, it is crucial that TrueConf Weathervane be launched before TrueConf Room.
2. Launch TrueConf Room and/or a matrix switcher.
3. Connect a digital discussion system if you are going to use it.
4. Configure presets following the previous examples.
Further steps may be different, depending on which control mode you would like to use.
This section will describe various control modes. They are compatible with each other, e.g. camera switching can be initiated by turning on/off the microphone of a digital discussion system, but the camera can also be switched by a timer through its own program.
# Switch Cameras Manually
When you click on a preset in TrueConf Weathervane main menu, the application will switch to a selected preset. You can use this method to test connection of cameras and system general view as well as to make one-time changes in automatic operation.
# Conference System Integration
Once you’ve connected to a conference system, the Start button is activated in the upper left corner of TrueConf Weathervane main menu. When you click on it, TrueConf Weathervane switches to conference system tracking mode.
When you turn on (activate) any microphones in this mode, the application will switch to a corresponding preset.
Check the box Tracking preset if you want to highlight an active preset.
# Program control
TrueConf Weathervane supports switching presets by changing command line parameters. The preset number can be determined through -p or -preset parameters (these parameters do similar tasks). For example, the command
WeatherVane.exe -preset 1
activates preset #1.
Thanks to this feature, you can configure automated presets switching using a third-party program or a script.