# TrueConf MCU installation
You can download the TrueConf MCU distributive file on our website:
Fill out the registration form and click the Download TrueConf MCU button. A registration key will be sent to the email address you provided.
When you fill out and submit the form, a new page with instructions will open. Click on the link in the second section to check the full installation guide in our knowledge base. There, you can also download the installation package for your OS.
To install TrueConf MCU, you need to have superuser (root) rights.
# If Internet connection is available
- Update the system packages using the console command:
apt update && apt -y upgrade
2. To start installation, run the following command in the directory with the downloaded distribution:
apt install -yq ./<file_name>.deb
3. The installation of the TrueConf MCU server begins. During installation, click OK to accept the terms of the license agreement.
You may need to install additional dependencies. In this case, run the following command:
apt install -f
Once the dependencies are installed, TrueConf MCU installation will resume.
4. To test TrueConf MCU, run the following command:
systemctl list-units | grep tcmcu
If installation is successful, the status will be active.
# Installation in the private network
When TrueConf MCU is being installed, additional packets (dependencies) are downloaded. So, if the host server does not have access to the Internet, you can configure additional settings for your system. Here is an example of deployment on Debian 10.
In addition to TrueConf MCU installation file, you will need to download the full Debian 10 distro from the official repository (opens new window). This distribution includes 3 DVDs with .iso images. You will need to copy these images to a USB drive.
All further operations will require superuser (root) rights.
The instruction below shows how to create folders with certain names, but you can select any names for them.
# Step 1. Copy files to your computer
Connect a USB drive to your server.
You will need to get additional information about the USB drive. To do it, run the following command in the terminal:
fdisk -l
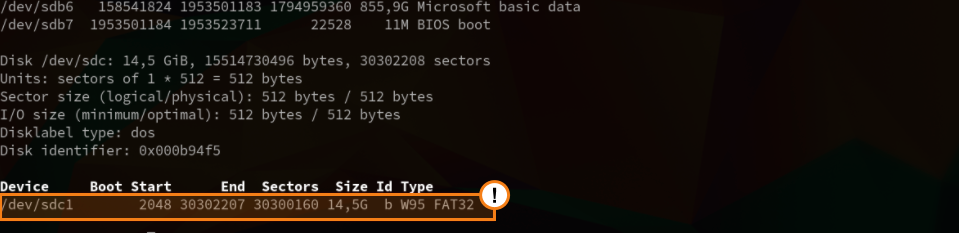
You will see information about all drives. Find out which of the drives is your USB drive. You can do it by checking the disk size. For example, you may need to check information about this disk /dev/sdc1, but in your case it may be /dev/sdb1:
3. Create a folder with the following command:
mkdir /home/$USER/usb/
4. Run the following command to mount the USB drive to the /home/$USER/usb folder:
mount /dev/sdc1 /home/$USER/usb/
5. Create an iso directory:
mkdir /home/$USER/iso
6. Copy data from the USB drive to the /home/$USER/iso/ folder:
cp -r /home/$USER/usb/ /home/$USER/iso/
Copying data may take some time.
# Step 2. Connect OS images as a repository
Then, you will need to mount OS images as a repository:
- Create the directories with the following commands:
mkdir /debian
mkdir /debian/dvd4
mkdir /debian/dvd5
mkdir /debian/dvd6
2. Mount ISO images of the operating system:
mount –o loop /home/$USER/iso/usb/debian-10.12.0-amd64-DVD-1.iso /debian/dvd4
mount –o loop /home/$USER/iso/usb/debian-10.12.0-amd64-DVD-2.iso /debian/dvd5
mount –o loop /home/$USER/iso/usb/debian-10.12.0-amd64-DVD-3.iso /debian/dvd6
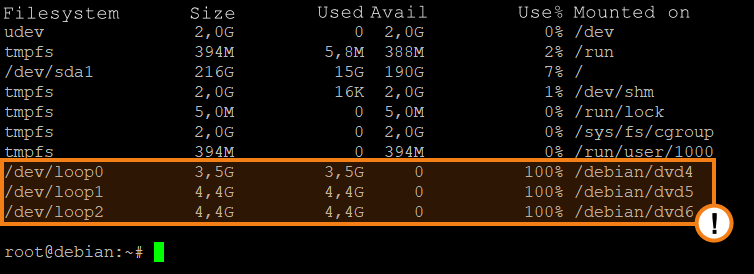
3. To make sure that the drive is properly mounted, run the following command:
df -h
4. Open the repository configuration file with the nano editor and make sure that all the lines are commented out:
nano /etc/apt/sources.list
If some of the lines are not commented out, comment them out with the “#” character which should be put the beginning of each line and add the following code at the end of the file:
deb [trusted=yes] file:/debian/dvd4 buster contrib main non-free
deb [trusted=yes] file:/debian/dvd5 buster contrib main non-free
deb [trusted=yes] file:/debian/dvd6 buster contrib main non-free
Save changes with Ctrl+O and close the editor with Ctrl+X. Update the list of packets and make sure that no error occurred during the process:
apt update
# Step 3: TrueConf MCU installation
Since you previously copied deb-package together with OS images, TrueConf MCU installation will be located in the /home/$USER/iso/usb/ path. To install TrueConf MCU via the terminal, run the following command:
apt –f install /home/$USER/iso/usb/<file_name>.deb
To make sure that the server has been started, run the following command:
systemctl list-units | grep tcmcu
# Authorization
TrueConf MCU starts automatically once the video conferencing server is launched. You can connect to the server from a browser using its IP address. You will need to enter your login and password on the authorization page.
Authorization data by default:
Login - admin
Password - admin
You can change the authorization data after registering the server.

# Registration
After authorization, the registration window will appear:

# Online
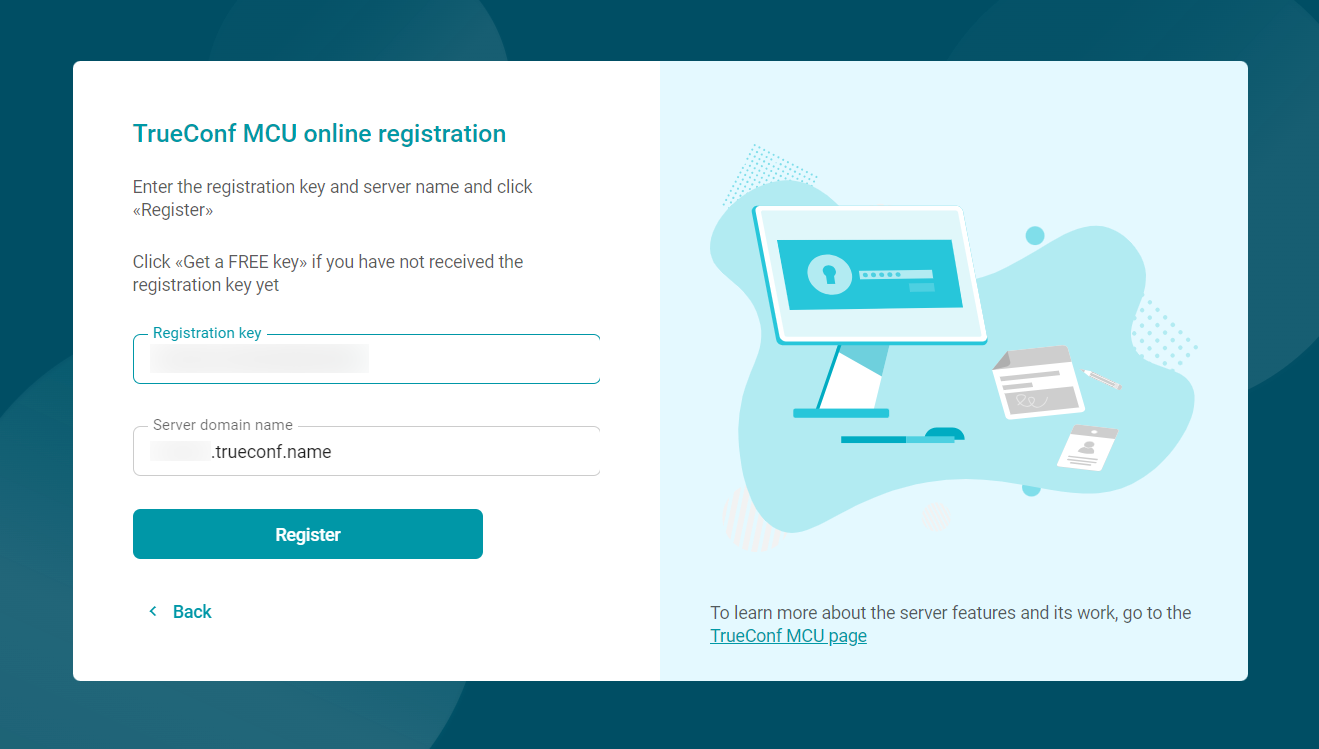
On the registration page, click the Online registration button, then in the Registration Key field enter the key you received via e-mail, and click the Register button.
# Offline
Offline registration is available only in the TrueConf MCU full version. If you would like to request a trial version that works without Internet connection, please contact our sales department.
If you are operating in a closed network without internet access, go to the registration page, click on the Offline registration button, enter the key that was received by e-mail, and then press the Create a registration file button. A regoffline.mrg file will be generated and its download to your computer will start automatically. Save the file at a convenient location and click on the Next button.
Send the previously saved file regoffline.mrg to our sales department email address.
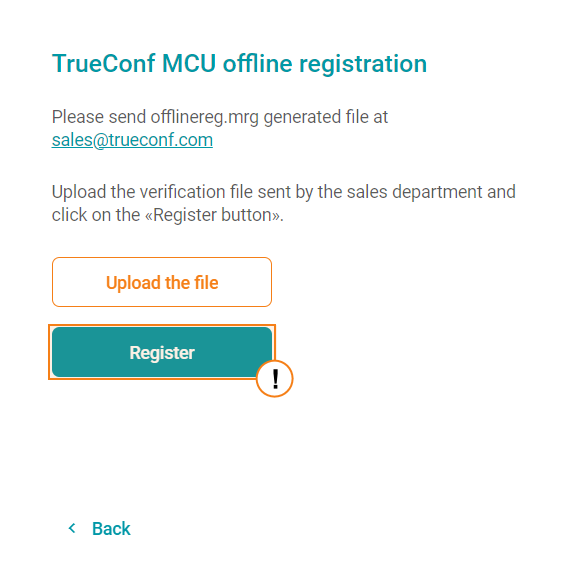
You will receive a registration confirmation file in the reply email. Upload it and click Register.
If the activation is successful, you will be automatically redirected to the TrueConf MCU control panel.
# Performance
To evaluate the performance of the computing platform, TrueConf MCU uses metrics based on the speed of performing key operations - transcoding, scaling, transferring data from one memory area to another, and so on.
It is a major misconception to think that everything comes down to the number of cores and clock speed. The memory speed, which is composed of numerous factors: the type of memory, the number of memory channels (slots on the motherboard), and the size of the processor cache, plays a crucial role.
Memory in virtualization systems operates slower than memory in hardware servers.
Performance also depends on the number of processors, as data need to be "exchanged" between processors as well.
The calibration procedure allows you to measure these indicators on a specific platform to later understand how many and what type of connections the server can handle without reducing resolution and frame rate (FPS).
# Power
We would like to highlight the management of CPU power in the Linux OS separately. This is an important factor that affects the server's performance.
By default, the processor in Linux operates in power-saving mode. You can check the current operating mode using the following command:
sudo cpupower frequency-info
You can enable maximum performance mode using the command:
sudo cpupower frequency-set --governor performance
By default, this utility is not included in the system. For most versions of Linux OS, it is available for installation from repositories:
sudo apt install linux-cpupower
According to our observations, full power management support appeared in Debian 11.
# Calibration
To ensure better performance, you should perform calibration each time when the server hardware is changed or when a major update of TrueConf MCU is released (e.g., an update from v 1.2 to v.1.3). This will allow you to increase the maximum number of users simultaneously participating in a conference and improve audio and video quality. Calibration also affects the correctness of the display of server statistics.
To perform calibration, go to the Administration → Calibration section and click Start calibration.
In the lower right corner there will be the calibration progress bar. You can end this process by clicking on the Stop button. During calibration TrueConf MCU will automatically rate the server performance in different modes and with different audio and video codecs.

When the calibration process starts, all ongoing conferences will be forcibly ended. Also, you won't be able to hold conferences on the server until the process is completed or canceled. The calibration can take several hours and depends on the server capacity.