# TrueConf Server control panel
TrueConf Server control panel (web manager, TrueConf Web Manager) is a web interface that allows administrating TrueConf Server.
Thanks to the web interface, administrators can:
View information about the status, registration, and server license,as well as track its performance
Add and delete users
Schedule video conferences
Setup client applications and integration with Active Directory and LDAP
Set connection rules for calls over SIP and H.323 gateways.
By default, the TCP port for accessing the TrueConf Server control panel is equal to 80; however, when deploying the server on Windows, you can change the port number in the installation dialogue window.
However, you can select any different port after installation both on Windows and Linux. In this case, the port has to be specified in the browser address book right after the colon in the hostname, e.g., http://localhost:8080.
# Control panel
# Summary
The Summary section opens automatically every time you access your TrueConf Server control panel.
In the Dashboard tab, you can view the following information:
Real-time performance graphs:
CPU usage
Network usage (according to the traffic type)
Numbers of active conferences and connections of all types
Available disk space
Storage space taken by the working directory, chat files and conference or call recordings
Number of online users, reserved PRO licenses, guest connections and SIP/H.323/RTSP connections
The number of active (ongoing) conferences and the total number of its participants
Service statuses.
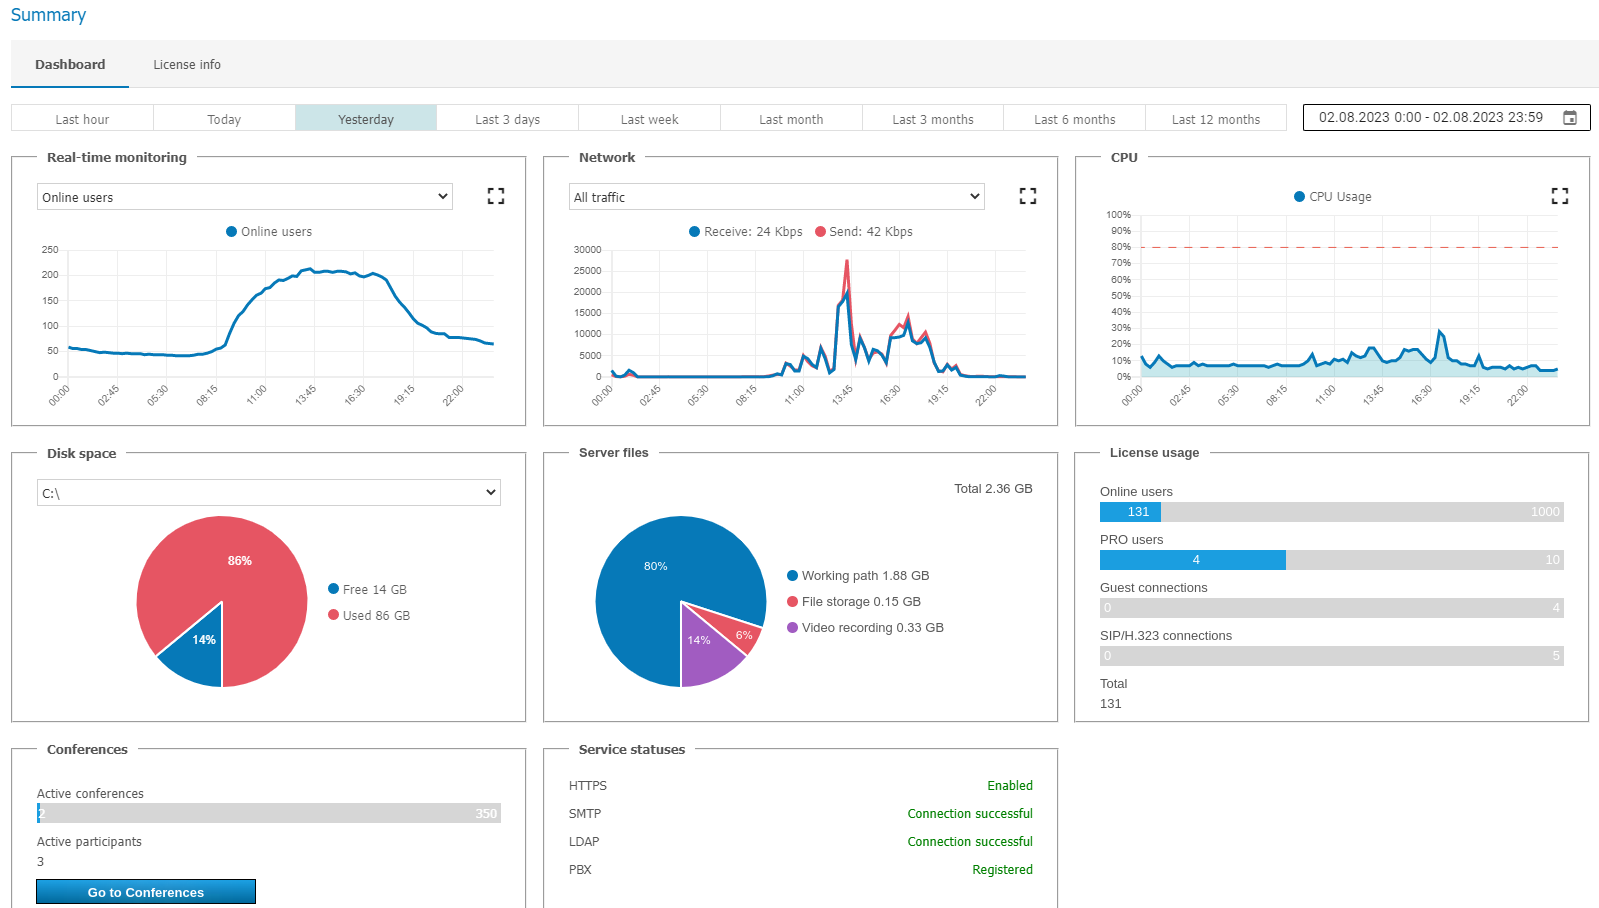
You can press the  button to enlarge any of the graphs and click the
  button to select any date range for your data display.
The License info tab shows information about the license, registered contact person, and the extensions used on the server. Here, you can:
Renew the server license or change the server name by clicking on the Register button
Purchase additional features from the Extensions section.
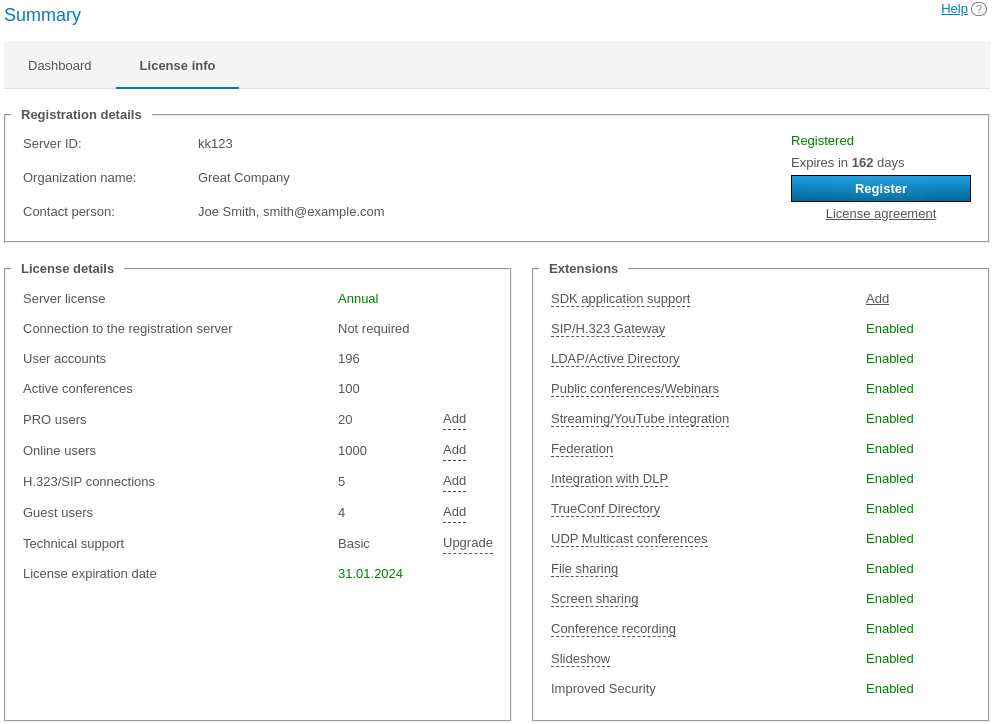
In case of any problems with TrueConf Server registration, the administrator may reach out to TrueConf technical support team via the contacts that will be displayed in case of an error.
If you're using a free version of TrueConf Server and connection to our registration server (host is reg.trueconf.com and TCP port is 4310) is lost, your server will shut down in 12 hours. The expected shut down time will be displayed in the Summary tab. The full version of TrueConf Server does not impose such limitations.
If the server is connected to the Internet, administrator will be able to receive notifications updates in TrueConf Server control panel. In the left menu of the control panel you will see a notification, while at the top of the page a message with the latest version download link will be displayed. After you have updates, the notification will disappear.
# PRO licenses
In this section, the TrueConf Server administrator can distribute PRO licenses needed for participation in group conferences. The administrator can also view information about the use of these licenses.
Distribution of permanent PRO licenses is not available in TrueConf Server Free.
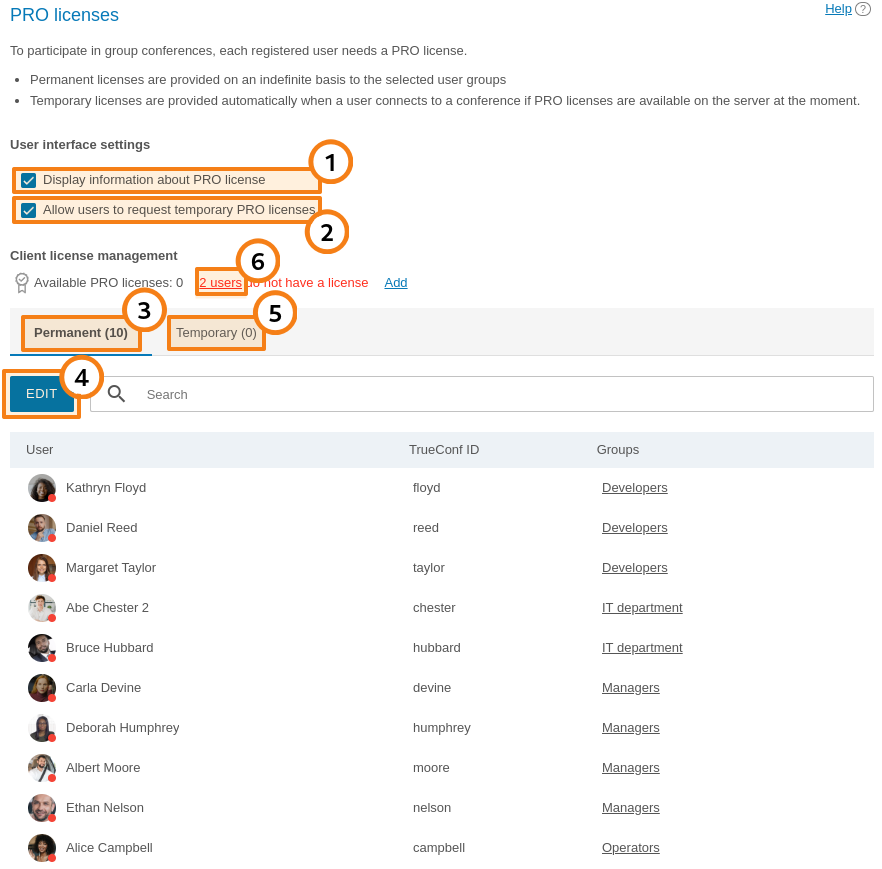
Activate the display of information about a PRO license in the user personal area and in TrueConf client applications (enabled by default).
Enable users to request a PRO license in advance (before participating in a conference) either in the personal area and in the client application (enabled by default).
The list of users who are given permanent PRO licenses. Such users can be picked only by selecting groups. It is impossible to select users individually.
Click on the Edit button to select groups of users. To apply changes, you will need to restart TrueConf Server. If the number of selected users is larger than the number of licenses available on your TrueConf Server, the licenses will be distributed depending on the priority of groups. Within groups, the licenses will be first given to the users who are on top of the list (users are sorted by their display names).
The list of users, who received temporary PRO licenses with validity period specified for each of the licenses. Here, one can also revoke a user
s temporary license by clicking on the button <StdPic id="gui/free_license" gui="true"/> which is next to the users name. Such a license will be returned to the pool of available licenses. If a user is currently participating in a conference, he/she will be automatically removed from this meeting.If there are users, who did not receive licenses, the corresponding notification will be displayed and the number of users without a license will be specified.
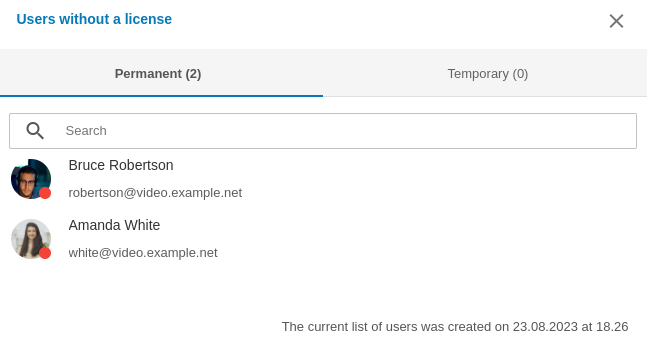
Two separate lists will be generated there:
Permanent — here, one can find the list of users who did not receive permanent PRO licenses when these licenses were distributed (below the list one can check the date when TrueConf Server was last restarted)
Temporary — the users, who tried to receive a temporary PRO license, but there were no licenses available.
Please note that the changes in the distribution of PRO licenses are applied either after the server restart or automatically once every 24 hours (check part 5 in the description of license distribution). For example, if a new user is added to the group with permanent PRO licenses, he/she will not receive a PRO license until you restart TrueConf Server.
# Settings
In this section you can specify the path where TrueConf Server data will be saved. Here, it is also possible to view detailed analytics about the server performance and configure settings for client applications.
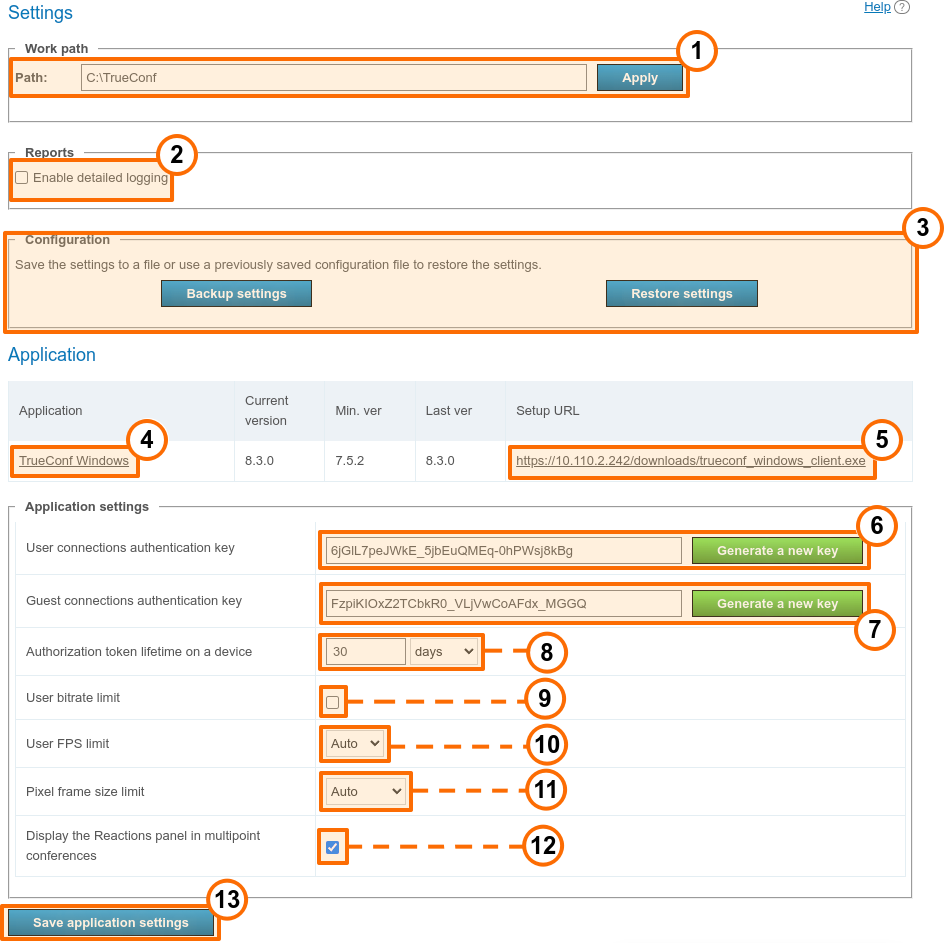
- A path to a working directory of server.
In the TrueConf Server for Linux control panel, the working directory path is set to /opt/trueconf/server/var/lib and it cannot be changed. However, you can set up a symbolic link (symlink) as shown in the corresponding section.
2. Enable detailed logging of your TrueConf Server activities. Might be required by our technical support team for troubleshooting.
You can read more about TrueConf Server log files and learn which logs are required for troubleshooting and reporting tickets to the technical support department in our knowledge base.
3. Backup and restore TrueConf Server settings (learn more below).
4. Go to the version settings for TrueConf for Windows client application.
5. Download link for TrueConf for Windows client application (the link will be published for your users on the guest page).
6. A field for generating a secret key. It is used for creating session keys to authenticate users in a video conference. To replace your key with a new one, click the Generate a new key button. By replacing the key you can make your conference more secure (e.g. inhibit third-party connections).
7. A key similar to the previous one. It controls authorizing using guest accounts in public conferences.
8. Specify the validity period of the authorization token; it determines the time interval during which the session will be maintained after a user connects to TrueConf Server from a client application or signs in to the personal area. When the validity period expires:
If a user has been signed in to a client application and then goes offline (either logs out or closes the application), he/she will need to authenticate again according to the specified settings when the application is launched.
If a user has been signed in to the personal area, he/she will be logged out after clicking on any button or going to a different section; this person will need to re-authorize according to the current settings.
9. Setting the maximum default bitrate that can be sent from each client application to the server.
10. Set maximum FPS rate transmitted from TrueConf Server to a client.
11. Set frame size limits in pixels.
12. Enable statuses (icons used as reactions) during a conference.
13. Save application settings.
We strongly advise you not to use settings 6-11, unless being told so by our technical support team, as they might significantly decrease the quality of your video conferences or put TrueConf Server security at risk. The ability of TrueConf Server to automatically and dynamically manage video streams encoding parameters is crucial for effective collaboration.
# Configuration back-up and restore
Backup copy of TrueConf Server settings will enable you to save the main server settings, including users, groups, scheduled conferences, network settings and then restore the server settings from the file where the settings were saved. This feature may be helpful when the operating system is re-installed or when the server is migrated to a different physical machine. You will not have to configure the server once again. Check full guides in our knowledge base to learn more about saving and restoring settings:
- TrueConf Server migration from one Windows server to another
- TrueConf Server migration from one Linux server to another
- TrueConf Server migration from Windows to Linux
- TrueConf Server migration from Linux to Windows.
When TrueConf Server settings are saved to a file, the reserve copy of this file will be automatically created in the [working_path]\registry_backups folder where [working_path] is the working directory of a server. This applies both for Windows and Linux versions of TrueConf Server.
# Client application version settings
Below you can see the client application section. Here you can put limitations on the versions of the applications which can be used for video calls and conferences on your TrueConf Server instance.
Click on the client application in the first table row:

Here, you can edit the following parameters:
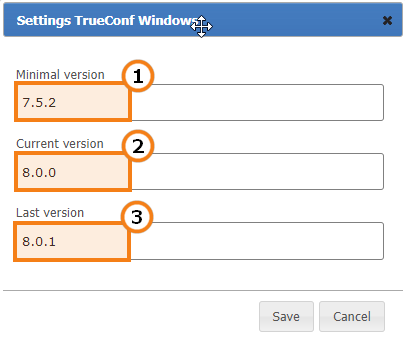
Minimal version of the client application supported by TrueConf Server. If the current version of client application is lower that the one specified here, client application will be stopped and mandatory updated.
Preferred version of the client application. If the version of the app is older than the version specified in this field, the user will be prompted to update. It's possible to cancel the update and continue to use the application unless it's version is higher then the Minimal one.
The version of client application which will be offered for update.
You can install TrueConf for Windows client application on multiple machines in the corporate network with the help of group policies (GPO). To do it, you can use an msi package that can be downloaded from our website. To learn more about this feature, read the corresponding article in our knowledge base.
# Network
In this section you can adjust some network settings for your TrueConf Server instance:
connecting client applications and third-party devices (SIP, H.323, etc.)
sending email notifications for users and administrator
connecting to other TrueConf Server instances.
# Network Settings
In this section you can specify IP addresses and ports which will be used by TrueConf client applications to connect to TrueConf Server. IP address of the computer where TrueConf Server is installed is used by default.
Client applications always connect to TrueConf Server over the only TCP port (4307is used by default). It is the only port used for signalling, sending authentification data and audio or video streams. An HTTPS port (443 selected by default) is used for displaying the scheduler, accessing real-time meeting management and for API calls. To learn more about this topic, check out the article in our knowledge base.
You can specify a different port when editing the list of IP addresses.
No UDP port can be used for communication between TrueConf Server and a client application.
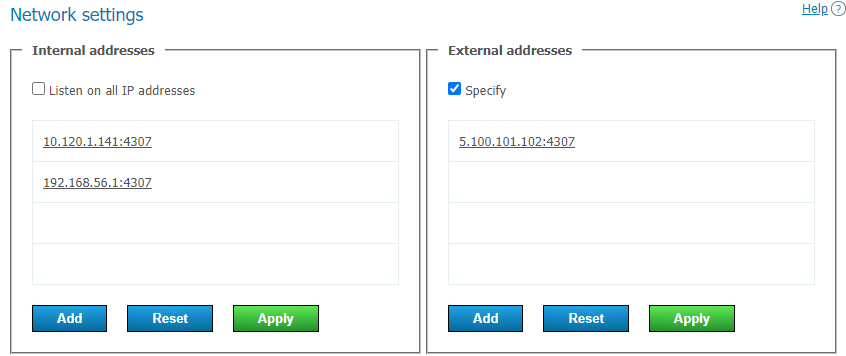
The Internal addresses list includes the addresses and ports that the server listens for incoming connections from client applications. These are the addresses of network interfaces on the computer where TrueConf Server is installed. It can also be the internal DNS name of this computer; this name will be resolved to one of the network interfaces by IP. If the Listen on all IP addresses box is checked (it is checked by default), the list is automatically compiled; it will include all such addresses including virtual ones.
To edit the Internal addresses list, you will need to:
Uncheck the Listen on all IP addresses box.
To change the parameters for the specific connection, just click on the line with the selected address.
Use the buttons at the end of the list to add a new address and to save or discard changes.
The addresses from the External addresses list will be encrypted and embedded into the name of TrueConf for Windows installer. These addresses will be used when the application is started for the first time. Client applications downloaded from your TrueConf Server instance will try to connect to these addresses on a first-priority basis (if these addresses are unavailable, the application will try to connect to internal addresses). So, you should include the addresses that will be available to the users both inside and outside the corporate network. This list may include the addresses forwarding to internal addresses, IP address of your NAT, DNS name or the addresses where you are planning to migrate TrueConf Server (this is usually done so that the applications that were downloaded previously could connect to the server via a new IP address). If the server is designed to operate in LAN only, you don't need to use this list.
To edit the External addresses list, mark the Specify checkbox.
If you plan to migrate the server to another IP address, all you need to do is to add the new IP address to the External addresses list beforehand. This will help client apps to store the new address right after the next connection to the server in advance.
When the external address is adopted, go to the Web → Settings section section in the control panel and change the external address of the web page to a public IP (indicated in the External addresses list). Then restart the server so that external users can connect to it from outside.
This guide does not cover TCP port forwarding or DNS names. You can learn more about these topics in your network equipment manuals.
# SMTP
Although TrueConf Server doesn't have a built-in mail server, it can use an external SMTP server or service to deliver email notifications, invitations and other important messages to your users. You can change the templates used for these messages in this section as well.
To configure an SMTP connection:

Specify the host (the address of the mail server).
Select a secure connection type: SSL, STARTTLS, or none.
Specify the port for your connection type if it is not default.
Select authentication mode (simple password or no authorization). If you have chosen password-protected authentication mode, please enter login and password to connect your TrueConf Server instance to the SMTP server.
Fill in the email address fields (full mailbox address, including login, @ and domain) and sender's name in the SMTP From field. In this case, the address should match the login and host specified above.
Check your settings using the Check connection button. The current status of your connection to the mail server is displayed in the Status: field: successfully connected in case of successful connection to the SMTP server and invalid server if the connection can not be established.
Enter your TrueConf Server administrator email to be displayed in the outgoing emails. Enable the checkbox below the input field so that the administrator is notified when TrueConf Server restarts due to internal errors.
Click Apply at the bottom of the page to save changes.
# Email template settings
Below the parameters for connecting to an SMTP server, you can set the templates for different email notifications.
To restore default templates for all emails, click the Set default button in the User mails section. In this case, the language of the templates will match the language selected in the preferences by the current administrator.
# Notifications about missed calls
To receive missed call notifications, enable the Notify users about missed calls checkbox. If any of the users is offline during the call or conference invitation, TrueConf Server will send an email notification at the email address specified in the E-mail field in the user account settings or in the corresponding field imported via LDAP synchronization.
# Conference invitations
To enable email invitations for all new scheduled conferences, enable the Send invitations to participants of the group conference checkbox. In this case, when scheduling a meeting, all invited users will receive email invitations where date and time of the meeting (if any) is specified.
You can enable or disable email invitations for each meeting individually in the Advanced tab when creating or editing the conference.
# Reminders about the upcoming conference
You can send automatic reminders about upcoming events. In this case all participants added to a scheduled conference will receive an email reminder before the start of this meeting. The reminder template can be set below in the Reminder about upcoming conference section.
In the Reminders list one can select when email reminders should be sent to participants. If the box is checked, but no option is selected in the list, the administrator or owner can manually select the period when scheduling a meeting. If a period has already been selected, for example, 1 day and 5 minutes before the meeting, email reminders will be sent according to the existing settings if a conference is created.
If the administrator checks the box Send users reminders about upcoming conference and selects a period in the Reminders section, automatic reminders with the specified time periods will be added for the scheduled conferences that were initially created without reminders.
# Confirmations of registration for a public conference
To send confirmations of a successful webinar registration (available if corresponding settings have been adjusted), use the Conference registration notification template.
# Notifications about removal from a conference
To notify users when they are removed from the list of invited participants, mark the Notify users if they are removed from the participant list checkbox. These settings will be applied to all conference modes. If registration settings have been configured for the webinar, the notification will be received by the participants who signed up for the webinar and those users who were invited to the list of participants when the conference was created.
# Parameters used in email templates
Use the following syntactic structures to customize the templates of emails sent by TrueConf Server:
For notifying users about missed calls:
%caller_display_name— display name of the caller%сaller_call_id— ID of the user who made the call (e.g.user@server.trueconf.name)%recipient_display_name— display name of the caller (the user who missed the call)%missed_call_time— time and date of the call.
additional variables for missed call notifications sent to unregistered users:
%recipient_call_id` is the ID of a user who missed the call.
“%tcs_guest_page_url” is the guest page URL of your TrueConf Server.
For inviting to a conference:
%conf_name— name of the conference%conf_id— ID of the conference, e.g.\c\df0a2adebe%owner_name— display name of the conference owner%user_display_name— display name of the user who is invited to the conference%start_timeis the time and date of the conference start. The time corresponds to the server time zone which will be specified in the email. Participants should take into account time zone differences to join the conference at the correct time.%conf_description— conference description specified in the Advanced → Description section when the conference is being created.%conf_url— the link to the conference page, e.g.,:https://example.com/c/CID
For notifications about webinar registration:
%conf_unique_link— the unique conference link provided to each participant.
Server administrator contacts parameters:
%admin_name— display name%admin_email— email address%admin_phone— phone number.
# Federation
With federation mode, your users can call and invite to conferences users of other TrueConf Server instances. Federation is available only in the TrueConf Server standard version (i.e. for every paid license). The number of federated servers is unlimited. The maximum number of participants in a group video conference is limited to the license of the TrueConf Server instance initiating the meeting.

The federation has to be configured for both servers so that they could be accessible to each other according to the rules specified below. To configure federation, you will need to:
In the drop-down list, select the federation mode:
- Disabled
Allowed for whitelisted servers. In this mode, only TrueConf Server instances specified in the whitelist can be federated
Allowed for all but blacklisted servers. In this mode, all TrueConf Server instances can be federated except for those specified in the blacklist.
2. Enter the IP addresses or domain names (FQDNs) of the required servers into one of the lists (depending on the federation mode) and click Add.
IP addresses do not have to be specified for federation; only DNS (FQDN) names are needed. Besides, the masks containing an asterisk * are supported, for example, *.example.com, v*.example.com, example.*, *.example.*.
3. To configure federation with TrueConf Online cloud service, please make sure that the outbound 4308 port is open. For more information about the outbound ports used in our solutions, take a look at the table in the corresponding article from our knowledge base.
4. Click Apply to restart your TrueConf Server instance and save the changes.
To be able to operate in federation, your TrueConf Server instance should be available to other servers and client applications by its DNS (FQDN) name indicated during the registration process. The server should be registered either under an existing DNS name or a server address using SRV DNS records.
If you would like to learn more, proceed to the client application automatic settings section.
Let us take a look at some examples.
Case 1
By adding trueconf.com to the whitelist, you can allow your server users to call and receive calls from TrueConf Online cloud video conferencing service users (only those whose TrueConf ID has the following format: id@trueconf.com). The federation on the side of TrueConf Online has been configured with an empty black list. So, the users of the cloud video conferencing server can receive calls from any TrueConf Server instance.
Case 2
To configure federation with a different TrueConf Server instance, e.g., videoserver.company.com, you will need to:
Add
videoserver.company.comto the white listActivate federation on the side of
videoserver.company.comin one of the following ways:Add the domain name of your server to the its white list
Allow federation with all the servers that have not been added to the black list (make sure that your server is not added to the black list).
3. Make sure that both servers and TrueConf client applications connected to these servers are accessible to each other via their domain names.
Case 3
If the videoserver.company.com server was added to the black list, the users from your server and all the users with id@videoserver.company.com ID will not be able to make calls to each other.
Connection to a conference in federation mode
Connection to a conference (including the cases when federation is used) is fully described in the "Conference page" section.
# Gateways
TrueConf Server has a built-in gateway for SIP 2.0, H.323, and RTSP protocols interoperability.
With its help you can:
- Configure integration of TrueConf Server and Asterisk
- Configure integration of TrueConf Server and Cisco UCM via SIP
Register TrueConf Server on an external H.323 gatekeeper by adding the required configuration.
Built-in gateway is necessary only if you need to call the devices connected to a third-party server (e.g. H.323 gatekeeper, PBX, MCU). Otherwise you can use the call string for SIP 2.0/H.323 devices.
TrueConf Server can process tone dialing signals; so, you will be able to send the following DTMF commands from your SIP/H.323 endpoint in “smart meeting” mode:
1– request to take the podium.2– to leave the podium.
To do this, use the supplied remote control or keypad. For more details, read the manuals for your specific device.
In our knowledge base, we discussed the use of Polycom HDX series endpoints together with TrueConf Server, including sending DTMF commands from them.
# Sip gateway
This section helps to configure TrueConf Server built-in SIP 2.0 gateway parameters. The number of rules created using these settings is unlimited.
TrueConf Server Free version provides only one active connection through the gateway, including SIP 2.0, H.323 and RTSP protocols.
Calling up devices via SIP gateway requires specific call string formats.
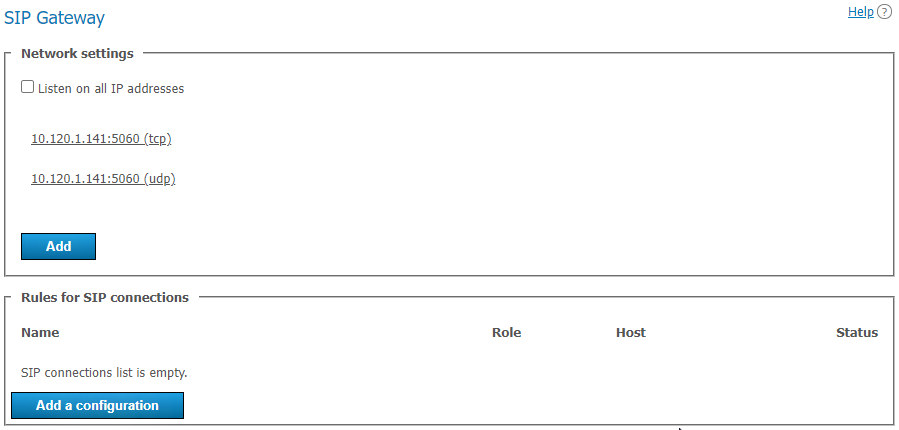
# Network settings
This list contains the addresses that are used by the gateway to listen for incoming SIP 2.0 connections. By default the list is prefilled with IP addresses provided by your operating system. You can edit this list by unchecking Listen on all IP addresses checkbox.
# Rules for SIP connections
In this section you can create specific rules for certain SIP addresses or call directions. For example, you can use special set of settings to connect to Skype for bussiness servers and another one for PBX connectivity. Every rule is relevant only for target address specified in Host field. Every rule redefines global settings for SIP 2.0 connections.
Gateway can also authenticate on and maintain active connection with SIP devices for which the rules have been created. This option can be useful to maintain permanent connection with PBX or VoIP services. You can find the connection status in the rules for SIP Connections table.
To create a new rule, click Add a configuration and select one of the two possible templates: manual configuration or Skype for bussiness connection. Skype for bussiness template has some preselected features required for Skype for bussiness interoperability, e.g. port, protocol, used video codec and registration mode.
# New rule form
Name field is only displayed in the table for rules. Host and Port fields are more important and also mandatory. They are required to determine call direction applied to this rule. If you are using an SIP proxy server, enter its IP address or domain name in the corresponding field. If the port for connecting to the proxy is different from the 5060 default port, enter the required port after the address and separate it with a colon. Please note that it isn't possible to set different rules for one host but different ports.
In the External NAT IP address field, you can specify the server IP address which will be specified in SDP for receiving and sending media streams when calling users behind NAT.
The Outgoing SIP domain for callback to TrueConf Server field is used to generate an SIP URI for outgoing calls to SIP devices. It is generated in the format user@server, where server is the IP address or FQDN value and user is the ID of the user who made the call. It is usually displayed as a caller address on SIP devices. Possible values are as follows:
Do not specify — in this case, the address will include only TrueConf ID.
Use server public name — the server external address will be used (this address is specified in the Web → Settings section).
Use other domain — the required domain has to be specified in the input field.
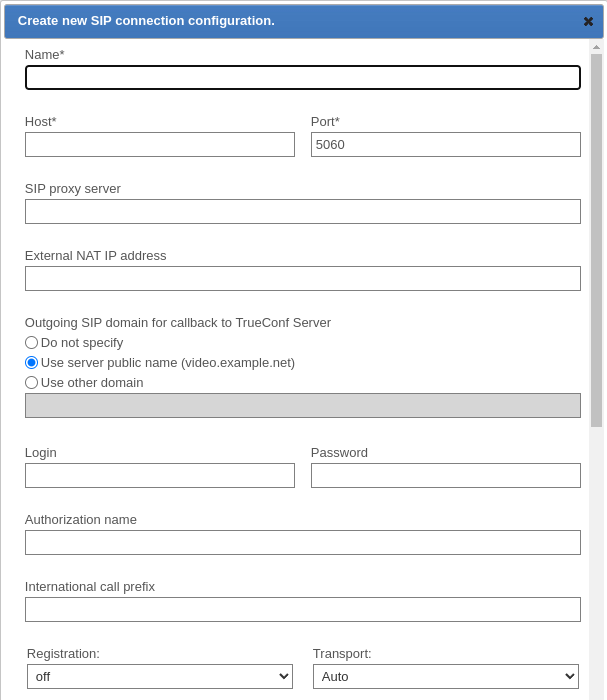
The following block of fields is designed to authorize on an SIP device for which the rule is created. If the Authorization name is the same as login, you may leave this field blank. You can use International call prefix to replace the '+' symbol used in phone numbers with another value, e.g. '810'. If you leave this field blank, '+' symbol will not be replaced in the phone numbers your users are calling to.
Registration mode defines registration method for the rule:
off — REGISTER request is not sent, registration or authorization on the external SIP device is not performed.
permanent — registration is performed automatically when TrueConf Server starts.
before call — registration is performed before every call and is kept active only during the call.
You can manually specify the connection protocol (TCP, UDP or TLS) if necessary.
Please note that each active gateway connection reserves one SIP 2.0/H.323 connection from TrueConf Server license.
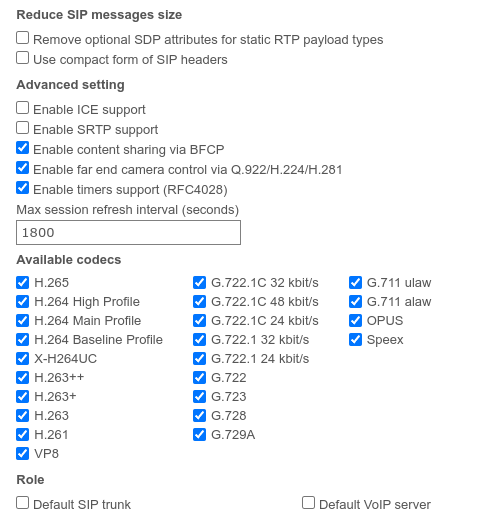
If you want to reduce SIP packets and headers and prevent potential issues that can be caused by exceeding maximum allowed packet size (MTU), you can use options in the Reduce SIP messages size block.
Enable ICE support (Interactive Connectivity Establishment) checkbox makes TrueConf Server gateway available behind NAT.
Enable SRTP support checkbox is used to encrypt media data sent in this direction. For some SIP devices encryption is mandatory (e.g. for Skype for bussiness servers).
Enable content sharing via BFCP checkbox will allow you to send and receive content from SIP devices as a second video stream. For example, it can be used to share desktop from the PC connected to SIP endpoint, or send slides back from TrueConf applications to SIP endpoints.
When you share content as a second stream from your SIP or H.323 device, the content is transmitted with a reduced frame rate to save traffic. If you need to transmit the second stream content at a higher frame rate, please contact our technical support to switch to the appropriate mode.
Enable far end camera control via Q.922/H.224/H.281 checkbox enables support for far end camera control of SIP endpoints from TrueConf client applications.
Please note that this parameter has the same name in the SIP and H.323 gateway configuration menus, however, these are two different checkboxes responsible for different permissions.
Enable timers support (RFC4028) is used for disconnecting SIP endpoint from the conference when the connection is lost.
You can manually specify Max session refresh interval (seconds) (1800 seconds by default).
The list of Available codecs displays the codecs which gateway is allowed to use in this direction. Disabling some of the codecs can solve compatibility issues with certain SIP devices. For more details please contact our technical support team.
SIP device for which the rule is created can take special roles:
Default SIP trunk. This role allows users to avoid entering full SIP URI for calls with
#sip:prefix. For example, all calls in the#sip:Endpointformat will be automatically replaced with#sip:Endpoint@Host, whereHostis taken from the properties of this rule andEndpointis a username specified during the call.Default VoIP server. This role is required for treating an SIP device as a VoIP server or a PBX and activating the dialers built in TrueConf client applications. All the calls made from application dialers or with the help of
#tel:prefix will be automatically forwarded to this SIP endpoint. For example,#tel:Phonewill be automatically replaced with#sip:Phone@Host, whereHostparameter is automatically taken from the properties of this rule andPhoneis replaced with the phone number entered by user.
Please note that each of these roles can be assigned only for one SIP 2.0/H.323 connection rule.
# Skype for Business integration configuration
This integration is designed to work with Skype for bussiness 2015 Server or Lync 2013 Server on-premises deployments and cannot be used for their cloud versions.
To connect successfully, you will need to receive a trusted root certificate from the Skype for bussiness administrator and install it in the system where TrueConf Server is installed.
Create a new account on Skype for bussiness server for TrueConf Server gateway.
Use Skype for bussiness template to create a new rule for SIP connections. Enter username and password of this freshly created account in the appropriate fields.
Enter Skype for bussiness server IP address or domain name in the Host field.
Check Default SIP proxy checkbox.
Save the rule and check if the connection status has changed to successful in the table for rules. Please note that TrueConf Server service must be running.
To call Skype for bussiness users from TrueConf client applications, use the following format: #sip:User, where User is TrueConf username. This user will receive an incoming call from the TrueConf Server account. The same method is used to invite Skype for bussiness users into the conference or add them to address book.
To call TrueConf users from Skype for bussiness client application, send the following message to the user created for TrueConf Server authentication: /call <TrueConf_ID>, where <TrueConf_ID> is any valid TrueConf Server user ID including SIP / H.323 devices registered on TrueConf Server. You can use /conf command to create a multipoint conference, etc. After the message has been sent, TrueConf Server will Skype for bussiness user and connect him/her to a TrueConf user or a conference. If you try to call this user directly, the call will be rejected and you will receive a help message with a list of available commands in chat. However, if default call destination is set in global SIP settings, you will be connected to this default destination address.
Please note that you can also create a group conference on TrueConf Server and invite into the conference the endpoints connected via any protocols the gateway supports. For example Skype for bussiness users and various SIP/H.323 devices or RTSP IP cameras.
# Global SIP settings section
Settings in this section automatically apply for all SIP 2.0 connections for which there are no rules.
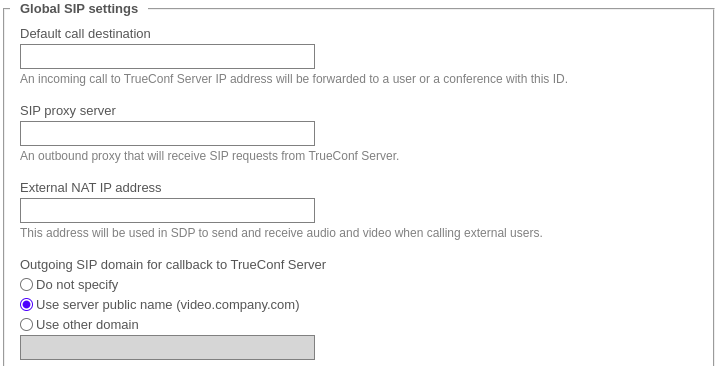
- Default call destination. When calling any address listed in the Network settings via SIP 2.0 protocol, all calls will be forwarded to this user ID or conference ID (CID).
Other settings are similar to those used to create connection rules.
# Invitation of the SIP endpoint to the conference on TrueConf Server
There are multiple ways of inviting a SIP endpoint into a conference: the conference owner can call a SIP endpoint using a specifically formatted call strings from TrueConf client application. Alternatively, administrator can do it from TrueConf Server control panel.
To add an SIP endpoint to the conference via control panel you need to:
Select a conference in Group conferences list.
Add SIP endpoint as a participant of the conference if it's not started yet, or invite in case it's already running. Use a call string to address the SIP endpoint.
# How to join a conference with its CID (conference ID) from an SIP endpoint
To connect to a conference from the endpoint registered on TrueConf Server, enter CID (Conference ID) into the endpoint address field. Please note that you need to replace \c\ in CID with 00 (two zeroes) when calling from external endpoints. In our case, you need to enter 00e22a39ba2a@<server> if CID is equal to \c\e22a39ba2a.
To connect to the conference from the endpoint unregistered on TrueConf Server, use the following format:
CID@<server>:<port>
where:
CIDis a conference ID with two leading zeroes instead\c<server>is an IP address of TrueConf Server gateway e.g.,00e22a39ba2a@192.168.1.99<port>— connection port (in case it is different from the standard 5060 port).
Additionally, in the case of SIP it is possible to specify the protocol name explicitly (UDP is used by default):
CID@<server>:<port>;transport=<protocol>
For example, 00e22a39ba2a@192.168.1.99:5061;transport=TCP.
You can also find an instruction on how to connect to a conference held on TrueConf Server from an SIP endpoint on the conference web page.
# H.323 gateway
This section explains how to configure built-in gateway parameters for H.323 connections. The number of rules for H.323 connections created using this section of control panel is unlimited.
TrueConf Server Free version provides only one active connection through the gateway, including SIP, H.323 and RTSP protocols.
H.323 connections are generally used to call third-party video conferencing endpoints. With TrueConf Server you can also set up H.323 integration with MCU, H.323 gatekeeper and PBX, which can be useful for addressing endpoints and users registered on these devices via H323-ID or E.164 without specifying IP address of the endpoint in the call string. To call an endpoint via H.323 gateway, there is a special call string format.
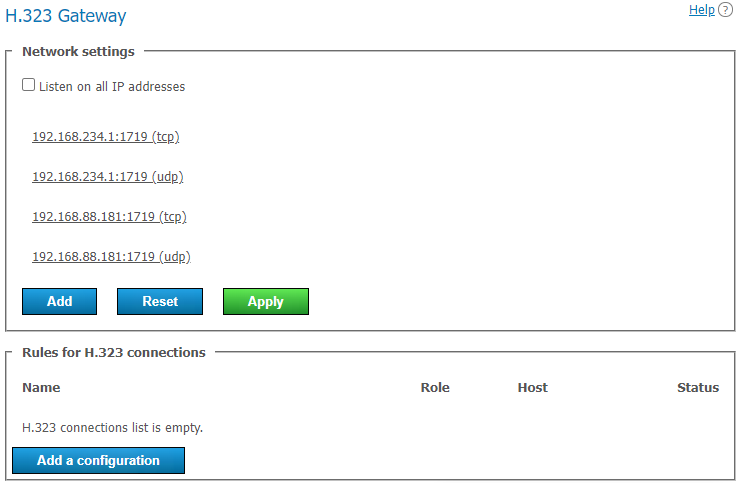
# Network settings
This section includes the list of addresses listened by the gateway for incoming H.323 connections. By default the list is prefilled with IP addresses provided by your operating system. You can edit this list by unchecking Listen on all IP addresses checkbox. The list of ports used for H.323 connections is available in our blog.
# Rules for H.323 connections
Here you can create specific rules for certain H.323 devices or call directions. Each rule is relevant only for specific destination address indicated in the Host field and redefines global settings for H.323 connections.
The gateway can also register on H.323 devices and maintain an active connection, which might be useful when connecting to an MCU or H.323 gatekeeper. The status for such connection is displayed in the rules table. To create a new rule, click Add a configuration button.
# New rule form
Name field value is used only to distinguish one rule from another. Host and Port fields are also mandatory. They are required to determine call direction to which this rule will be applied. Please note that it isn't possible to create different rules for one host but for different ports on it.
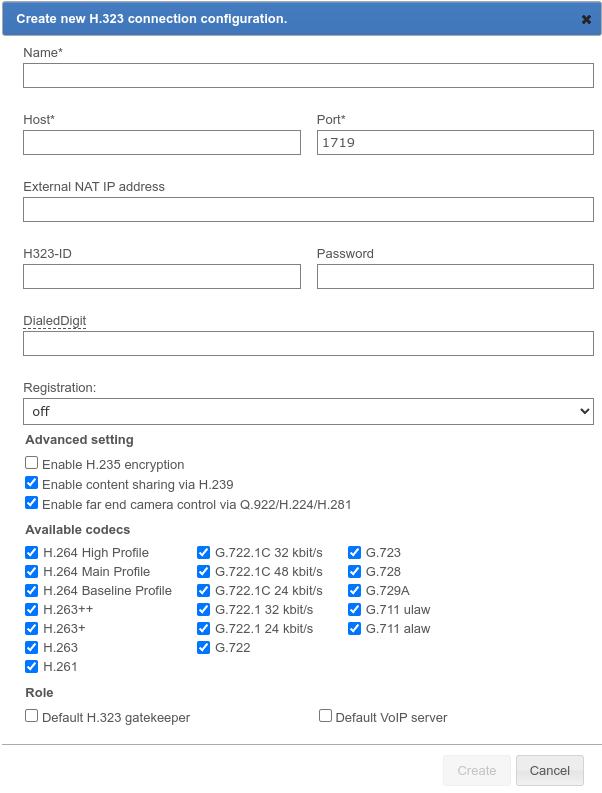
In the External NAT IP address field, you can specify the server IP address which will be specified in SDP for receiving and sending media streams when calling users behind NAT.
H323-ID and Password fields can be provided to authorize on H.323 device for which the rule is created. To maintain permanent connection with this device, you’ll need to select necessary item in the Registration drop-down list.
Once successfully registered on the H.323 device, TrueConf Server can be reached via phone number in the E.164 format provided it has been specified in the DialedDigit field. This setting can be useful if bundled with Default call destination option in the global H.323 settings section. In this case all calls to the specified DialedDigit number outcoming from the connected H.323 device will be redirected to a specific user ID or conference ID on TrueConf Server side.
Please note that each active gateway connection reserves one SIP/H.323 connection from TrueConf Server license.
Enable H.235 encryption checkbox enables encryption of the media streams sent to H.323 devices according to ITU-T H.235 version 3 recommendations. It is required for proper interoperability with some endpoints.
Enable content sharing via H.239 checkbox allows to send and receive content from H.323 devices as an additional video stream. For example, it can be used to share desktop from the PC connected to H.323 endpoint or to send content from TrueConf applications in the opposite direction.
When you share content as a second stream from your SIP or H.323 device, the content is transmitted with a reduced frame rate to save traffic. If you need to transmit the second stream content at a higher frame rate, please contact our technical support to switch to the appropriate mode.
Enable far end camera control via Q.922/H.224/H.281 checkbox enables support for far end camera control of H.323 endpoints via **Q.922, H.224 and H.281** protocols from TrueConf client applications.
Please note that this parameter has the same name in the SIP and H.323 gateway configuration menus, however, these are two different checkboxes responsible for different permissions.
The list of Available codecs displays the codecs which gateway is allowed to use in this direction. Disabling some of the codecs can solve compatibility issues with certain H.323 devices.
H.323 device for which the rule is created can take special roles:
Default H.323 gatekeeper. This role allows users to avoid entering full address of the H.323 device using
#h323:prefix. For example, all calls in any direction in the#h323:Endpointformat will be automatically replaced with#h323:Endpoint@Host, whereHostis taken from the properties of this rule andEndpointis a username specified during the call.Default VoIP server. This role is required for treating an H.323 device as a VoIP server or a PBX and activating the dialers built in TrueConf client applications. All the calls made from application dialers or with the help of
#tel:prefix will be automatically directed to this H.323 endpoint. For example,#tel:Phonewill be automatically replaced with#h323:Phone@Host, whereHostparameter is automatically taken from the properties of this rule andPhoneis replaced with the phone number entered by user.
Please note that each of these roles can be assigned only for one H.323 rule.
# Global H.323 settings
Most of the settings in this section are identical to the settings described above. However, they automatically apply for all H.323 connections for which there are no rules.
Use Default call destination field to enter TrueConf ID or conference ID (CID) which will receive all incoming calls over H.323 protocol in cases where destination user ID wasn't specified.
# How to call TrueConf users and conferences from H.323 devices
Depending on the H.323 endpoint model there are two different methods to call TrueConf Server users and conferences: using SIP URI or hashes (##) notation. Please try both to find the one suitable for your H.323 equipment. The call strings provided below should be entered as a string or number to call in the endpoint’s interface. TrueConf Server IP address mentioned below could be an any address specified in H.323 network settings section:
Server##User, whereServeris TrueConf Server IP address andUseris ID of the user or device registered on TrueConf ServerServer##00CID, whereServeris the IP address of TrueConf Server whileCIDis the ID of a conference hosted on TrueConf ServerUser@Server, whereUseris ID of the user or device registered on TrueConf Server andServeris TrueConf Server IP address\c\CID@Server, whereCIDis ID of the conference on TrueConf Server andServeris TrueConf Server IP address00CID@Server, where first two characters are zeroes,CIDis ID of the conference on TrueConf Server andServeris TrueConf Server IP address.
Call formats for H.323 and their examples are fully described in the user guide.
# How to register H.323 devices on TrueConf Server
TrueConf Server can act as a gatekeeper or MCU for third-party H.323 devices and simplify their addressing. From the TrueConf Server user perspective an H.323 device registered on the server does not differ from any other user: you can see its status, call it from the address book or invite to the conference without using call strings notation. Similarly, calls using H323-ID names from a registered H.323 device interface will be interpreted by the server as a call to specific TrueConf ID to entered H323-ID.
Registering an H.323 device on TrueConf Server is similar for most endpoints available on the market. Basically, to do so, you will need to specify TrueConf Server address as a gatekeeper or MCU address and use username and password of any TrueConf Server account to authenticate.
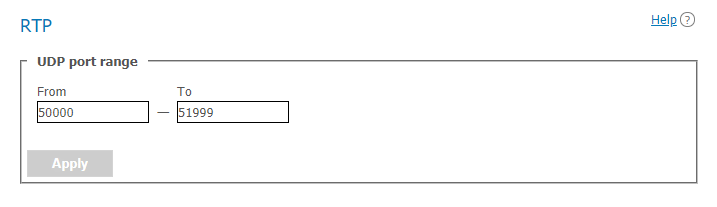
# RTP
In the Gateways → RTP section, you can configure the UDP port range used to exchange media data for SIP/H.323 calls (50000-51999 by default).
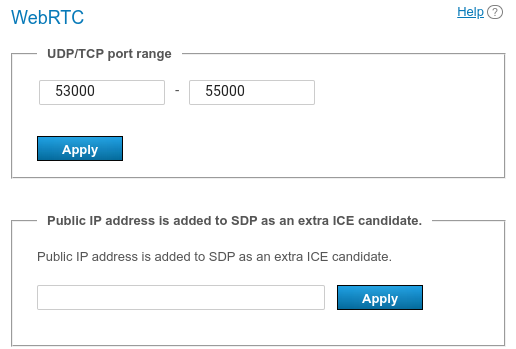
# WebRTC
In this section you can configure the UDP or TCP port range for a WebRTC connection (53000-55000 by default).
You can also specify the IP address used for NAT traversal if automatic detection fails for some reason in the Public IP address is added to SDP as an extra ICE candidate field in the TrueConf Server control panel.
# Transcoding
This section enables you to set up video conferencing quality for WebRTC users (in browsers), H.323/SIP/RTSP devices and recording fixation.
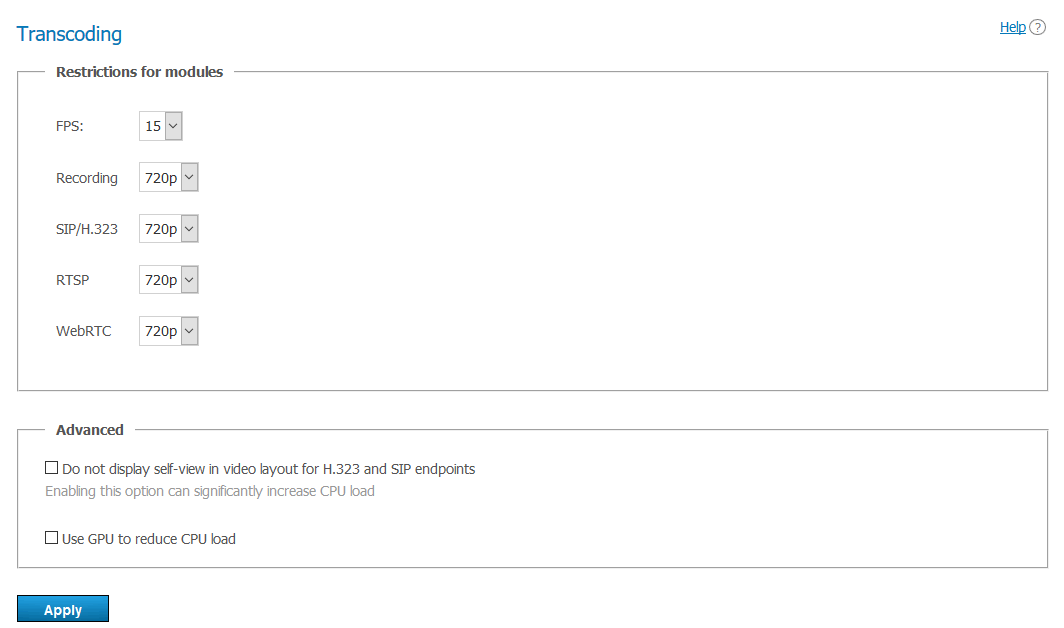
Cheking the box Do not display self-view in video layout for H.323 and SIP endpoints allows displaying the conference layout for SIP and H.323 devices without the self-view window. In other words, an individual layout will be created for an SIP/H.323 participant with no video from the camera connected to the endpoint.
This setting can significantly increase the load on the CPU of the physical machine with TrueConf Server installed.
When the box Use GPU to reduce CPU load is checked, video conferences will be processed by the GPU of the physical machine with TrueConf Server installed.
# Web
In this section, you can find settings for your guest page and control panel access.
# Web Settings
To change the guest page URL and its appearance, you can use the following options:

The TrueConf Server address which is used to generate links to the server guest page and conference pages. Make sure that it is available to all users of your TrueConf Server instance. In case of an unstandardized port (different from HTTP
80or HTTPS443), type it with a colon in the address field, e.g.,https://video.server.com:4433. Besides, if HTTPS is used, make sure to specify this protocol in the server address.A link to the guest page which contains instructions on how to connect new users to TrueConf Server.
Your company's name which will be displayed on the guest page.
Server administrator contact details which are published on the guest page and web conference pages.
Upload a logo to be displayed on the guest page and conference webpages.
If some users in your organization install MS Outlook web plugin from your TrueConf Server (check the “Mail plugins” section) and the external address of the server is changed, they will need to delete the plugin and reinstall it. This issue can be explained by the fact that the external address is specified in the xml file of the plugin downloaded from the server.
You can add your custom documents in the Personal data processing block:
Cookie Policy
Privacy Policy
Terms of Use
Document links will be displayed at the bottom of your TrueConf Server guest page and conference webpages.
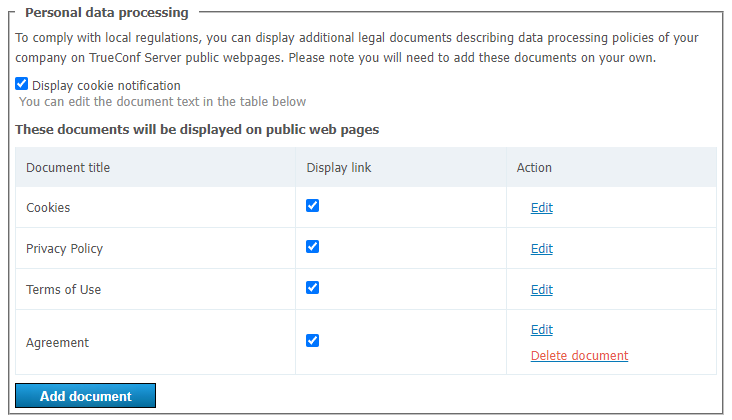
To add or edit rules:
Choose a document you would like to edit and click Edit to change the title and content of your document. The Cookie Policy already contains default text; however, you can also change it.
Check the Display link box.
Check the Display cookie notification box if you want to display a pop-up notification with a link to the cookie policy for each new visitor of your TrueConf Server guest page or public conference webpages.
If you want to display an additional document or agreement (up to 2 additional documents and up to 5 documents in total), click Add document. Do not forget to check the Display link box to display your document on the TrueConf Server public webpages.
Click Delete document to remove documents from the list. Please note that you cannot remove default documents, but you can hide them on your TrueConf Server public webpages by unchecking the Display link box.
You can also add extra information or a manual for your guest page visitors, which will be displayed once you click on the Help button at the bottom of the page. Please note that Help is optional and it does not replace the default manual that opens by clicking on the User guide button.
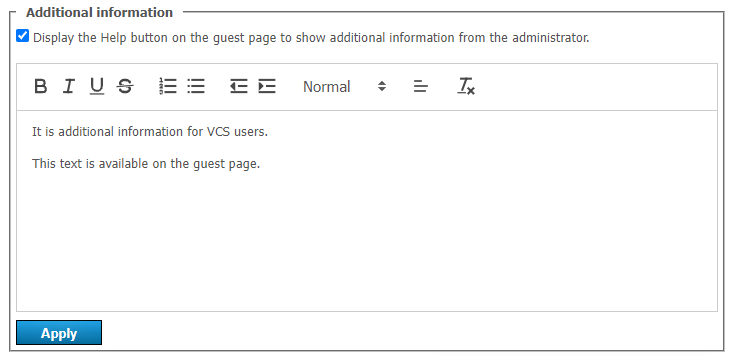
To display additional information:
Check the Display the Help button box.
Enter your information in the field below.
Press Apply.
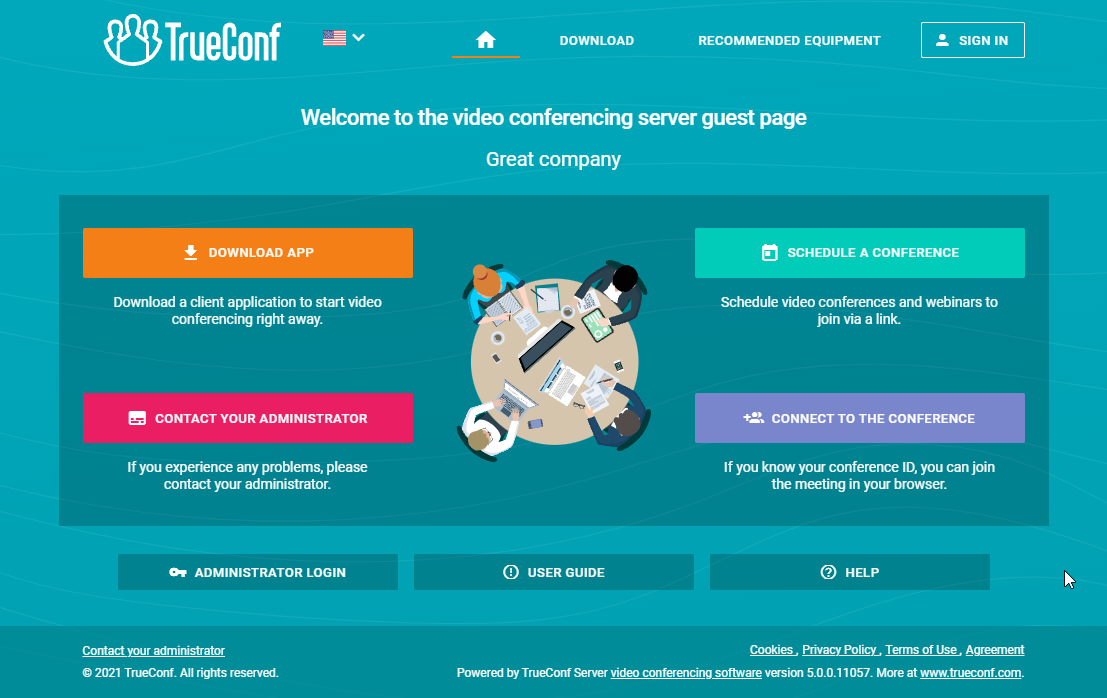
Below you can see an example of a guest page with three default documents, one additional document and a custom Help button:
# Security
In this section you can set up access to your TrueConf Server control panel and TrueConf Server API.
Read more about TrueConf Server admin roles on different operating systems in the TrueConf Server installation and initial setup section.
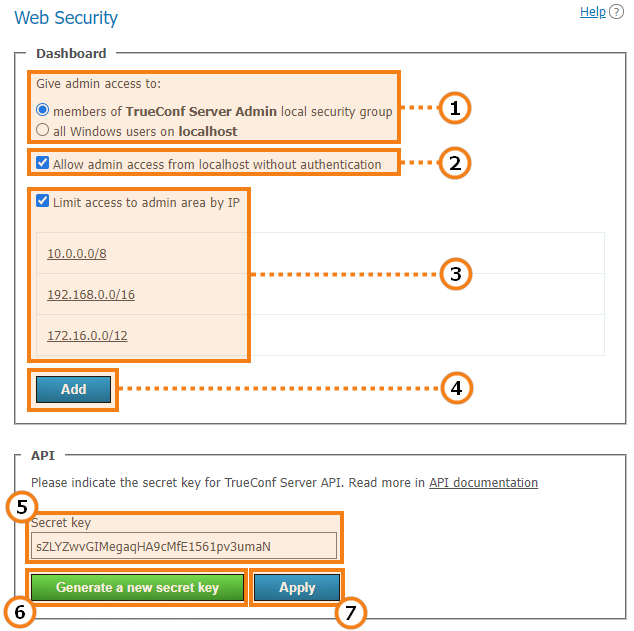
Select the users of your operating system who will be granted access to your TrueConf Server control panel.
If this option is enabled (it is enabled by default), the control panel can be accessed without authorization from the computer on which your TrueConf Server instance is installed (browser’s host is
localhostor127.0.0.1). Uncheck the box if you require all admins to authorize.
Please make sure that you have a user account that is a member of TrueConf Server Admin group (for Windows) and tcadmins (for Linux) on the computer where your TrueConf Server instance is installed. Otherwise, you will not be able to authorize and access the TrueConf Server control panel after you’ve saved the changes. If you’ve still faced this issue, please reinstall TrueConf Server or contact our technical support department.
3. Check this box to make sure that your server is available for control only to the IP addresses specified in the list. In such a case the Administrator login button will be displayed only if the guest page is opened from the IP address added to this list. If the guest page is opened from the IP address which is not included in the specified ranges, the button for administrator login will be hidden.
4. Press this button to add a subnetwork with access to the control panel. Add the address in the Network address field (admissible symbols are numbers and dots, admissible format is 4 octets in decimal representation without initial noughts from 0 to 255, separated by dots, e.g. 192.168.11.10). To open a drop-down list in Subnet mask field click the arrow on the right side and choose the appropriate option. 32 - 255.255.255.255 mask is set by default.
5. Secret security key for accessing API of your TrueConf Server.
With a secret key, you can access APIs with no time limits or verifications until the key is changed. This is why we recommend that you use the secret key only for testing purposes or for TrueConf Server admin with privileges that cannot be specified when creating an OAuth application (e.g., viewing logs). For regular operation, please use OAuth2 technology.
6. Click to generate a new secret key. Reverting to the previous key or using your own is not possible.
7. Click to apply the changes.
# HTTPS
In this control panel section you can configure the safety data transfer parameters between your browser and TrueConf Server.
A secure connection with your TrueConf Server instance is necessary for capturing media devices using WebRTC technology in all modern browsers. Thus, users won’t be able to join your meeting from their browsers if you haven’t enabled HTTPS connection.
HTTPS is also required for users connected to your TrueConf Server instance from their client applications. Without it, they won’t be able to access and use conference scheduler, show slides and manage meetings in real time.
TrueConf strongly recommends that you should configure HTTPS even if you are not intending to use TrueConf Server for holding public conferences and connecting participants via a browser (via WebRTC). Using HTTPS is one of the best practices for web services and helps to enhance the security of video communication.
After configuring HTTPS, you need to update the external address of your server in the Web → Settings section and make sure that it starts with https. For example: https://video.company.com.
# HTTPS configuration
In this section you can select your certificate and set other HTTPS parameters. The web server applies HTTPS settings at startup. If invalid certificate port and parameters are entered, the web server will not start and administrator will lose access to the control panel. Therefore it is required to carefully check the parameters beforehand.
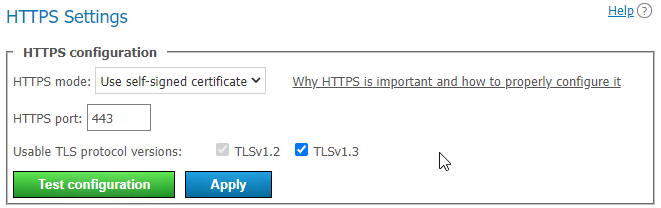
Select one of the three operating modes in the HTTPS mode dropdown list:
Disable HTTPS. HTTPS protocol will not be used.
Use self-signed certificate. This mode uses a certificate automatically obtained from the server (this certificate is not suitable for connecting external users via WebRTC).
Use custom certificate. This mode uses a certificate uploaded by the TrueConf Server administrator.
2. Specify the TCP port that the web server will use for HTTPS connections (use numbers) in the HTTPS port: port field. Port 443 is set by default.
Set the versions of the TLS protocol that your TrueConf Server instance will use for HTTPS operation.
4. Click the Test configuration button to verify the HTTPS configuration data without restarting the web server. This action does not change the configuration file of the web server.
5. Click Apply to save the web server configuration file with the specified parameters. You will see a dialog box notifying you that this action will automatically lead to your TrueConf Server instance restart.
# Self-signed and custom certificates
There are two certificate types available in TrueConf Server. If you are using a trusted certificate, no additional actions are required, as browsers trust certificate authorities who signed it. To configure an uploaded certificate, the server administrator requires an X.509 certificate and the correct private key.
As an alternative you can also use a self-signed certificate:
a self-signed certificate is valid for 365 days and can be generated from control panel
this certificate can be renewed for unlimited period of time
with a self-signed certificate, you can test WebRTC without purchasing a trusted certificate
# Self-signed certificate
If you have previously created a self-signed certificate, here you can find the basic parameters of the root certificate, Create a new SSL certificate button, as well as the certificate to be used by the web server and TrueConf Server:
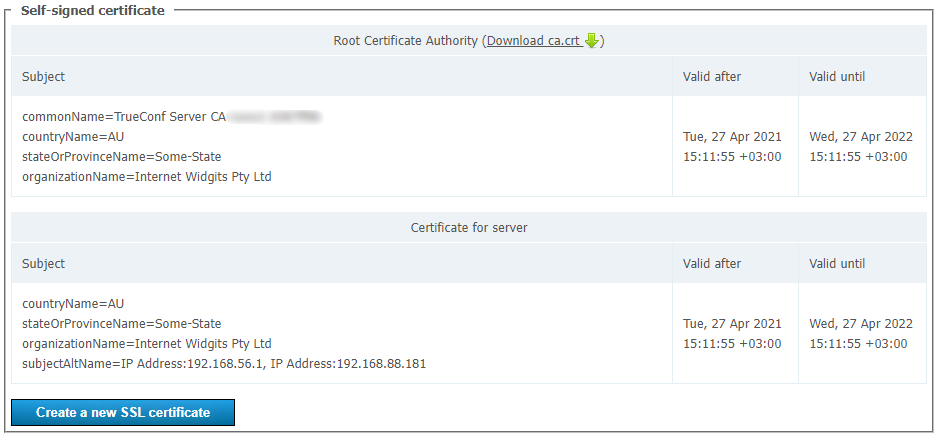
To create a new self-signed certificate, press Create a new SSL certificate. You may use this option to renew your certificate for 365 days or to update information about your company in the certificate (if your company’s name has changed). Administrator can download a root certificate file for sharing among client devices via the link Download ca.crt.
# Custom certificate
If the certificate is uploaded, this section will contain the basic certificate’s parameters. If it's not, you will find the buttons for uploading the certificate:
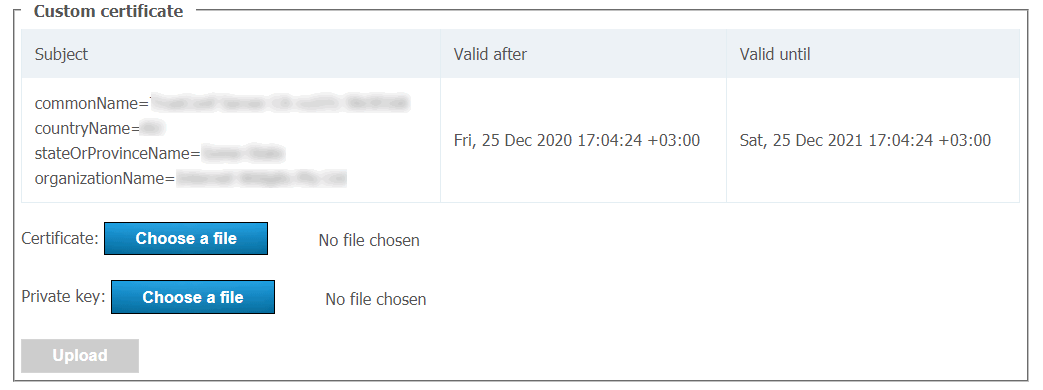
Use the Choose a file button to select the certificate and key files. Then click Upload.
The certificate format, key format and key correspondence to certificate are checked during download. Should just one check fail, the certificate and key files will not be not saved.
Read how to convert an existing commercial certificate to a format supported by the TrueConf Server in our knowledge base.
# Users
# User Accounts
In the User Accounts section you can add new user accounts, as well as edit and remote existing user accounts.
In TrueConf Server Free the number of user accounts is restricted. To learn more, go to the web page of this solution.
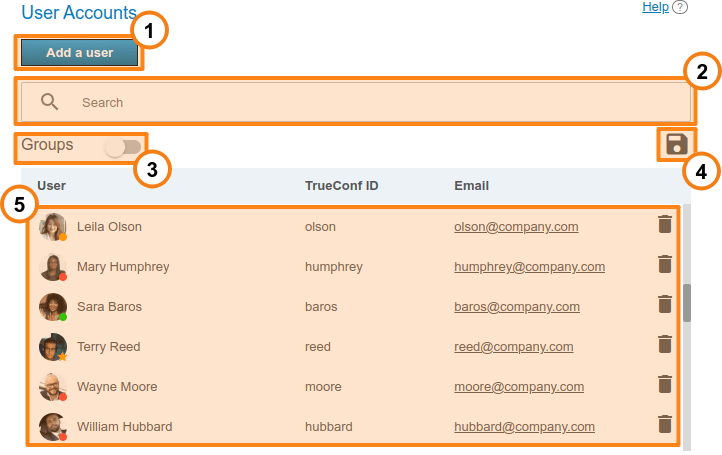
Add a new user.
Search users by TrueConf ID, first name, last name, display name, or email.
View user groups available on your TrueConf Server instance.
Export the list of users to a CSV file for later import to the address book of TrueConf Group (can be done in the Maintenance section of the endpoint control panel ). This button is available only in the Registry mode. The CSV file will saved in the UTF-8 encoding and ";" will be used as a separator which means that the preference settings will be ignored.
The list of the users registered on your TrueConf Server instance. At the bottom of each user's avatar, user status is displayed:
 — the user is online
 — the user is offline
 — the user is in a conference or in a call
 — the user is the owner in the conference
 — the user account is deactivated by the administrator (check the Status section in the profile).
Read how to connect users from outside your network to your TrueConf Server instance in our knowledge base.
In order to change user information, click on the username. To remove a user, click on the  button.
You cannot edit user details in LDAP mode. User data entry form is available only in Registry mode.
# User profile
Click on any user account in any control panel section to proceed to edit mode:
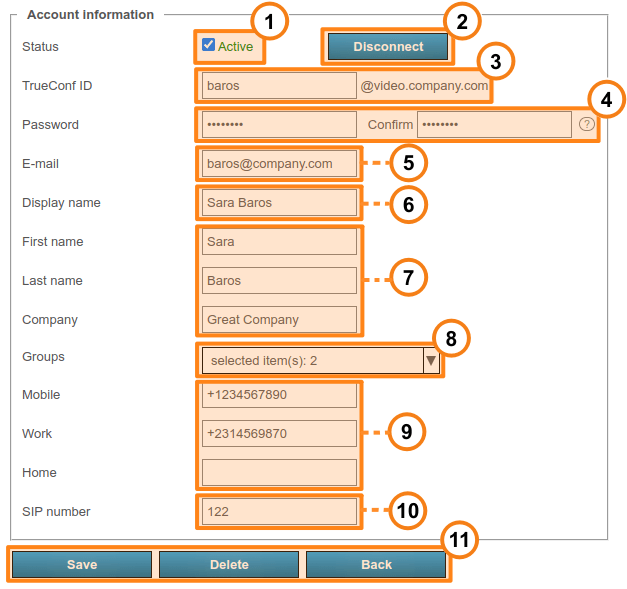
Switch user to an "active" or "inactive" state. If the state is inactive, the user account still exists, but this user will be unable to authorize on the server. Such users will be displayed semi-transparent in the general list and will have a gray status.
Forcefully disconnect all user’s client applications from your TrueConf Server instance. You may use this option to allow another user to connect to your server when the maximum number of connections in your license has been reached.
TrueConf ID is a unique user identifier. It can be used for authorizing in client applications and making calls and conferences. Username is a part of your TrueConf ID displayed before the “@” symbol. It may consist of Latin characters, numbers, underscores, hyphens and dots. The server name displayed after the username (
@servernext to the input field) is required for calling a user of another TrueConf Server instance. The username is set when creating a user account and cannot be changed afterwards.Enter the user's password. After creating or editing an account, you cannot see the password you’ve set. However, you can always change the password. To check password requirements, click on the
 button which is next to the password confirmation field.
User’s email address. You can set automatic email notifications to this address via SMTP server connected to your TrueConf Server instance.
The name you have entered will be displayed in the address book of other users. This field, as well as the username indicated at step 3, is prefilled. However, the field value can be changed.
User’s personal details. These fields are not required.
User groups. Click the arrow icon to view existing groups on your TrueConf Server instance. To add a user to one or more groups, check the box on the left of each group name.
If necessary, you can enter the user’s phone numbers. One can call any of these numbers by clicking on it in the user profile section of TrueConf client application.
If SIP telephony is used, you can enter a number for making SIP calls in this field. Then, the corresponding field will be displayed in the user profile in TrueConf client application. When a user clicks on this number, the call will be started in the format
#sip:<number>and the number can specified as<number>,sip:<number>, or#sip:<number>.Save changes, delete account, or return to the list of users.
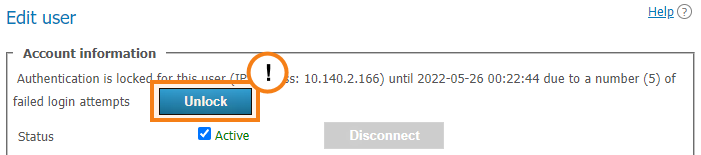
If a user has entered an incorrect password multiple times in a row (the exact number will be specified in the Users → Settings section), the authorizatin via the web application will be locked for 24 hours. You can enable the access to the application manually by clicking the Unlock button on the user profile page:
# Calls and conferences
If you are editing the user account created previously, you will see the Calls and conferences section where you can find the links for accessing:
Call history of the selected user
The general list of scheduled conferences and virtual rooms created on this server and filtered by this user. It will include only those meetings where this user is one of the participants.

The call history will include all user sessions in one-on-one calls and conferences:
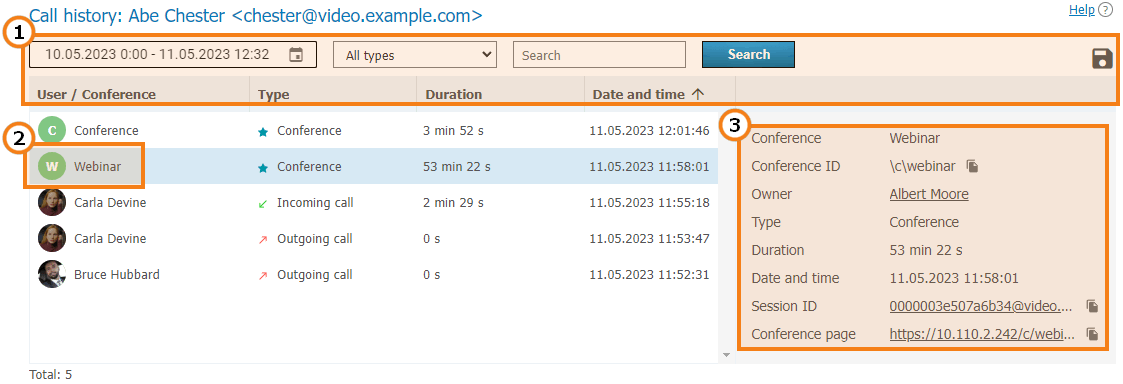
The general UI for working with the table (check the description below). The events can be filtered by one of these types:
All types (selected by default)
- Incoming call
- Outgoing call
- Missed call
Conference.
2. To view full information, select session (communication session) in the list on the left, Recurring conferences and virtual rooms may have multiple sessions depending on the number of times these conferences were started.
3. When selecting a session linked to the specific conference, you will see the following information in the card on the right:
Conference name and ID
The owner’s display name
Current session duration
Session start and end time
Link to the detailed information about the session in the Call history section
Link to the web page of a conference linked to the session. It will not be available for the meetings created ad hoc in TrueConf client applications.
# Application settings
On the page where a user account is either edited or created, the administrator can set special parameters that will be activated in the client application when a user authorizes on the server. These parameters can determine the restrictions for incoming and outgoing bitrate and can be found in the Application settings section.
If such settings have not been configured, group settings (if any) are applied to the user (the member of the group). User group settings are displayed next to the user settings field. They are displayed for preview only and cannot be changed. If a user is a member of multiple groups, the scope of the user rights will be defined by the group with fewer rights.
User application settings have higher priority than group settings: if you put user restrictions lower than group restrictions, user restrictions will be applied.
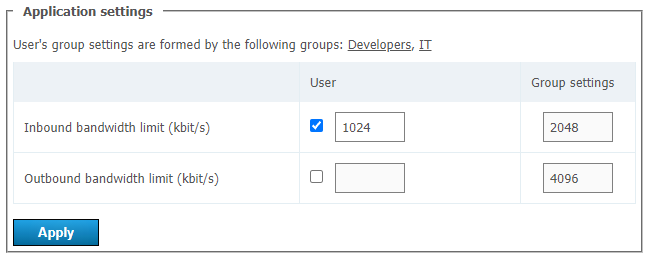
Users can independently change bitrate settings in their client applications. But the server settings will have the highest priority.
# User address book
At the bottom of the page you can find the address book and edit buttons. The address book contains all the users who are located in the address books of the user groups where the user belongs.
You can add individual entries to the list, which will be displayed only to the user being edited. Please note that you can add not only TrueConf Server users, but any call string, such as conference ID, SIP/H.323 or RTSP in the address book. Subsequently, you can delete them using the button. The user can delete them in the address book of the client application or in the personal area.
If address book editing is allowed at the group level, a user will be able to add contacts and organize them into groups in the client applications. Such groups are displayed only for the current user and are not included in the list of groups displayed in the control panel. However, the contacts added by the user will be displayed in the address book for his/her account in the control panel and the administrator will be able to edit this list.
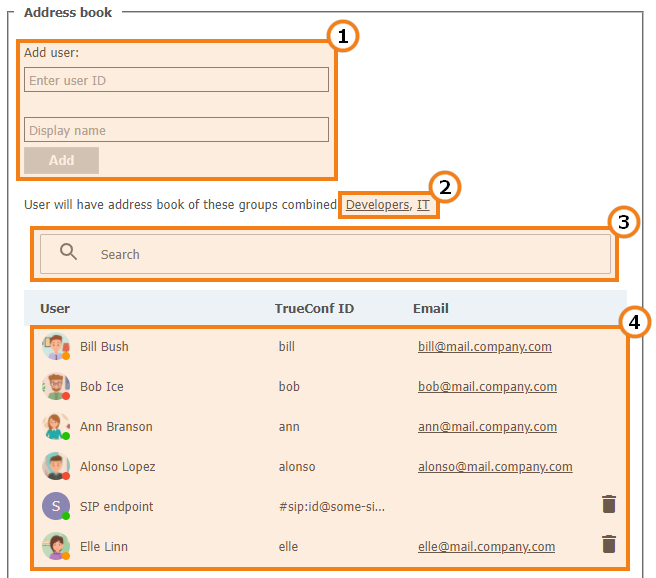
Add a user to the address book. To add a user, start typing the username or display name. From the drop-down list, select the user that matches your search (if the user is registered on your TrueConf Server instance).
The list of groups that the user belongs to, as well as the address books which are included in the user’s contact list and cannot be removed.
Search for users.
The list of users displayed in the address book. Click on the user registered on your TrueConf Server instance to edit their profile.
# Groups
In Groups tab you can create, rename, edit and delete groups. You can also add or remove users from the group, set up their address book and configure individual settings for the users of any group.
By default, the list includes the following groups:
Users without group — this group automatically includes the users who were not explicitly added to any group when their account was set or in this section as it will be described below.
Federated users — the users who make calls to the users or conferences on your TrueConf Server instance from a federated server.
Guest users — the guests who joined your public conferences (webinars).
It is impossible to rename or delete the default groups.
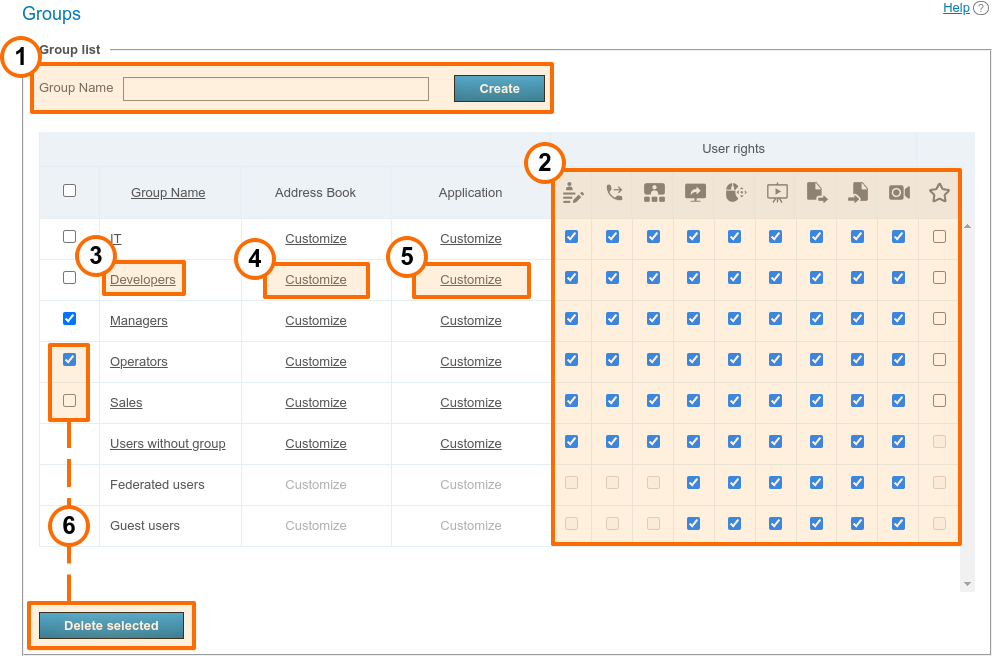
To add a new group, enter its name and press Create.
At the group level you can allow or forbid the following features:
Editing address book. By checking this field, administrator allows users to change users display names of the users, delete/add users and perform any other changes in the group’s address book. If the box is not checked, group users will not be able to perform the actions mentioned above. In this case, all changes are performed by administrator in TrueConf Server control panel and extend to all address books of the users from this group.
Making point-to-point video calls. However, users can still receive incoming calls.
Creating group conferences.
Sharing the screen and application windows
Ability to permit the remote control of one’s desktop
Slideshows
Sending files in both private and group chats
Downloading files in chats. If a user does not have this right, instead of a file, he/she will see the notification indicating that this feature is unavailable.
Conference recording in the client application. This feature does not affect the ability to activate video recording when creating a conference in the application scheduler or personal area.
Operator rights. Operator right enables a group participant to become a moderator and have access to the real-time meeting management tool of any conference he or she joins.
These settings allow you to distinguish between different server users.
3. Edit the name of the group and its members.
4. Set up address book for group members.
5. Adjust bandwidth settings for group members.
6. To delete one or more groups, check corresponding boxes and click Delete selected. Accounts of the group members will not be deleted from your TrueConf Server instance.
You can find the examples of user group settings in the article in our knowledge base:
how to create a group in the Registry mode and add it in LDAP mode
how to configure the group address book and add SIP/H.323/RTSP endpoints and conferences to the address book.
# How the restrictions of rights work
If a user is a member of two groups: the permissive settings will override restrictive ones. For example, the user account is included in such groups as IT and DevOps. If the members of the IT group are allowed to show slides, the user will be allowed to show slides even if this feature is not permitted for the members of the DevOps group.
The persons who make a call to the users of your TrueConf Server via federation, will have the rights specified on your side (for the group Federated users) and on the side of their own server. For example, if you have disabled file sharing for federated users, they will not be able to send files when participating in the conferences hosted on your server, even if this right was given to them on their own TrueConf Server. Similarly, the federated user will be unable to send files if you have allowed this feature for federated users; but this right is denied to the group of this user on the side of his/her video conferencing server.
# Editing group's name and its members
Click on the group name from the list to access the User Accounts page. Here you can rename the group and edit the list of members using the corresponding buttons:
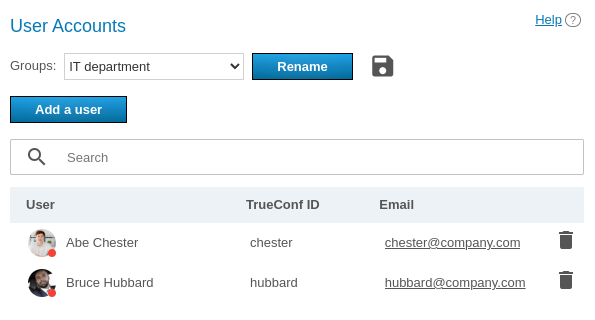
Click the Add a user button to complete the list. Select the users you want to add to the chosen group in the window. After that they will be marked with a checkmark. After all users have been selected, click Save:

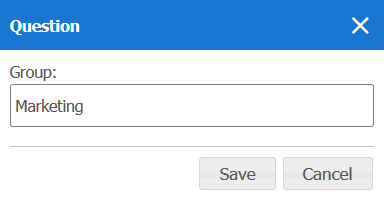
Click Rename to change the group name. Enter the new name and press Save (or press Cancel if you want to close the window without changing the settings):
You can also click the  button to export the user list of a specific group to a CSV file for subsequent import into the TrueConf Group address book.
# Setting up address book for users of the group
In the Address Book column of each group, click Customize. Click on it to edit the address book of this group. Group members can also add new contacts to the address book if they have a corresponding right (to enable it, please check Address Book Editing box).
You can add all users belonging to another group at once to the group’s address book (i. e. to the address book of each of its members). To that end, use Define, which users will be shown in the address book of the users in the group. Please note that automatic addition of users to the address book and manual addition are applied independently of each other.
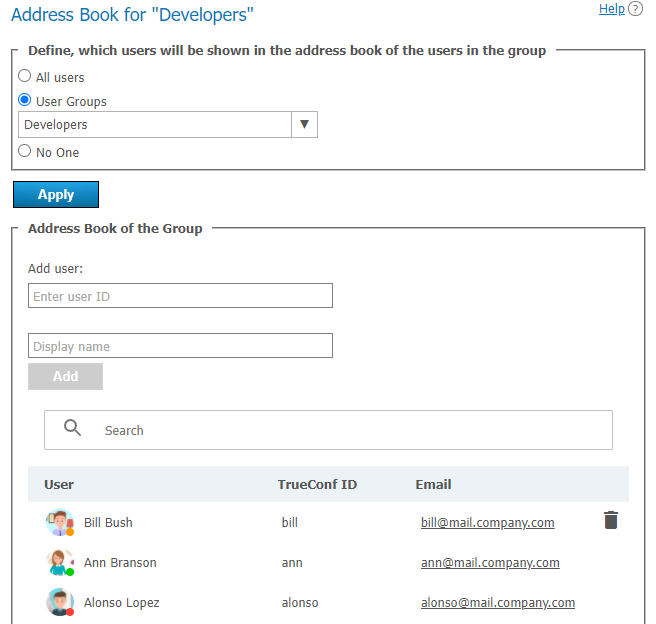
You can also manually add users of different types (this process is similar to adding users to the address book in the user's profile). However, group members cannot delete users themselves, because these contacts are added to the entire group and not to their personal address book.
Group members can search for other TrueConf Server users and add them to their list of contacts on their own (if you have enabled address book editing).
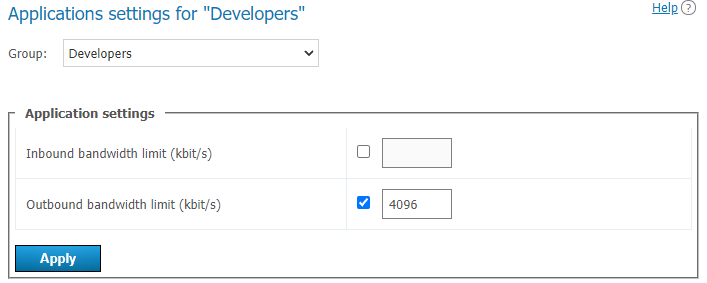
# Setting application settings for group users
Click Customize in Application column to set bandwidth limits for the group users.
# Aliases
# Description
Thanks to aliases, you can call TrueConf Server user or any other user who can be called via the server (e.g. SIP, H.323, RTSP or other server users) using a short alias without entering full call string. By adding an alias, you create an extra name for existing user. When calling an alias, your call is redirected to the existing user corresponding to this alias.
This option is very useful for those users who are making calls to TrueConf Server users from mobile devices using a dialer. You can create digital aliases for server users so that they can be called from mobile devices.
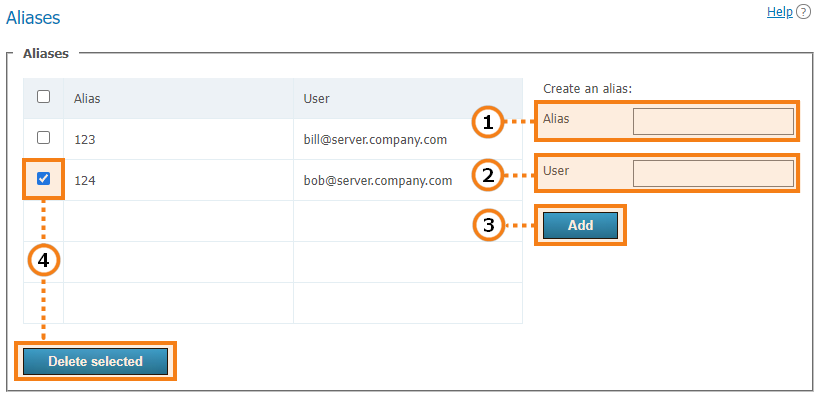
An alias may contain numbers and letters. The maximum number of characters is 32. You can update aliases only after restart you have restarted the server.
Call string (including username of the server user). The calls to the alias will be forwarded to this user.
Press the button to add a new alias to the list.
To delete one or more aliases, mark them and click Delete selected.
After adding or removing aliases, please restart your server to update the list of aliases.
# Use for federation
In federation mode aliases can be used to make calls just like TrueConf ID. An alias will be resolved on the server which is specified after @ in the full alias@server alias , e.g., 122@video.server.name.
We will now discuss two examples of using aliases on federated TrueConf Server instances, one.name and two.name.
Case 1
Each of TrueConf Server instances has its own aliases. We have created an alias 111 for the user userA from the one.name server.
To make a call to userA from the two.name server, the following string should be entered in the address line:
111@server where server is the DNS name or IP address of the one.name server.
Case 2
Create an alias 111 on the two.name server for the user userA from the one.name server. It will correspond to the following call format:
userA@server where server is the DNS name or IP address of the one.name server.
In this case the users from the two.name server will be able to call users from the one.name server without its IP or DNS name. They will just have to enter aliases in the address line of their client application. For example, they can use 111 which we have discussed before.
The second option is more transparent for users, but in this case, it will be more difficult to configure a convenient system of aliases.
# Authentication
In this section you can configure authentication options for the users of your TrueConf Server.
Authentication may occur in two different security zones: trusted (or Trusted network as it is called by default) and external (untrusted) (called Internet by default). They are included from the very beginning and cannot be deleted. However, one can configure them as it will be described below.
Everyone, who does not get into the trusted zone, will automatically be moved to the external zone. A user’s IP address will determine the zone to which this person will belong.

Security zones. To open the settings of the security zone, click on it.
Authentication methods specified for each zone.
Zone activation or deactivation. When a zone is deactivated, the users, who belong to this zone, will receive a notification that authorization is currently unavailable when they try to connect to your TrueConf Server. The users, who were connected previously, will be able to interact with the system up until the moment when the authorization token expires.
Configurable verification methods. If you click on Kerberos SSO and AD FS, a configuration pop-up will be displayed. There are no settings for Login and password and NTLM (Single Sign-On) options; they can be simply activated with switchers on the right.
The configuration and work status of each method.
Activation of authentication options.
To make sure that the authentication options Kerberos SSO, NTLM SSO and AD FS are available, activate the LDAP / Active Directory extension](../extensions/#ldap) for your license. Besides, it is necessary to select the corresponding mode of storing user accounts.
# Access zones settings
Click on the name of a trusted zone to open its settings:

Changing the zone name, e.g., to “Corporate network”.
The subnets of this zone. If you click on any entry, you will see a window when one can edit the address or masks of the subnet. Here, you can also delete the subnet.
Adding a new subnet.
Selection of authentication methods.
Don’t forget to save changes.
You can specify the name of the external zone and configure authentication methods for it.
# SSO and AD FS settings
When integrated with an LDAP server, SSO (Single sign-on) technology will enable the users of your TrueConf Server to authorize automatically after logging into the operating system and starting TrueConf client application. For this purpose, one can use one of the two protocols: Kerberos (opens new window) or NTLM (opens new window).
The machine where TrueConf Server is installed and the user’s computer should be added to the domain; otherwise SSO authentication will not work.
To activate NTLM you only need to enable this option in the State section; there are no additional settings.
To configure connection via Kerberos, click on the Kerberos SSO link in the Authentication methods section (on the Authentication page with the list of security zones):
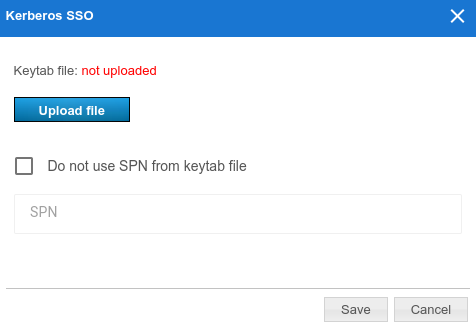
In the pop-up window, select:
The keytab file that will be used for authentication
If necessary, click on More and specify your own value for ServicePrincipalName (SPN) instead of the value saved in the file.
Active Directory Federation Services (AD FS) is the software component of Windows Server which acts as the authentication provider needed for accessing the resources outside the Active Directory corporate system, for example, it may be used for accessing web applications.
To configure integration with federation services, click on the AD FS link in the Authentication methods section and specify the required parameters:
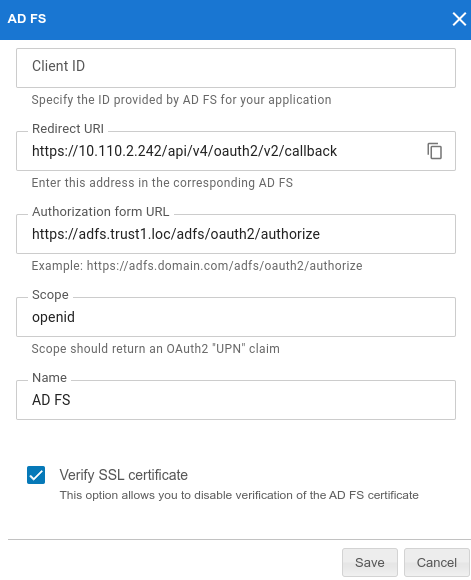
The identifier (Client ID) of the OAuth application which is configured on the side of AD FS for receiving the access token
URI on the side of used for receiving the response from AD FS; it also needs to be specified on the federation service.
If you click on More, you will be able to change the following parameters (if necessary):
Authorization form URL which has to be specified on the side of AD FS and used for receiving the access token for a TrueConf Server user during connection
Scope
The authorization provider name displayed in the list of authorization options on the page where access zones are configured and in TrueConf client applications when two-factor authorization is used
On the side of TrueConf Server, you can also disable the verification of the SSL certificate received from AD FS.
# LDAP / Active Directory
Switching between user data storage modes. TrueConf Server supports two types of data storage: Registry and LDAP. You can switch to any type by pressing Switch button:
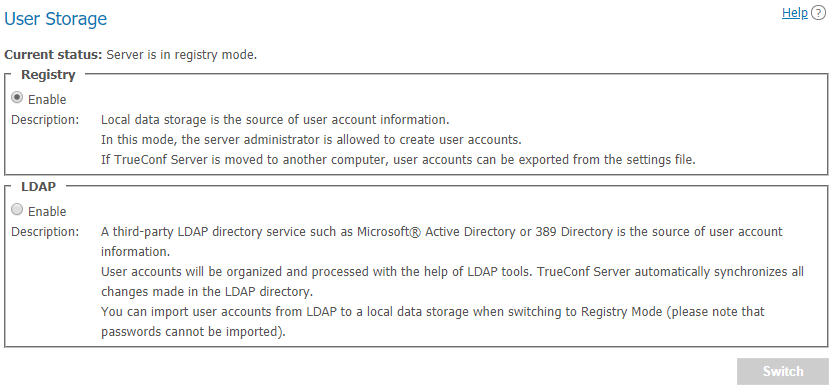
# Registry mode
Registry mode is used by default. In this mode, the server contains information about the users on the local server. You can add or remove users via control panel. If the server has been switched from Registry to LDAP data storage mode, existing user records will not be used anymore.
When switching to LDAP data storage mode, user records stored on the local computer will not be removed, so switching to another data storage mode will not damage saved information.
# LDAP mode
In this mode the server operates information about the users from removed or local LDAP directory. In LDAP mode you cannot edit user list and user group settings via control panel. By default, configuration settings for LDAP match Microsoft Active Directory. User information is edited using Active Directory management tools.
To learn more about the LDAP protocol and the Microsoft Active Directory service, read our website.
In LDAP mode, user rights correspond to the Active Directory group where users belong. To activate this mode, check LDAP → Enable and press LDAP settings button at the bottom. LDAP settings window will open:
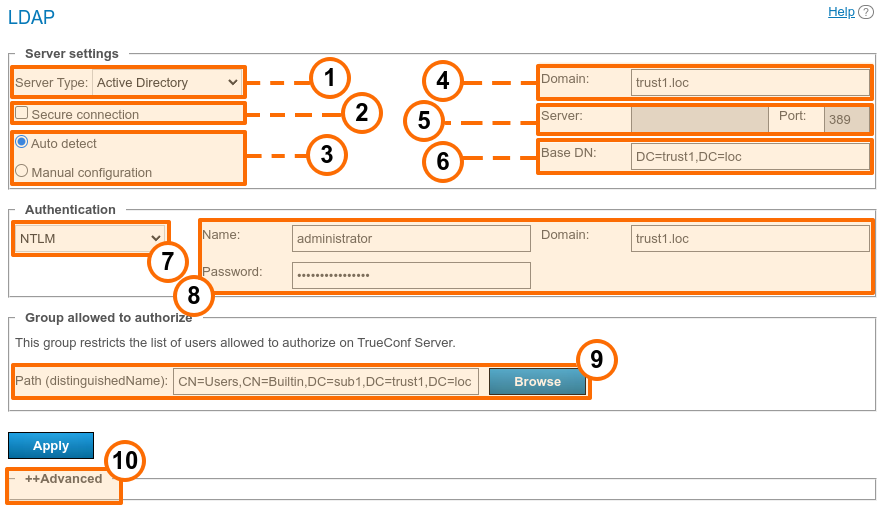
Server type, the following types are supported: Active Directory, OpenLDAP, 389 Directory Server. This will determine the default names of attributes that will be parsed by the server from the LDAP directory. It is also possible to select the Custom option if you want to specify the attribute name manually. When the server type is selected, open the Advanced section and click the Default button to switch to the attribute name that corresponds to this type of server. You will see that the attribute name in the Value column has changed. If necessary, you can specify the required values and then click the Apply button which is also in the Advanced section.
Connecting to the LDAP server in protected mode (via LDAPS protocol) to ensure secure transfer of user data over the network.
LDAP server settings configuration (automatic and manual).
In the automatic mode the LDAP server can be chosen among the servers by default of the DNS domain, specified in this field. Default servers are being chosen according to the relevant DNS-notes of SRV type. For Active Directory DNS domain name AD can be indicated here.
The address and port of the LDAP server when manual configuration is used. It is possible to use the global directory for connecting to the directory service. To do it, specify 3268 or *3269 as the connection port when working via LDAP and LDAPS respectively.
Base Distinguished Name is a directory object designed for searching users, e.g.
ou=People,dc=example,dc=com.TrueConf Server authorization modes on the LDAP server.
Authorization parameters on the LDAP server.
In this section, you can specify an LDAP group of users who will be allowed to authorize on TrueConf Server, for example,
cn=TC_Users,ou=People,dc=example,dc=com. It is possible to select a group by clicking on the Browse button. To enable this button, you need to fill out the fields required for connection to the LDAP server (in the Server settings and Authentication blocks) which will enable the Base DN field.Additional LDAP parameters. Allow to adjust the parameters to other types of LDAP servers.
When changing from LDAP mode to Registry mode it is possible to import user data. To do this, choose the Registry mode in the User storage tab, tick on Import User Information and click on Switch.
User passwords are not imported. After being imported the user accounts are inactive (see User accounts section).
In LDAP mode, only the digest password will be available for editing in the user profile. This digest password must be specified when registering an SIP/H.323 endpoint on TrueConf Server. The same password should be specified in the authorization settings for the endpoint:
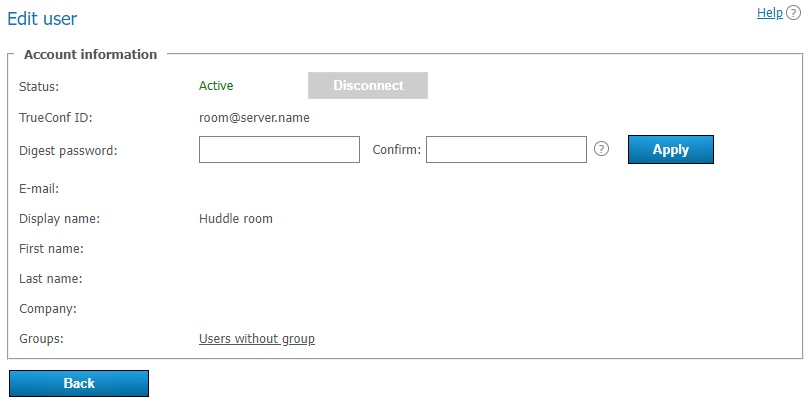
Directory of groups and users registered on TrueConf Server. This tab allows to create and manage the user’s groups. User Accounts tabs allows creating groups and managing rights. In the Registry mode a user can belong to one (or more) created groups. This parameter can be edited in the edit user information window. In the LDAP mode this window allows you to define rights for several LDAP groups. User attribute can be defined in the LDAP folder.
To import user groups from LDAP, open Users → Groups. Click the Change button and select corresponding groups in the drop-down list. Read more in our article on how to set up user groups.
When groups of users are imported from LDAP, the list will include only the groups that are included in it by default.
If you have several TrueConf Server instances connected to a common LDAP directory, users can log in to the personal area from a guest page of any of the connected servers. In addition, users can participate in private meetings hosted on a different TrueConf Server instance connected to a common LDAP directory using an auto-generated login.
# How to upload user accounts from different domains
Create a group with the area of application (range) Domain Local on the main domain to which TrueConf Server will be connected.
Move to this group the accounts of users (or user groups with the universal range; nested groups are supported only within a single forest) that you want to upload on the server.
Complete the steps 1 and 2 for all domains that will be used for uploading accounts.
Specify this group in the field Path (distinguishedName) in LDAP settings.
Make sure that the parameter Trust Enabled in LDAP settings is equal to 1 (default value) in the Advanced section.
# Certificate installation for LDAPS connection
To ensure connection via LDAPS, one may have to upload the root SSL certificate on the physical or virtual machine where TrueConf Server is deployed. This certificate should correspond to the domain where the domain controller server operates. To do it, copy the root SSL certificate of the domain to any directory on the machine with TrueConf Server.
Please note that the certificate has to be in the .crt format. So, if a different format is used, you will need to convert the certificate as it is described in this article.
Next, install the .crt certificate depending on your OS:
For Windows OS
Double-click on the certificate.
Click on the Install Certificate button in the certificate installation window.
Select Local Machine in the pop-up where the storage location has to be specified.
Select Place all certificates in the following storage and click Browse in the storage settings window that will be displayed next.
In the list of storages, select Trusted Root Certification Authorities and click OK.
To complete configuration, click the Next and Finish buttons.
На Debian:
- Run the following command in the terminal as the administrator:
cp /home/$USER/cert.crt /usr/local/share/ca-certificates && update-ca-certificates
where /home/$USER/cert.crt is the absolute path to the .crt certificate copied to the machine with TrueConf Server.
2. Please reboot the computer on which TrueConf Server is installed.
На CentOS:
- Run the following command in the terminal as the administrator:
cp /home/$USER/cert.crt /etc/pki/ca-trust/source/anchors/ && update-ca-trust
where /home/$USER/cert.crt is the absolute path to the .crt certificate copied to the machine with TrueConf Server.
2. Please reboot the computer on which TrueConf Server is installed.
# How to address typical issues when using LDAP
When LDAP is configured, some errors may occur while connecting to the directory service. In such cases, after you click on the Apply button which is in the connection parameters block, the corresponding notification will be displayed in the upper part of the screen. Below you can find some typical issues:
LDAP error 81 (Server Down)
No connection with the directory service. Most likely, TrueConf Server cannot access this service via the specified address and TCP port (389 for the standard connection and 636 for the secure connection via LDAPS). To test the connection, you can use the console application telnet (available on Windows and Linux):
telnet [ldap-server] [port]
where [ldap-server] is the address while [port] is the port of the server that acts as the domain controller. For example, if you need to test access via LDAPS, you need to run:
telnet ldap.example.com 636
If there is no connection, it is necessary to check the network equipment settings or network-to-network software. One should also make sure that the server acting as the domain controller has been started.
LDAP error 49 (Invalid Credentials)
Unable to authorize on the LDAP server. Make sure to provide the correct service account data used for connection to the directory service (go to LDAP settings, the Authentication section).
LDAP error -1
This error may occur when connecting to the directory service via the secure LDAPS connection. This problem may occur due to various reasons.
- It is necessary to make sure that the root SSL certificate of the domain, which includes the domain controller server, is uploaded on the physical or virtual machine where TrueConf Server is deployed. When the certificate is uploaded, you can test the connection with the openssl program: run the following command in a Windows or Linux terminal:
openssl s_client -connect [ldap-server]:[port]
where [ldap-server] is the address while [port] is the port of the server acting as the domain controller.
2. If TrueConf Server is deployed on Linux, and connection to Microsoft Active Directory has to be configured, make sure to specify the fully qualified domain name (FQDN) of the machine, where the domain controller server is deployed, in the Domain field. It should include the name of this machine, for example, server-name.ldap.example.com. In this case, FQDN should be used in the command testing SSL connection (check the previous step).
Connection has been established, but the list of accounts is empty
Make sure that the set of filters in the Advanced tab corresponds to the selected server type (Active Directory, OpenLDAP, 389 Directory Server). To switch to the corresponding attribute name after the server type is changed, click the Default button and configure required filters.
The users from the main domain are displayed, but the users from trusted domains are missing
Make sure that:
The Trust Enabled parameter equals 1 in the Advanced section, LDAP settings.
The account used for connecting to the domain controller server has the right to read the attribute member of from the container ForeignSecurityPrincipals.
# Password and account lockout settings
# Password requirements
When using the Registry mode, you can specify the minimum password length (from 2 to 64 characters) and specify other requirements (upper and lowercase characters, digits, special characters) for a TrueConf Server user. These parameters will be checked when adding a new user account or changing the password. These requirements will also be applied when a user will be editing the password in the personal area.
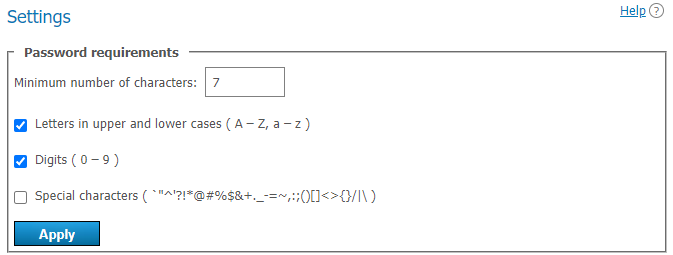
If the password does not meet the requirements, an error message will be displayed. Click on the ![]() button (which is next to the input field) to view the password requirements:
button (which is next to the input field) to view the password requirements:
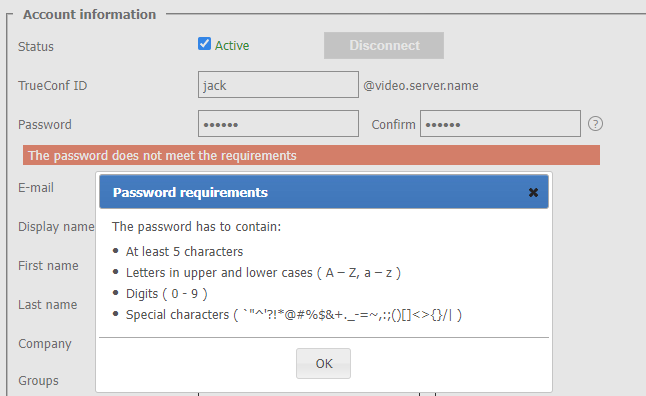
# Automatic lockout
In this section, you can enable the account lockout policy for those cases when a user enters an incorrect password during authorization.
Lockout settings are available both in [Registry]](#registry-mode) and LDAP modes. The lockout should be configured on the side of the video conferencing server; it is not related to AD/LDAP settings.
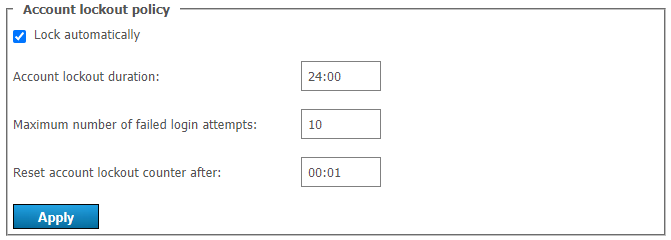
Here, you can specify:
account lockout period (a user can be manually unlocked at any time in his/her profile)
maximum number of failed login attempts
time interval between unsuccessful login attempts (if the interval is larger than the specified value, the counter for unsuccessful login attempts will be reset to zero).
Let us consider the following example. Here, we will use these settings:
Account lockout duration = 6:00 (6 hours);
Maximum number of failed login attempts = 5;
Reset account lockout counter after = 00:10 (10 minutes).
Then, if a user makes 5 unsuccessful authorization attempts with the login (TrueConf ID) existing on the server and the time difference between these attempts will be less than or equal to 10 minutes, the account will be locked for 6 hours.
# Group conferences
This section enables server administrators to schedule conferences, invite participants, and set other parameters.
Such conferences can be launched automatically (at a specified time or according to a schedule) or manually by server administrators.
In TrueConf Server Free the number of group conferences that can be held at the same time is restricted. To learn more, go to the web page of this solution.
# PDF file import settings
With TrueConf Server (both free and paid license), users can enjoy a number of collaboration tools: share screen or separate application windows, show slides, control desktops remotely, etc. However, you need to set up additional third-party software to display slides created from PDF files in TrueConf for Windows client applications.
The open-source Ghostscript library is used to create a slideshow from a PDF file in TrueConf for Windows. When a user imports a PDF file for the first time, this library will be automatically downloaded from your TrueConf Server instance and installed on the user's PC. However, you need to manually pre-configure the library on the server side because it is not incorporated into TrueConf software.
TrueConf client applications for Linux and macOS use system libraries for working with PDF files. The import of these files will be available when connecting to TrueConf Server for Linux and TrueConf Server for Windows. Please contact our technical support if you have any problems or additional questions about this feature.
# TrueConf Server for Windows
Please contact TrueConf technical support to request the archive with compiled Ghostscript libraries. The archive will include four files: gsdll86.lib, gsdll64.lib, gsdll86.dll, gsdll64.dll.
Create a
third_party_extensionsdirectory in the TrueConf Server working folder (C:\TrueConf\by default).Unpack the archive from step 1.
Open the registry (for example, by running the regedit command from your console).
Go to the registry branch
HKEY_LOCAL_MACHINE\SOFTWARE\TrueConf\Server\AppProperties
and create a string parameter pdflibrary_url with the value https://[server_address]/third-party-extensions/gsdll.dll, where [server_address] is the FQDN (domain name) or IP address of your TrueConf Server instance. This address will be used for connecting to the server from client applications.
6. Open the file [installation_path]\httpconf\opt\redirects.conf, where [installation_path] is the server installation path and add the following text starting from a new line (all other line should be commented out):
RewriteEngine On

Include opt/work_dir.conf
<IfDefine work_dir>
  RewriteCond  %{REQUEST_URI}  ^\/third-party-extensions\/gsdll.dll$
  RewriteCond  %{QUERY_STRING} ^(.+&)?(arch=x(64|86))(.+)?
  RewriteRule  ^(.*)$ "${work_dir}/third_party_extensions/gsdll%3.dll" [L,QSA]
</IfDefine>

<IfDefine work_dir>
    AliasMatch  ^/third-party-extensions/(.+).(.+) "${work_dir}/third_party_extensions/$1.$2"
</IfDefine>
7. Restart TrueConf Server and TrueConf Web Manager services from your Task Manager. TrueConf Web Manager service will not be affected if you restart TrueConf Server from the control panel.
# TrueConf Server for Linux
The commands listed below need to be executed with superuser privileges or using sudo (e.g., sudo command). Please note that sudo may be unavailable by default in your operating system. You can check its availability using the sudo -V command.
Please contact TrueConf technical support to request the archive with compiled Ghostscript libraries. The archive will include four files: gsdll86.lib, gsdll64.lib, gsdll86.dll, gsdll64.dll.
Create the redirect configuration file, e.g., with nano editor in the terminal:
nano /opt/trueconf/server/etc/webmanager/opt/redirects.conf
3. Write the following lines to the configuration file and save it:
RewriteEngine On
Include /opt/trueconf/server/etc/webmanager/opt/work_dir.conf
<IfDefine work_dir>
RewriteCond %{REQUEST_URI} ^\/third-party-extensions\/gsdll.dll$
RewriteCond %{QUERY_STRING} ^(.+&)?(arch=x(64|86))(.+)?
RewriteRule ^(.*)$ "${work_dir}/third_party_extensions/gsdll%3.dll" [L,QSA]
</IfDefine>
<IfDefine work_dir>
AliasMatch ^/third-party-extensions/(.+)\.(.+) "${work_dir}/third_party_extensions/$1.$2"
</IfDefine>
4. Add a parameter with a link for loading the necessary libraries in the application by running this command:
/opt/trueconf/server/bin/vcs/tc_regkey set "AppProperties" "pdflibrary_url" str "https://[server_address]/third-party-extensions/gsdll.dll"
where [server_address] is the FQDN (domain name) or IP address of TrueConf Server that will be used for connecting to the server from client applications.
5. Create a directory for libraries:
mkdir /opt/trueconf/server/var/lib/third_party_extensions
6. Unpack all files from the archive (received at Step 1) to the third_party_extensions directory.
7. Restart the web server services and the main TrueConf Server service:
systemctl restart trueconf-web

systemctl restart trueconf
# Conference list
This list includes the following events:
events created by administrator in this section of the TrueConf Server control panel
events added by users in the application or personal area
active conferences created ad hoc in the client applications (they will disappear from the list when they end).
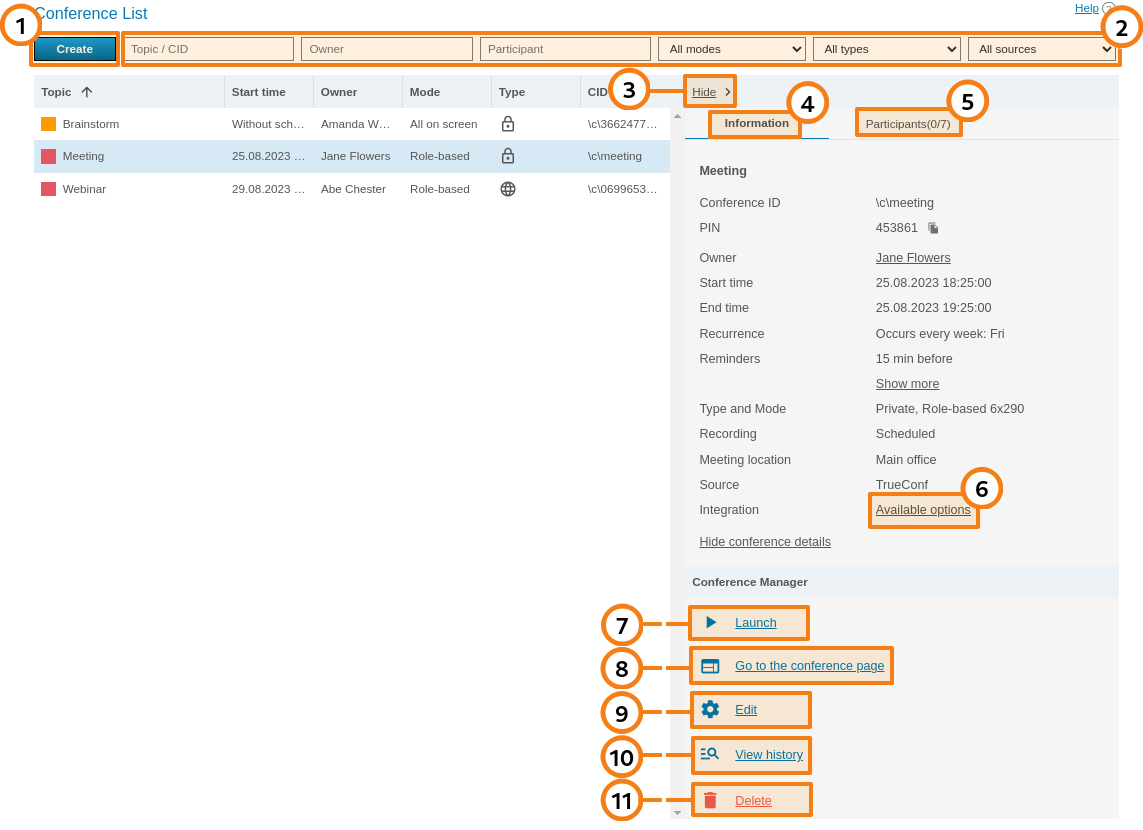
Ongoing meetings are always displayed in the upper part of the list and are highlighted in orange.
Here you can do the following actions:
Filter the list by the name (or ID) of the required conference, by the owner of this meeting, one of its participants, access type, and source.
The conference card can be minimized; in this case, the control panel with multiple buttons will be displayed instead (the buttons on the panel will vary depending on the conference status, either active or inactive). The actions available for each scenario will be described below in more detail.
View information about the conference: its name, ID (unique identifier), PIN (if specified), owner`s name, email reminders (if they were added), location (if specified), mode and start type, source (TrueConf or mail plugin) and information indicating if the meeting will be video recorded.
Open the list of invited participants.
Click on the link to get the HTML code of the widget needed for embedding the conference on external websites. It wil be available only for webinars (public online events). If you have set a streaming configuration for the webinar, the corresponding link will be displayed below the widget code:
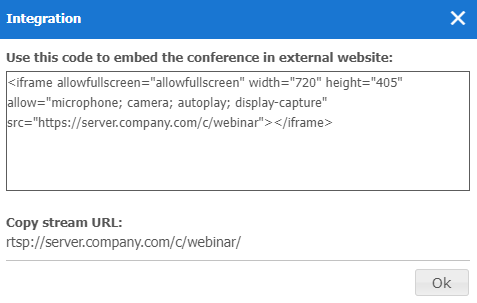
Start the conference manually. Before the start you will be offered to invite all the participants to the conference or select particular users. At conference forced start, only online users will be invited to the conference. Email invitations will not be sent out.
Go to the conference page.
Edit the selected conference (unavailable for an ongoing meeting). In the conference editing menu, you can use almost the same group of features that are available when a conference is created.
View the previous sessions (history) of the selected conference in the Call History section.
Remove selected conference.
# Conference page
On the conference web page, you can see the general information about the meeting, its start time (available for a scheduled meeting) and the Join button. The button will be displayed if the conference has already started or if it is a virtual room:
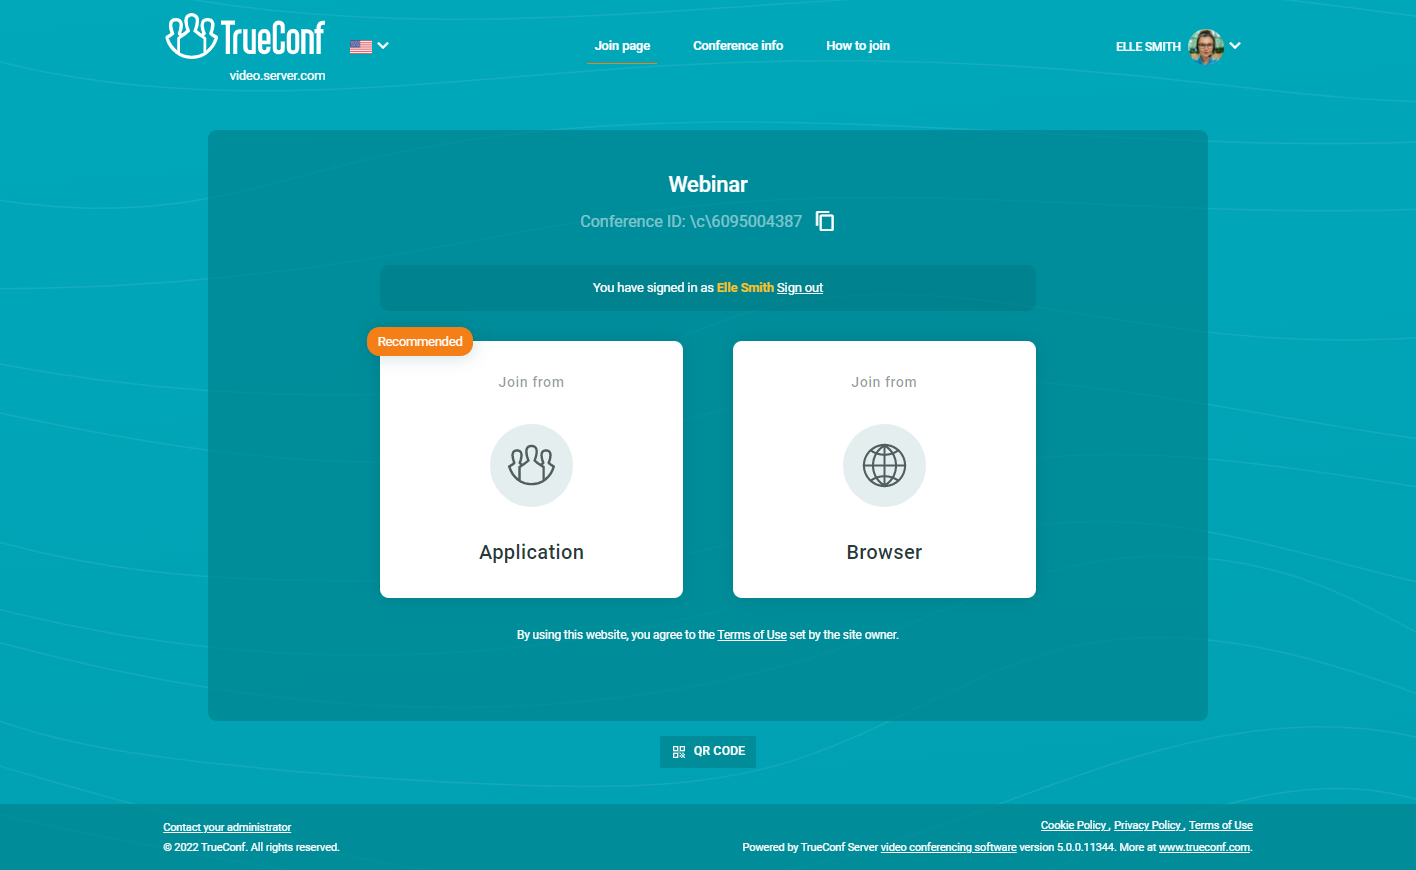
If the client application has already been installed, it will connect to the conference in the following way:
The application will try to connect to the conference with the authenticated user account (regardless of the name entered on the conference web page).
If the conference was created on a different TrueConf Server instance, the application will try to connect to the conference via federation.
If there is no connection via federation, the user will join the conference as a guest and then, when the conference is over, authorize automatically on the local server.
To learn more about connection options, check our article.
# How to configure an ongoing meeting
When selecting an ongoing conference, the administrator can view information about it or change some of its parameters (e.g., the layout or PIN code). Standard editing and deletion options will be unavailable.
# "Information" tab
Display conference information and the control buttons:
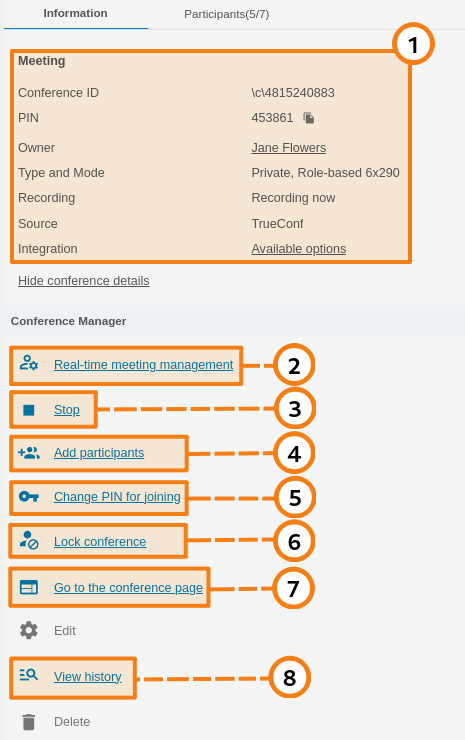
Basic meeting information and options for integration with third-party websites.
Proceed to real-time meeting manager.
Stop the meeting for all participants.
Click on the Add participants to select new users:
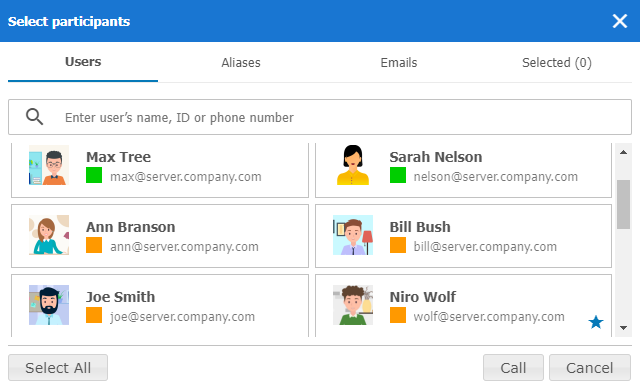
To add participants to a conference, select the users in the Users tab. You can select all server users at once by clicking on the Select All button. In the Aliases and Emails tabs, you can add a participant by his or her alias and send the invitation, specifying the email and the name displayed in the meeting. The resulting list is displayed in the Selected() tab. After the list is formed, click the Call button at the bottom of the window.
5. Changing or disabling PIN needed for joining a conference. If secure access is disabled, you can activate it by clicking Request PIN for joining.
6. Locking a conference. In this case, a conference can be joined only by moderators (including the owner) and the users invited after the conference was locked. If a regular user was added to the list of invited participants, but could not join the meeting before it was locked, he/she will be unable to join. If a public conference is held, guests will be unable to join and it will be impossible to send email invitations.
Each time when a conference ends, its access status is switched to unlocked which is the default value.
7. Go to the conference page.
It is also possible to set a PIN for a conference or lock it in the real-time meeting management tool.
8. View the previous sessions (history) of the selected conference in the Call History section.
# "Participants" tab
Information about invited participants and those who have already joined the meeting:
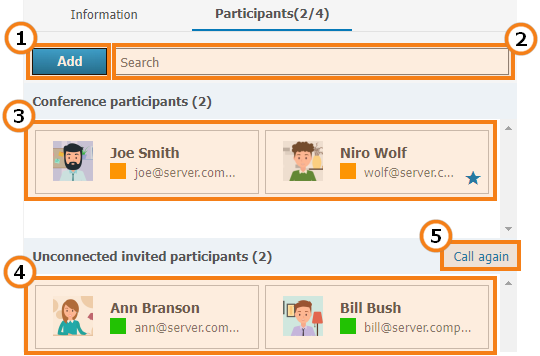
Adding new participants to a conference.
Quick search for participants.
The list of participants who have successfully joined and are present in the current meeting.
Users who have been invited to a meeting, but have not joined it yet.
To invite all non-connected participants to a meeting, click the Call again link. Then, click the Invite button in the opened window.
# Creating a new conference
Click on the Create button in the Conference List menu to select a conferencing type:
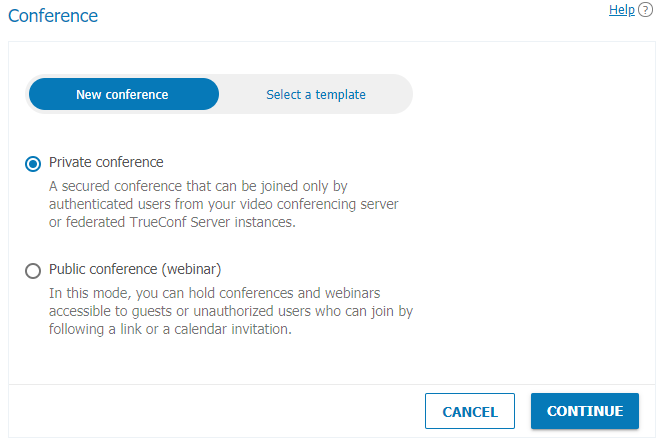
You can quickly create a meeting by selecting one of the previously saved templates.
Otherwise, specify the meeting type:
Private conference (selected by default) is a conference that can joined only by the users registered on TrueConf Server and third-party SIP/H.323 or RTSP devices (if you are making a call directly by the conference ID or if the device is invited as a conference participant). Unauthorized users cannot join a private conference.
Public meetings can be joined by external users (guests) who do not have a user account on TrueConf Server.
The maximum number of guests in a webinar is determined by your license (and by overall restrictions depending on a specific conference mode). TrueConf Server Free has its own restrictions on the number of guests.
Learn more about webinars in our articles and videos:
Click Continue to proceed to the meeting settings.
# "General" tab
This tab contains the settings required for creating a meeting:
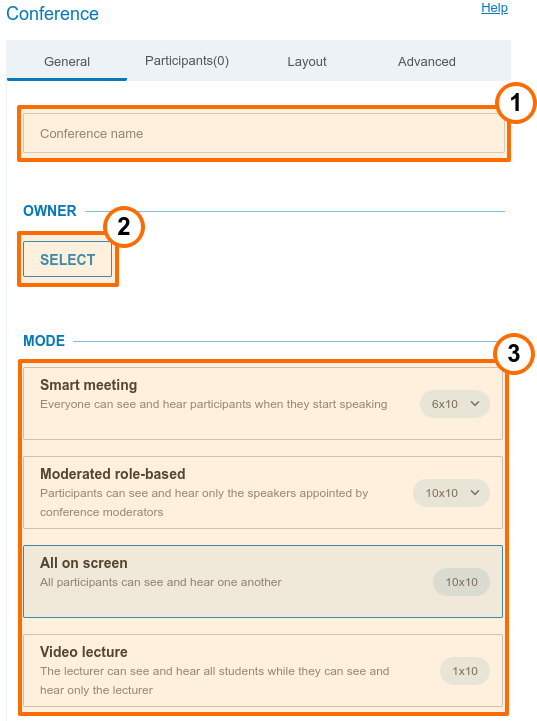
Conference Name Field, e.g. "Marketing Department Meeting".
Select the conference owner.
When scheduling a conference, the administrator assigns the conference owner (who automatically becomes moderator) and other moderators. Other roles will be given by users in a conference.
3. Select the conference mode: all on screen, smart meeting, moderated role-based conference, and video lecture.
The mechanism determining how the layout will be filled in smart meeting mode with different types of connection is fully described in the documentation for TrueConf client application.
Specify the number of presenters if a moderated role-based conference or smart meeting is selected.
The maximum number of participants in a moderated role-based conference and smart meeting depends on the type of your license. The number of participants can reach up to 1500 (or 1600 if you are using UDP Multicast). The maximum number of speakers in a smart meeting or moderated role-based conference is 49.
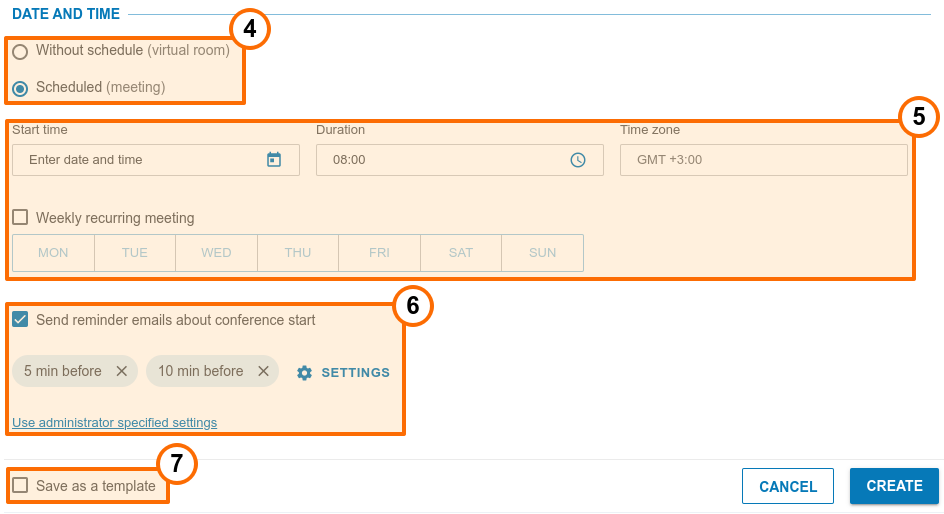
4. Indicate the conference type: scheduled meeting or a virtual room.
5. Setting time and regular schedule for the scheduled meeting.
6. Send automatic email reminders to conference participants. This feature will be available if it has been activated in the SMTP settings. It is possible to add up to 4 reminders for one conference. To do it, click on the Settings button. If you want to sync the notifications settings with the global ones, click the button Use administrator specified settings.
Sometimes when editing a conference created previously, you will see the reminders that were not added by you or the conference owner. This issue may occur due to the activation of the global notifications settings in the SMTP section at the moment when the conference had already been created.
7. You can save the conference as a template. With the help of templates, you can quickly create a meeting with similar settings in one click.
# "Participants" tab
This tab displays the number of participants added to the conference (the maximum possible number of participants depends on the conferencing mode and your TrueConf Server license. You can add participants to the conference from the list of users, by ID, by call string (for SIP/H.323/RTSP devices), and by email (for public conferences).
Add by ID or call string
Enter the user ID or call string for an SIP/H.323 or RTSP device in the search field on the Contacts tab and click Select ID to make it a meeting participant.
Adding email notification recipients
This feature is available only in public conference mode.
To invite participants via email, create a list of meeting guests:
Click on the Email tab.
Fill in the Name and Email fields with the participant’s personal details.
Click Select to add the user to the guest list.
After selecting all users, click Add to include users to the list of meeting participants.
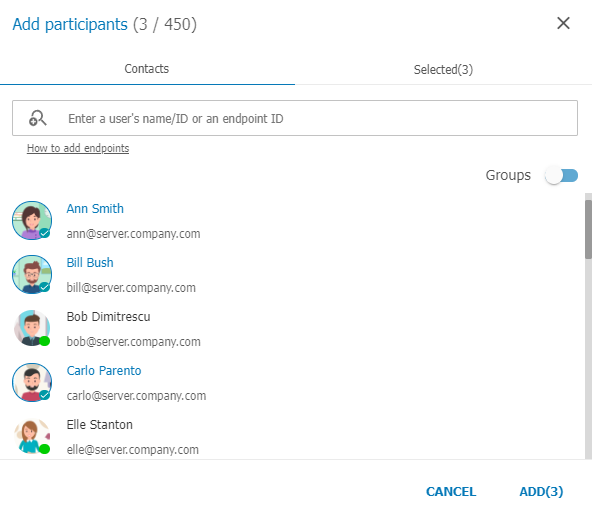
How to Make a Participant a Moderator
Select a user from the list of added conference participants and click three dot button.
Press Assign as a moderator.
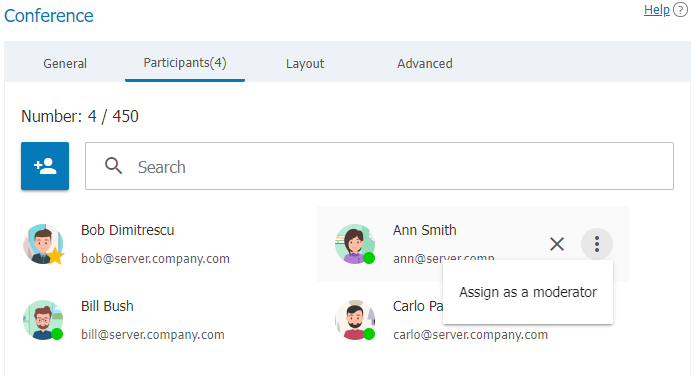
The participant appointed as a moderator is marked with a star icon:  .
.
# "Layout" tab
On this tab you can set video layout (combination of participants' video windows).
Layout settings are unavailable in smart meeting and video lecture modes.
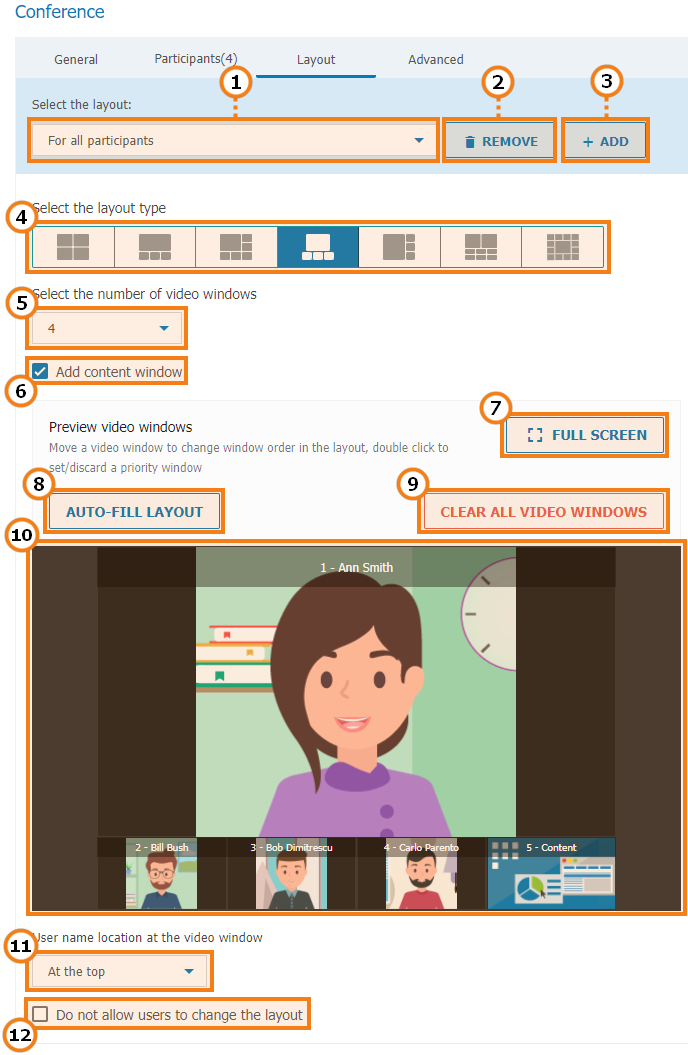
Select a video layout: general (for all participants) or individual (for a particular participant or SIP/H.323 device).
Remove unnecessary layout.
Add a new layout.
Specify the largest video window in a layout.
Select the number of participants' video windows in a layout.
Add an additional video window to a conference layout to broadcast content.
Go to the layout preview in full screen mode.
You can auto-fill the participants in video windows.
Clear layout.
Edit the conference layout. You can move the video window of any participant or double click to enlarge it.
Select the location of a user display name in a video window.
Forbid conference participants from changing layouts.
# "Advanced" tab
If necessary, you can set up additional conference settings.

Enter a custom conference join URL to make it easier for participants to join.
Enable the use of PIN to join the conference. PIN boosts your meeting security and protects your conference from third-party access (even if a third party has a conference join URL in case you organize a webinar). PIN will be generated automatically upon checking the box. However, you can always change the PIN in the field below. PIN protection will be unavailable if you allow users to sign up for a public conference (webinar).
PIN-protected meetings can be joined only from TrueConf client applications and browsers (via WebRTC).
To join a PIN-protected conference from an SIP/H.323 endpoint, it is necessary to add PIN, separated by a comma after the conference ID in the call string:
00<conf_id>,pin@<trueconf_server>:<port>
3. Manually set your PIN or refresh it using the  button.
4. Allow users to join the conference without invitation (for internal conferences only).
5. Activate the waiting room for the event. You will be able to select which participants should be directed to this room. This list will be slightly different for private and public conferences.
SIP/H.323/RTSP connections are always treated as the participants from other servers. For example, if an endpoint makes a call to a conference or is invited to this meeting, it will be directed to the waiting room if all the settings are activated except Guests only for a webinar.
It is not possible to select the participants who will be directed to the waiting room, if registration is allowed for a public conference (webinar). In such a case, all participants except the owner and moderator will be directed to the waiting room if it is enabled.
Categories that can be selected for public conferences:
All participants (except the owner and moderators) – all participants except the owner and moderators will be moved to the waiting room (this includes the participants who signed up for the event)
Uninvited participants and guests (selected by default) – the following participants will be moved to the waiting room:
all users from your server, who were not invited in advance before the start of the conference and are now calling the conference/owner or are invited after the start of the event
all users from a federated server who were not invited in advance before the start of the conference
all guests.
The following participants will not be moved to the waiting room:
users from your server who were invited in advance before the start of the conference
users from a federated server who were invited in advance before the start of the conference
users who signed up for the conference (since they have already been added to the list of invited participants)
users from your server and federated server who were invited in advance, but did not join when the conference started and are now trying to join during a conference or receive another invitation call.
Uninvited participants from other servers and guests – only guests (if they did not sign up for the event) and users from a federated server, who were not invited in advance, will be directed to the waiting room.
Guests only – only guests, if they did not sign up for the event, will be directed to the waiting room.
Categories that can be selected for private conferences (the rules are similar to the ones set for webinars except guests and unregistered participants):
- All participants (except the owner and moderators)
Uninvited participants (selected by default)
Uninvited participants from other servers.
6. Configure settings for automatically turning off participants’ cameras and microphones when they join the conference.
On/off flag for camera and microphone is now ignored by SIP/H.323 endpoints when connecting to a conference to improve compatibility with smart meeting mode.
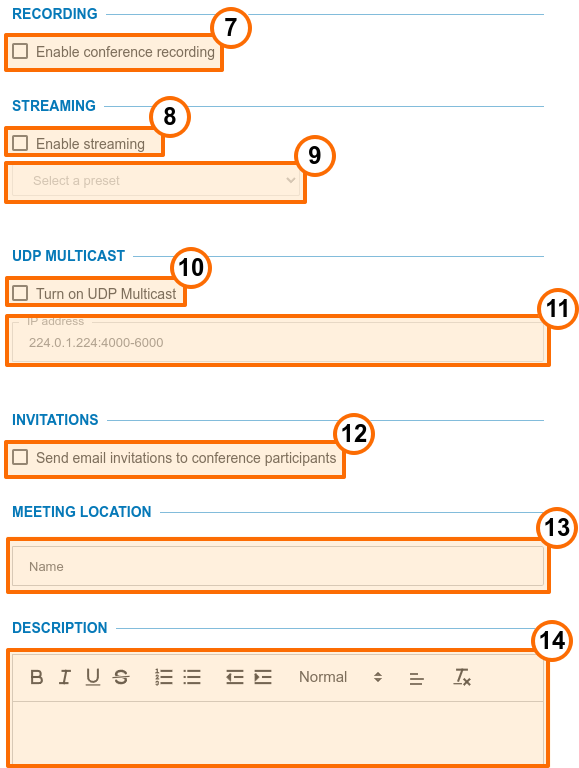
7. Click to activate conference recording (check the description of the Recordings section). If this feature is activated, you will see the corresponding information on the conference page. The conference owner can control the recording process (pause or resume it on the fly during the meeting).
8. Press to setup streaming.
9. Select the streaming preset (see Streaming).
10. Enable UDP Multicast mode; to learn more about this mode, check the extension description. This will enable you to increase the number of conference participants (up to 1600 in role-based conference modes). In this case, there will be no dependence on the number of podiums. For example, you can create a moderated role-based conference or smart meeting for up to 1600 participants and 36 podiums for speakers. However, there will be multiple restrictions described below.
If UDP Multicast mode is enabled while you are trying to connect to the conference using third-party protocols (WebRTC, RTSP, SIP, H.323, etc), video conference recording and streaming will be unavailable.
Enabling this function is recommended only for those users who have hands-on experience in the sphere of network administration. Please note that it is your responsibility to check if this technology is available in your network.
If your network equipment is not configured to work in UDP Multicast mode, participants will see only a black screen during a conference.
11. The field to indicate Multicast/Broadcast IP address. By default it is 224.0.1.224:4000-6000.
12. Enable email invitations for conference participants. This option is available only for scheduled conferences providing the SMTP server integration is set up.
When editing a previously created conference, this option is disabled regardless of the conference settings configured earlier. This is specifically designed to prevent the invitations from being mistakenly resent when editing an event. If you need to reactivate conference invitations (e.g., when adding participants), please manually activate the Send email invitations to conference participants checkbox.
13. Specify the conference location. The location will be displayed in the Information tab on the conference page and in the list of conferences).
14. Adding guide text to the scheduled event (e.g. presentation description or event program). This text will be displayed on the conference page.
# Restrictions for webinars
If you check the Public conference (webinar) box when creating the conference, this tab will also contain permission settings for guest users:
Permission settings for guest users
This parameter is used to restrict the number of guests in the selected webinar (by default they can join the event up until the moment when the licence limit for guest connections is reached). This may be helpful when multiple webinars are held at the same time and it is necessary to distribute guest connections between them or if the rules of your event impose restrictions on the number of attendees (e.g., if it is a lecture):

Users of Mozilla Firefox, Safari, Google Chrome and other Chromium-based desktop and mobile browsers can participate in conferences via WebRTC. The number of guest connections is limited by your license.
# "Registration" tab
The Registration tab will be displayed if a public conference (webinar) is created. Here, you can configure registration settings for conference participants who want to sign up for your online event (this option will be available only for a scheduled conference):
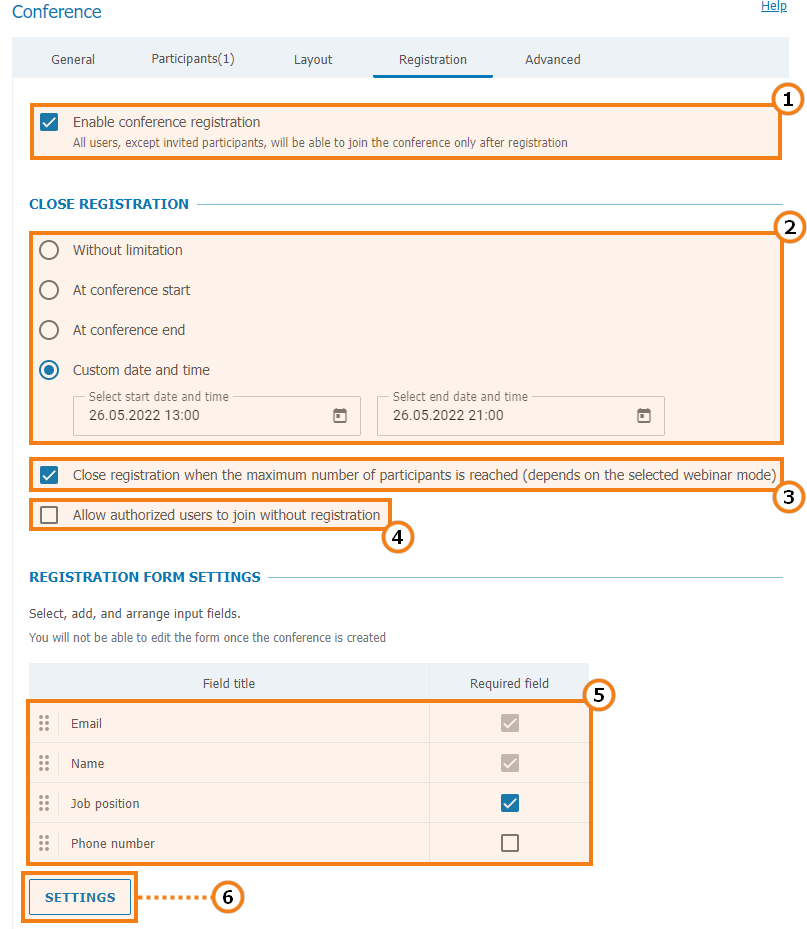
Enable registration (disabled by default)
Specify the time when the registration will be closed:
Without limitation — available only for a recurring conference (registration for such an event will be constantly open)
At conference start — the registration will be closed right after the webinar start
At conference end — the registration will be available up until the conference end
Custom date and time — set a custom period during which the registration will be open.
3. Automatically close the webinar registration when the maximum number of participants (depends on the conference mode) is reached.
4. Allow any authorized user to join the conference after its start. In this case, any user registered on your server can sign in on the conference page and add oneself to the list of invited participants by clicking on the Attend button.
5. Settings for the input fields in the registration form. You can drag and drop input fields to create a custom registration form. Besides, you can mark the corresponding checkboxes to make sure that certain fields must be filled by participants. The customization of registration form is available only when a conference is created. This feature is not available when the conference is edited.
6. You can select the input fields that should be displayed during registration only when creating a conference. Сlick on the Add field button to specify both standard and custom fields (up to 10 ):
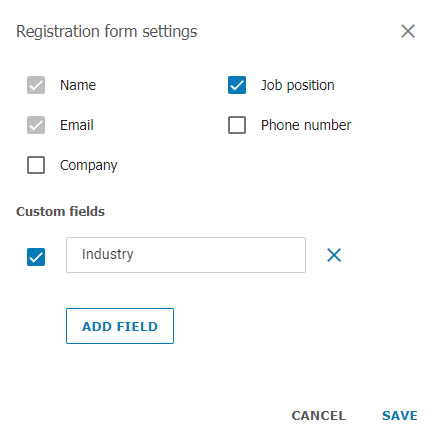
When the changes are saved, users will be able to sign up for a public conference on its web page. To learn more about this feature, check out the TrueConf Server user guide:
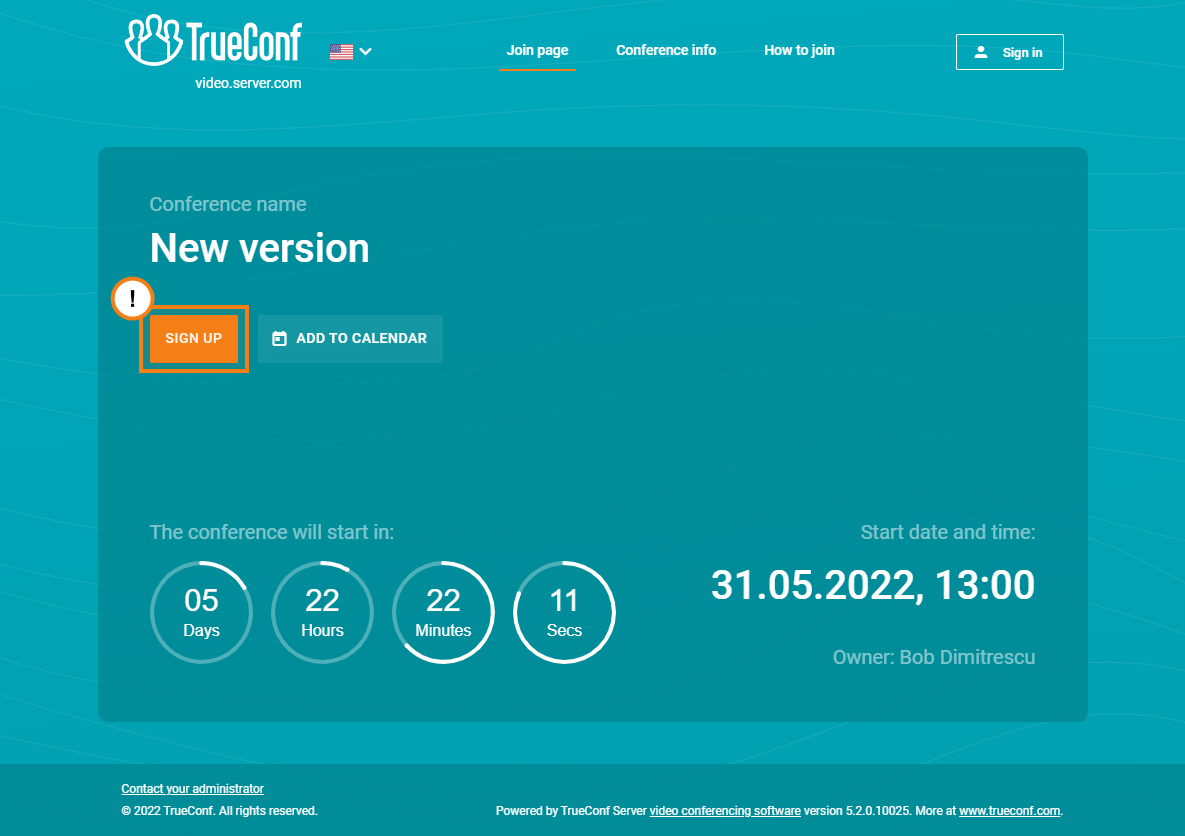
To view the list of participants who have signed up for the event, select your webinar in the list of conferences, and go to the Participants tab. The guest users' IDs will start with #guest2::
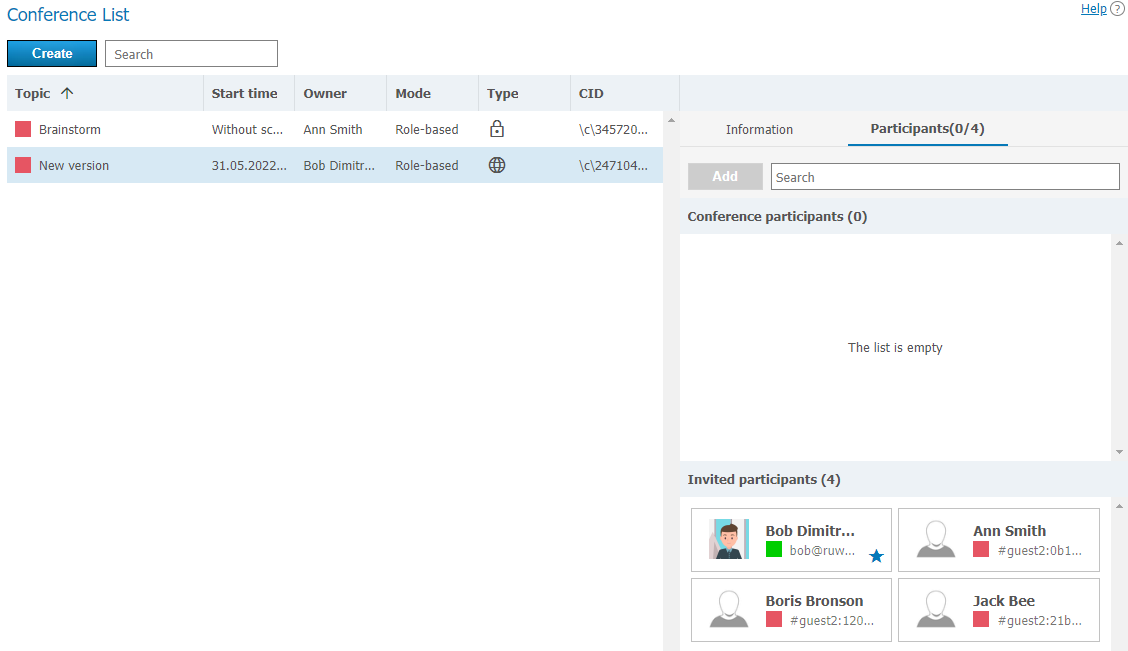
# Templates
This section allows server administrator to create new conference templates and edit saved ones. Templates can also be saved while editing conference.
When a conference is created from a template, its scheduling settings are cleared (it becomes a virtual room by default); however, the following parameters remain unchanged:
Information about the name, mode, and owner
List of participants
Parameters from the Additional tab (except conference ID)
For a scheduled public conference (webinar) — registration settings saved in the template, except the time when participant registration will be closed.
Please note that the Owner field corresponds to the owner of the template (not the owner of the conference). In the example below, the administrator added two templates ("Meeting Template" and "Webinar"), while Ann Branson added the "Sales" template from the scheduler in her client application or from the personal area.
Creating and editing templates is very similar to creating and editing conferences.
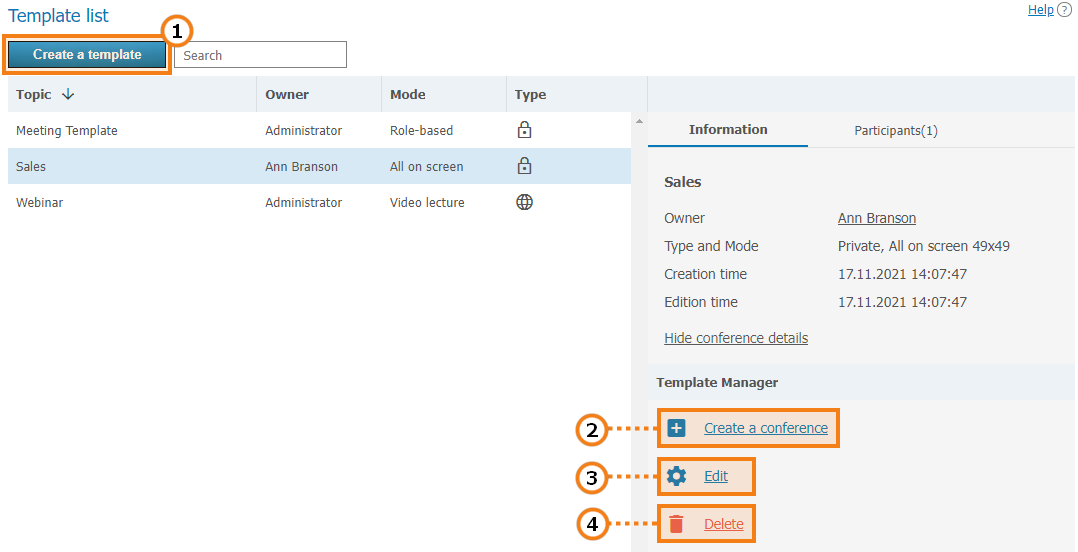
Create a new conference template.
Use a saved template to create a conference with typical parameters.
Edit saved conference template.
Delete unnecessary template.
# Streaming
In this section, you can create and set streaming configurations used for setting up a conference.
Click the Add a configuration button to create the configuration. In the window that appears, select your streaming type:
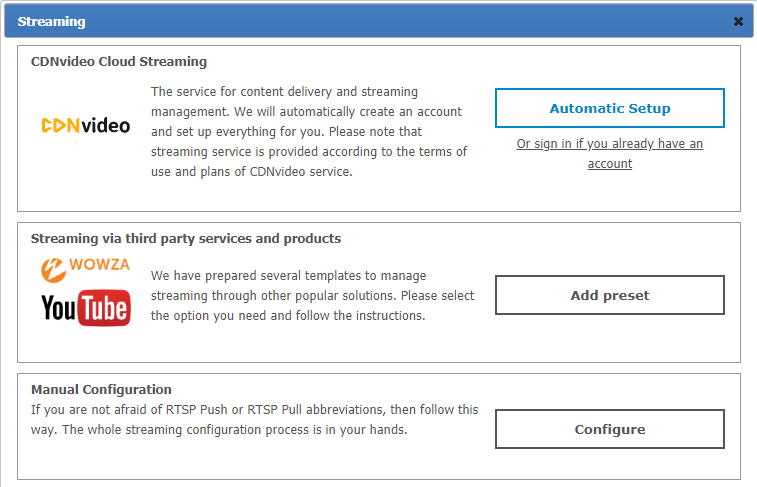
# Streaming through CDNvideo cloud service
Click on Automatic Setup to create a new account at CDN video service. To continue please make sure that a PC with installed TrueConf Server on it is connected to the Internet:
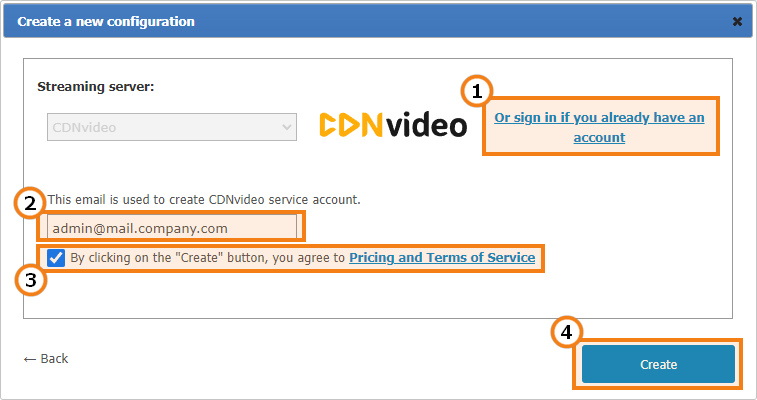
If you already have a CDNvideo account, click on this link to enter your username and password.
Email address that will be used to create a new CDNvideo account. TrueConf Server administrator email is used by default.
By creating a CDNvideo account you agree with CDNvideo terms of use.
Save current streaming configuration.
How to connect to CDNvideo streaming
Conference streaming is available on any intranet or Internet HTML page with the CDNvideo video player widget embedded on it. The streaming will start automatically when participants join the conference or, in case it is a moderated role-based conference, when the first participant takes the podium. Widget code is unique and is set up to stream only the current conference.
To get the CDNvideo video player code:
Go to the conference list page.
Select a conference pre-configured for streaming.
Click the link Display conference details in the side menu of the page.
Follow the link next to Integration.
Copy the HTML code of the video player widget.

# Streaming via third-party services and products
This section includes ready-to-use templates for popular streaming services and products, designed to work in corporate networks and via the Internet. Press Add preset to choose a template to start with:
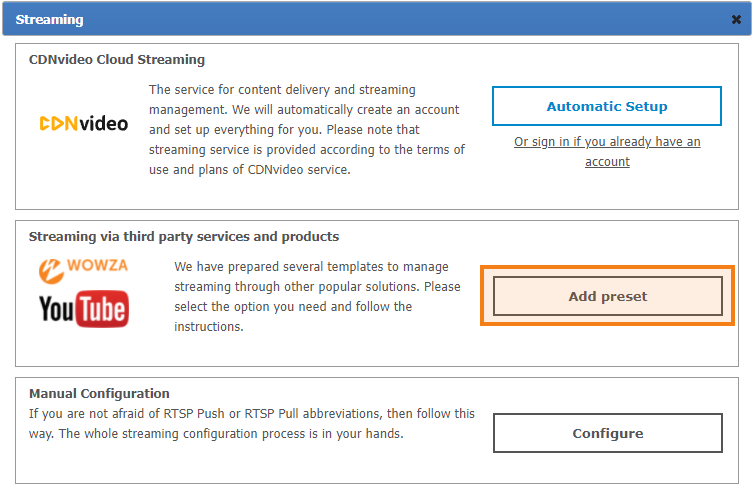
In the configuration window select a required streaming service. Streaming service settings are listed below.
# Wowza Streaming Engine
To stream video to Wowza Streaming Engine, specify the following parameters:
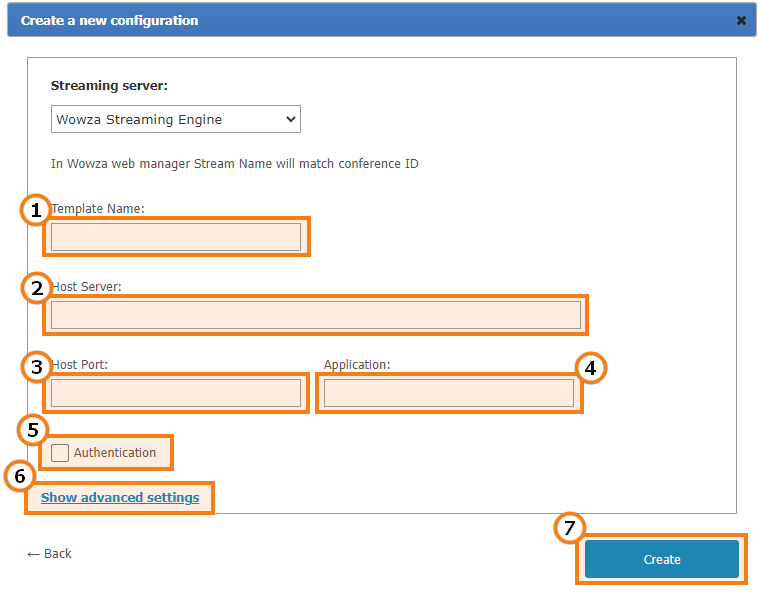
Configuration name displayed in streaming configuration list on the conference edit page.
Address of the Wowza Streaming Engine.
Wowza Streaming Engine accepts connections on this port (e.g.
1935or1940).Read the description of this field in Wowza Streaming Engine documentation.
Check Authentication to enter username and password to access Wowza Streaming Engine if required.
This section includes additional settings for current streaming configuration (see Advanced streaming settings in present user’s guide).
Save current streaming configuration.
# Wowza Streaming Cloud
The following settings will be helpful when streaming a conference to Wowza Streaming Cloud:
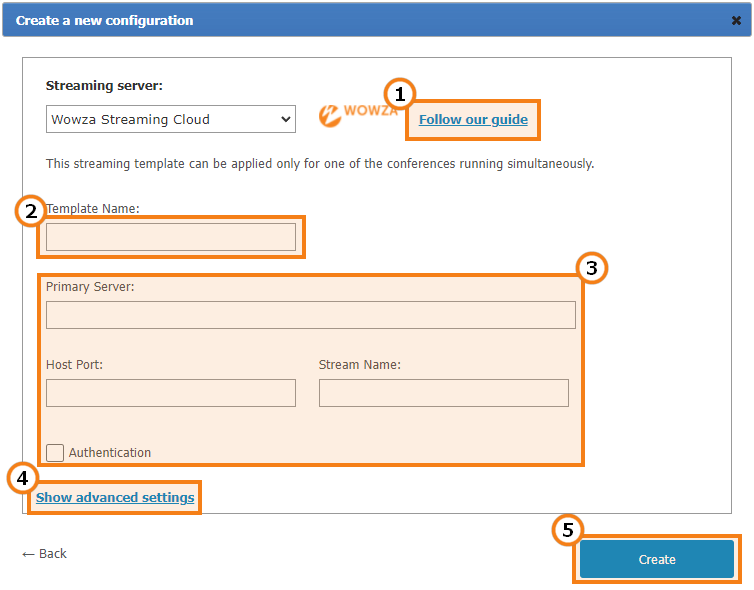
Click to read our detailed manual on how to configure conference streaming via Wowza Streaming Cloud.
Configuration name displayed in streaming configuration list on the conference edit page.
Streaming settings that you received on the Wowza Streaming Cloud service when you created the streaming.
This section includes additional settings for current streaming configuration (see Advanced streaming settings in present user’s guide).
Save current streaming configuration.
# YouTube
Specify the following parameters for YouTube streaming:
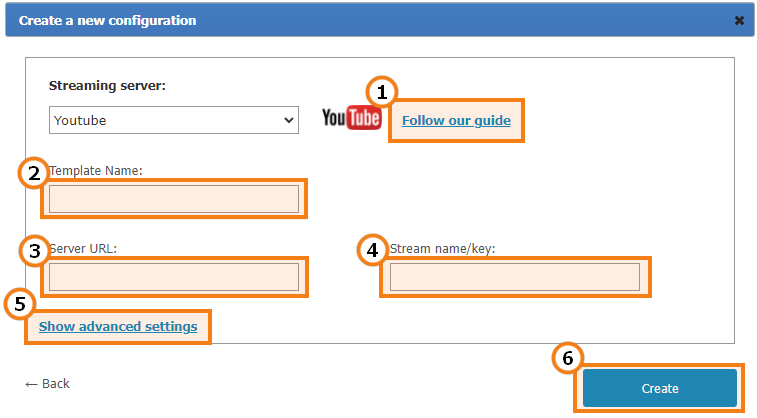
Proceed to our manual on how to stream TrueConf conferences on YouTube.
Configuration name displayed in streaming configuration list on the conference edit page.
Server URL from the webpage where YouTube stream is created.
Stream name/key from the webpage where YouTube stream is created.
This section includes additional settings for current streaming configuration (see Advanced streaming settings in present user’s guide).
Save current streaming configuration.
# Manual settings
This section allows you to manually setup streaming for the majority of existing streaming services and products, including those listed above. TrueConf Server supports two ways of content transmission: RTSP Publish (aka RTSP Push) and RTSP Pull. When using RTSP Publish, your server notifies streaming platform about content available to be picked up. When using RTSP Pull, the platform itself collects the content from your server.
RTSP Publish manual settings
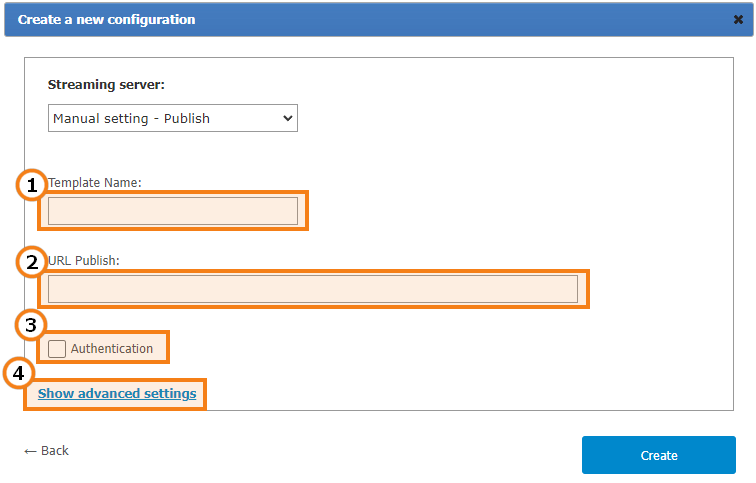
Configuration name displayed in streaming configuration list on the conference edit page.
The address which will be used to notify about available stream via RTSP ANNOUNCE protocol.
Check Authentication to enter username and password and gain access to the service.
This section includes additional settings for the current streaming configuration.
RTSP Pull manual settings
This method can used to get an RTSP link to the conference stream and to specify this link directly on a third-party service or convert the stream with additional software, e.g., OBS Studio.
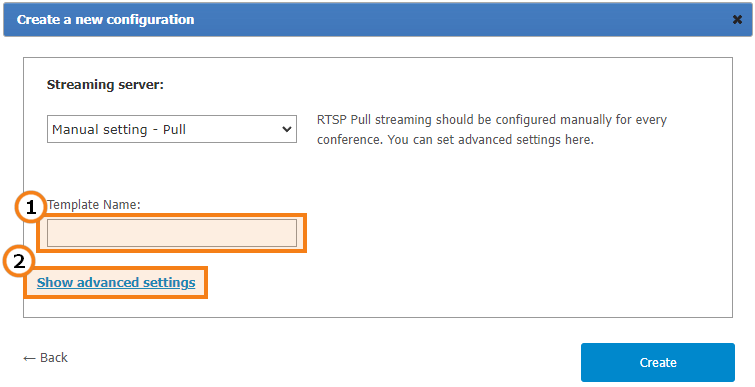
Configuration name displayed in streaming configuration list on the conference edit page.
This section includes additional settings for the current streaming configuration.
Additional streaming configuration settings
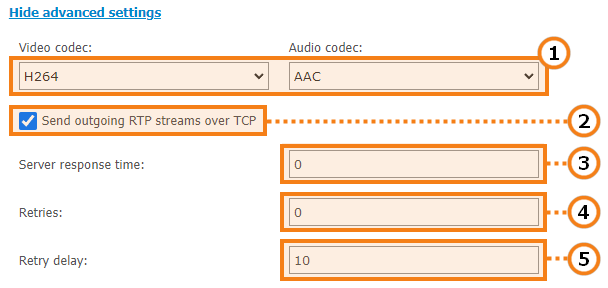
You can change video and audio codecs used for the stream encryption.
Check if you need to send outbound RTP streams via TCP protocol. UDP is used by default.
Response waiting time (in seconds) for the information about published conference stream being successfully received by streaming platform.
In case connection with streaming platform is terminated, TrueConf Server will attempt to publish the stream again. This parameter sets the number of such attempts.
Delay (in seconds) between stream publication attempts.
# Conference settings
In the Group Conferences → Settings section, you can configure automatic deletion of conferences. This may be helpful for deleting meetings from the general list if such meetings have already ended and information about them is no longer needed.
The server will still store the information as to when these conferences were started (it will be available in the Reports → Call History section). The chat created for the conference which was automatically deleted as well as the files sent in this chat will be available in the server control panel and on participants’ devices.
The following features are available:
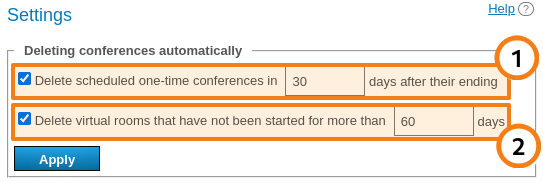
Delete one-time scheduled conferences. It is possible to specify for how long such conferences should be stored after their ending. The storage period ranges from 1 to 10 000 days.
Delete virtual rooms that have not been launched for a certain number of days (from 1 to 10 000 days). The virtual rooms that were created, but were never launched during the specified period will also be deleted.
The list of conferences will be checked every 60 minutes and certain meetings that match the specified criteria will be deleted.
# API
# OAuth2
This section is used to manage applications or services which utilize TrueConf Server API. Permissions are controlled based on OAuth 2.0. protocol. You can learn more information about OAuth 2.0. protocol in RFC 6749 official documentation (opens new window) or in the note below.
Oauth 2.0 is used to authorize certain applications (clients) to access protected resources with limited scopes and rights. With this approach, you can block a particular application or a user from the server resources at any given period of time. The protocol also allows you to authorize third-party applications and do actions on the server on behalf of the user via API. In this case, the user does not need to give their username or password to any third-party application (Authorization Code method).
After authorization on TrueConf Server using OAuth 2.0 protocol, every third-party application obtains an access token. Those applications with a valid access token can access TrueConf Server API. The list of API commands can be found in [TrueConf Server API documentation]. TrueConf Server administrator can manage third-party application permissions and access tokens obtained via this section.
Learn more about TrueConf API use cases in our blog.
After successful authorization, the application receives access token with a limited lifespan and scope (server wide or limited to a specific user). For example, server wide scope gives information about any conference on the server, while user’s scope provides the information only about those conferences where the user is the conference owner or a listed participant. The scope is defined by the authorization type selected by a third-party application developer, while permissions set (rights) are determined by TrueConf Server administrator for every application.
| OAuth 2.0 authorization method | Access token scope | Authorization result |
|---|---|---|
| Client Credentials The client gets access token, the scope of which is server wide. User authorization is not performed. This method is recommended for trusted applications only. | Server wide | Access token valid for 1 hour is issued. |
| User Credentials (a.k.a. Resource Owner Password Credentials Grant)
To obtain access token, it is required to provide username and password received on the application side. | User’s scope | Access token valid for 1 hour and (refresh token) valid for 7 days are issued. |
| Authorization Code Access token is issued after user has successfully authorized on TrueConf Server special web page. The application cannot access username and password of the user. | User’s scope | Access token valid for 1 hour and refresh token valid for 7 days are issued. |
| Refresh Token This method is used to obtain a new access token based on your existing refresh token. | Equal to scope of the user who has received refresh token initially | Access token valid for 24 hours is issued. This method cannot be used to obtain new refresh token. |
When requesting an access token, it is required to indicate Application ID and Secret. These parameters can be obtained and updated by creating or editing the application in this section. Application ID is created automatically and cannot be changed later. By contrast, application secret can be further regenerated.
# Permissions
API capabilities of a third-party application depend on the permissions it obtained.
| Permission | Description |
|---|---|
| conferences:read | Reading conference details |
| conferences:write | Creating, editing, and deleting a conference |
| conferences.records:read | Reading conference recording details |
| conferences.participants:read | Reading the list of conference participants |
| conferences.participants:write | Creating, editing, and deleting conference participants |
| conferences.invitations | Reading and editing the list of participants invited to the conference |
| conferences.sessions:read | Reading active video conferencing session details |
| conferences.sessions.participants:read | Reading the list of active conference participants and their roles |
| conferences.sessions.podiums.participants | Inviting a participant of an active conference to the podium and removing the participant from the podium |
| groups:read | Reading user group information |
| groups:write | Creating, editing, and deleting user groups. Unavailable in LDAP mode |
| groups.users:read | Reading the group user list |
| groups.users:write | Creating, editing, and deleting group users. Unavailable in LDAP mode |
| users:read | Reading server user information |
| users:write | Creating, editing, and deleting server users. Unavailable in LDAP mode |
| users.addressbook:read | Reading contacts from user address books |
| users.addressbook:write | Creating, editing, and deleting contacts in the user address book |
| users.avatar:read | Reading user avatars details |
| users.avatar:write | Adding and deleting user avatars |
| templates.conferences:read | Reading conference template details |
| templates.conferences:write | Creating, editing, and deleting conference templates |
| logs.calls:read | Reading the conference list from server logs |
| logs.calls.participants:read | Reading the list of conference participants from server logs |
| logs.calls.invites:read | Reading the list of invited users from server logs |
Each method is assigned with a set of permissions required for successful method call. All sets of permissions are specified in TrueConf Server API documentation.
If an OAuth application requires both read and write access to a certain parameter, then you can specify a general permission <permission> instead of specifying <permission>:read and <permission>:write permissions, if it is available. For example, you don't need to click both users:read and users:write checkboxes to allow an application to read and edit TrueConf Server user accounts. Instead, you can select only the users checkbox.
# Creating new OAuth 2.0 application
To add an OAuth 2.0 application:
Click the Create a new application button.
Enter its identifier in the Name field. It is only displayed in the application list.
To authorize using the Authorization Code method, specify the URL to redirect the application to in the Redirect URL field. For other authorization methods please indicate the following address
https://localhost/.Check the rights required for your application in the Permissions list.
Save your changes by clicking the Create button.
# Editing application
On the application page you can not only edit its properties but also view access token list obtained by the application’s users. You can remove user access tokens at any time to block particular user from accessing API data.
You can also Regenerate the application secret to block the application and its new users from accessing the server for security purposes. Please note that access tokens and refresh tokens obtained using previous application secret will still be valid within their lifespan.
# Reports
This section stores all information about user connections, calls, messages, and video conference recordings. Data can be filtered according to various parameters and downloaded in CSV format. In the tables, time is displayed according to the time zone selected in the preferences menu.
On the right side of some tables you can find a dashboard containing detailed information about any event that is selected in the table.
The table reports have common functions:

Filter entries.
Save a table in the CSV format (the export format can be selected in the preferences section).Please note that in this case, you will save the selection obtained after applying filters and clicking on the Search button.
Deleting the user accounts selected through filtering. Please note that you will only delete the accounts that have been selected in the input fields, but not the ones that are currently displayed.
Sort entries by field values (click on any column name to change sorting order).
# Events
The event log includes consecutive records of:
All changes in the user status (authorization, offline, and others) and changes in the server state (start, shutdown, connection to AD/LDAP)
Revocation of a user`s PRO licenses due to one of these reasons:
No PRO licenses were available when a user tried to join a group conference.
A user lost a PRO license (permanent or temporary) after automatic redistribution of licenses.
A user`s temporary PRO license was revoked by the administrator (in the Dashboard → PRO Licenses section).
Deletion of video recordings by clicking on the
 button in the control panel
Deletion of logs in the Reports section (the title from the Event column will refer to the corresponding subsection):
delete_events – Events
delete_conferences – Call History
delete_chat_messages – Chat Messages
delete_logs – Configuration Changes
delete_video_recording – Conference Recordings
delete_connections – Endpoints.
If you click on an event in the table, you will be able to check several details, for example, what client application or IP was used to authorize. Besides, you can track changes in the user status.
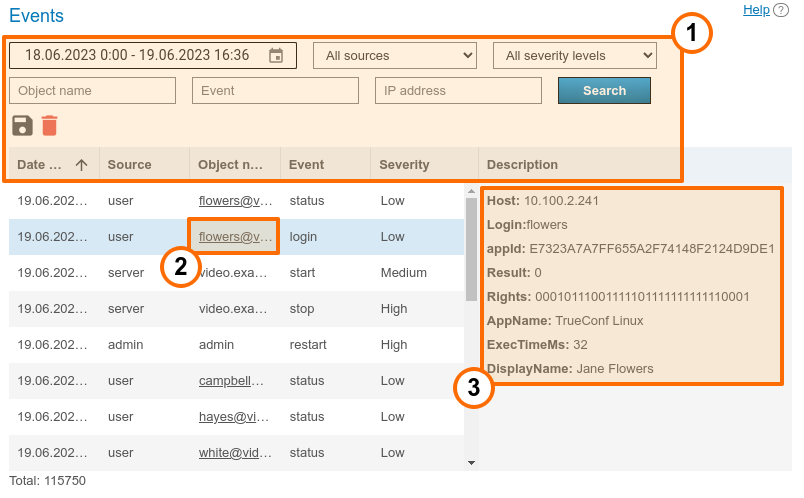
General table interface (see the description above).
Link to an active user profile.
Event details. Contains detailed information required for the technical support department to solve possible issues you may face. The most common event details:
users: the list of users’ TrueConf IDs (displayed in multiple cases, e.g., if some users could not get a PRO license after these licenses were redistributed)
Host: the IP address of the connected user
Login: TrueConf ID of the user
appId: a unique application identifier
Rights: a binary sequence for user's rights encryption
AppName: the name of the application that was used to log in to TrueConf Server
DisplayName: displayed username
OldStatus: status of the user before the transition to the new value, takes one of the values:
-2- inactive,0- offline,1- online,2- (busy) participating in a conference or video call,5- connected to the conference as its ownerNewStatus: the status to which the user transitioned as a result of the event (has the same values as OldStatus).
description: or Details: is a detailed description of the event
result: a numeric code that displays the result of the event.
0if the action has been successfully completed, otherwise, the extended description can be specified in the description: or Details: fielduser_agent: the part of the HTTP request that includes information about the web application and the OS of the device which is being used to connect to the server.
# Call History
This section contains history of video calls and conferences hold on the server.
Please note that each time you start the same conference, a new conferencing session with its own identifier is initiated. This is relevant for scheduled recurring events or for virtual rooms. For this reason, there will be several entries in the call history table with details of each independent conferencing session.
# Call list
On the main page of the section you can see the table where you can select a particular meeting. Besides the call history, the list also contains information about active sessions. The End field remains blank for current conferences.
When data is deleted, the lines corresponding to active communication sessions will be skipped. Other lines will be successfully excluded from the table.

General table interface (see the description above).
Link to the page with detailed information about a session.
Link to a profile of the conference or call owner.
If this session has a parent server-side conference (not created ad hoc in the client application), you can find it in the general list.
# Session information
Click on the session ID in the general table to view information about the selected conferencing session, including:
information about time and owner of the conference
list of what time the participant was attending the conference
general media streams quality technical data
history of conference invitations and accepted/rejected video calls
Sending files.
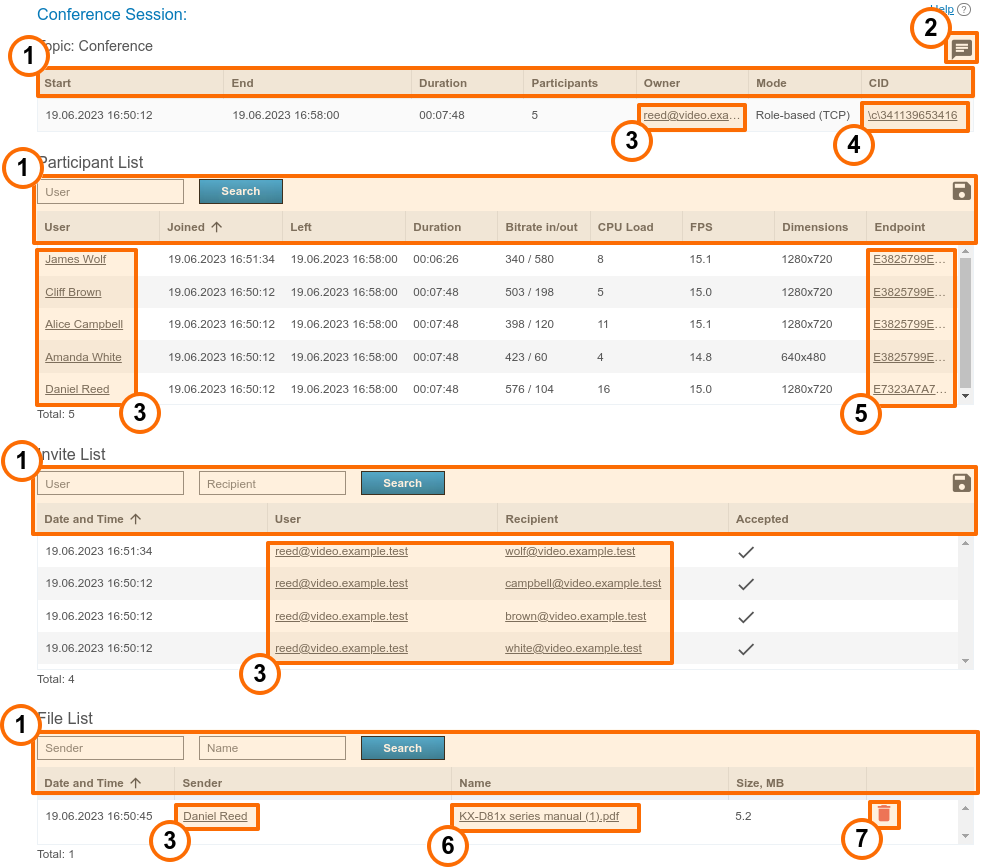
General table interface (see the description above).
Conference chat button.
Link to user profiles of participants and invited users.
If this session has a parent server-side conference (not created ad hoc in the client application), you can find it in the general list.
Link to the pages with each conference participant connection details.
The list of files sent to the conference chat. When any of the files is clicked, the download page will open.
The button for deleting a file from the server.
Please note that the use of UDP Multicast in this session can be specified in brackets in the Mode column (not used in the example above).
# Connection properties
Here you can view all connection details to a given conferencing session for each user (e.g., the client application version, operating system and CPU). The example below shows some of these parts:
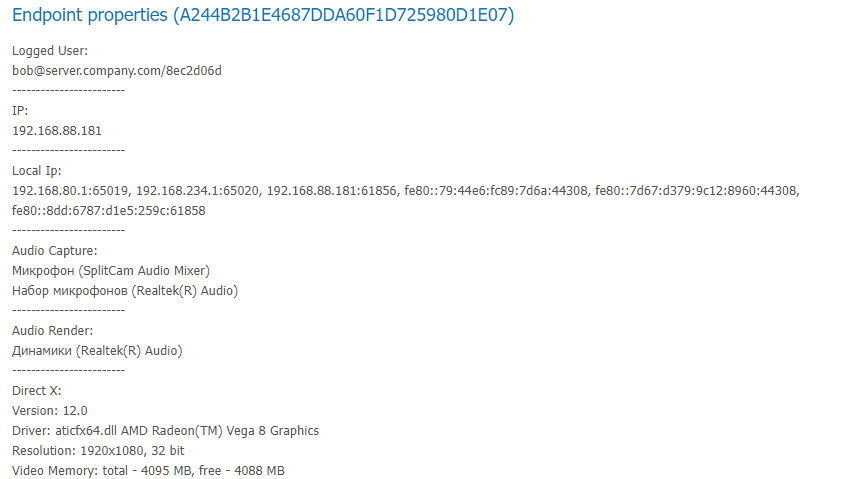
# Chat Messages
Chat Messages section features all messages sent by TrueConf Server users both in personal chats and group conference chats. Please note that the table contains time sorted messages from all users at once (you can change sorting features in the table header). To view messages in personal or group chat, you can filter them by Sender, Recipient, Session ID, and message date.
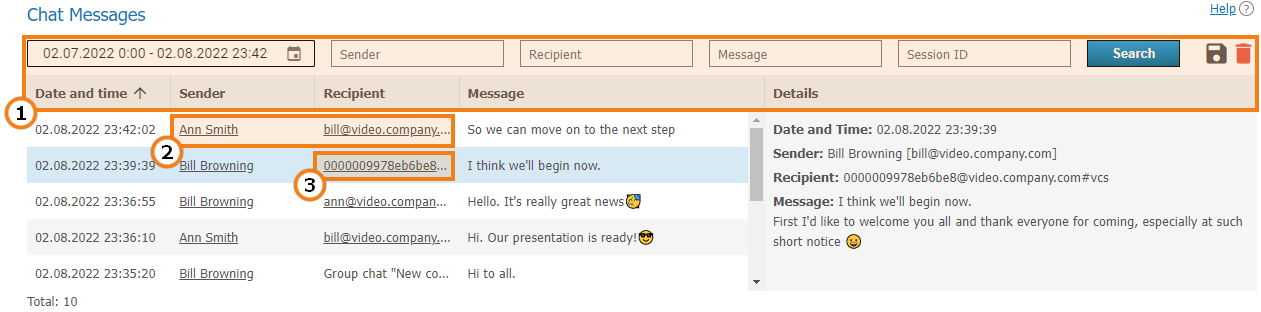
General table interface (see the description above).
Links to user profiles of the sender and recipient of a private message.
Link to a page with detailed information about the session to the common chat of which a message was sent.
# Configuration Changes
In this section, one can view the log of the following changes:
TrueConf Server settings
List of conferences stored on the server
Changes in the parameters from the Dashboard → PRO Licenses section, including the cases when PRO licenses were manually redistributed by the administrator
Settings of user groups and separate user accounts (available only in Registry storage mode).
Every entry in the table corresponds to a certain change. If you click on an entry, the panel on the right will display the server settings before and after this change.
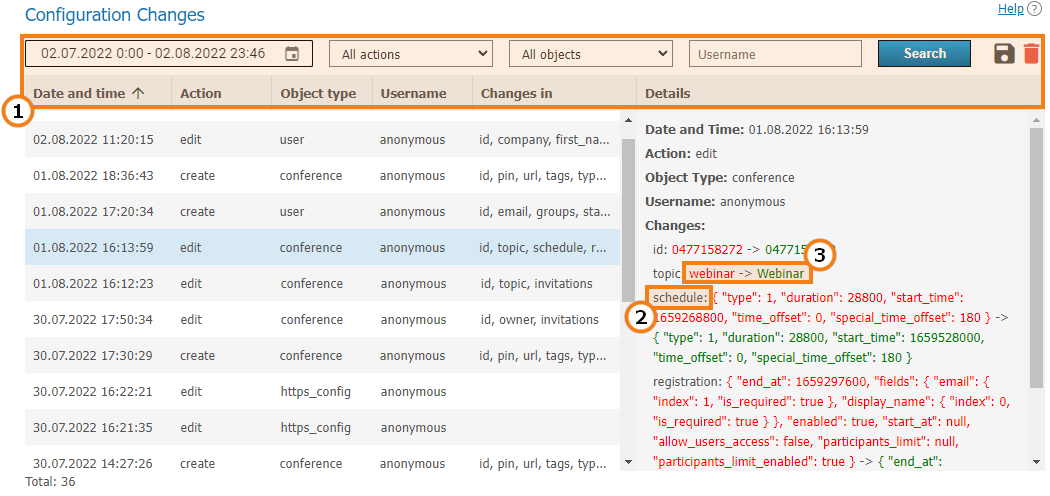
General table interface (see the description above).
Name of the modified parameter.
Parameter values: previous (before change) -> new (after change).
For example, the picture above illustrates an event involving some changes in the conference settings. The following parameters were changed:
Name (
topicparameter )Schedule settings (
scheduleparameter)Conference registration settings (
registrationparameter).
# Conference Recordings
This section contains a list of recorded conferences. Here you can playback, download or delete their records.
The parameters for storing conference recordings are set in a different section, Recordings.
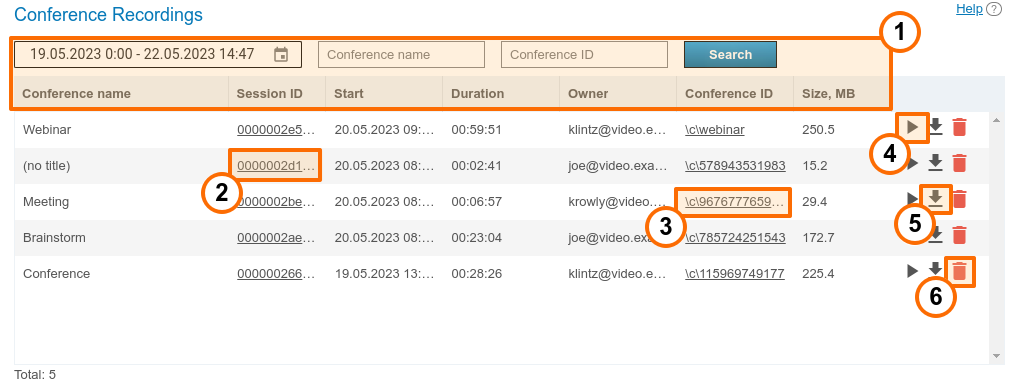
General table interface (see the description above).
Link to the page with detailed information about a session.
Go to the conference card in the general list
Playback button
Recording download button
Delete button.
Point-to-point video calls will be named (no title).
You can use the  button to playback recorded conferences (available only for .MP4 format) with chat synchronization (for group conferences only):
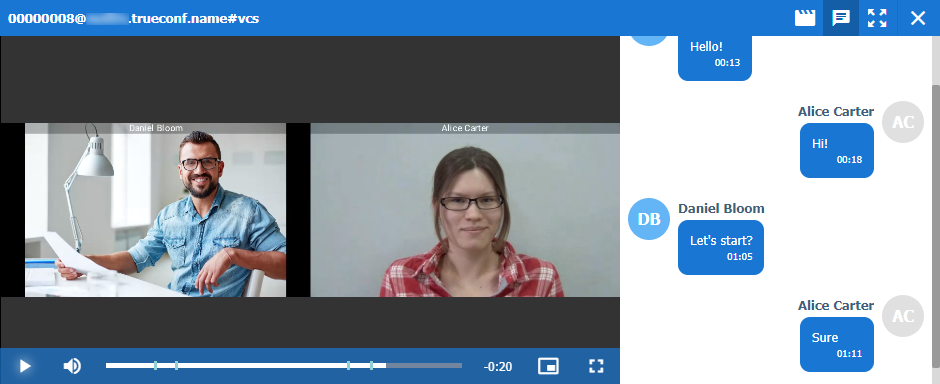
# Endpoints
This section provides information about user endpoints. This information can be useful for real time technical support.
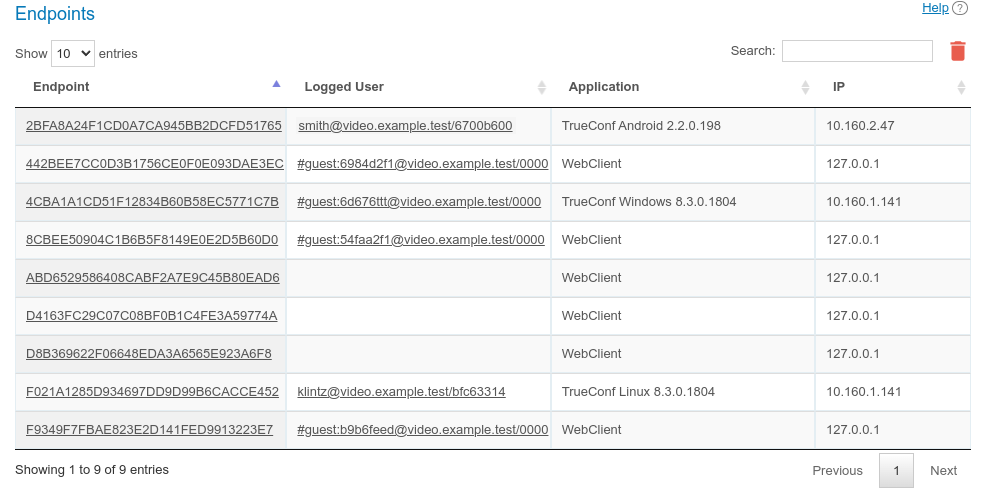
Use the quick search field to filter records by any of the parameters. The search is case-insensitive and can be performed for all fields (the table is filtered and you can see only those records that have at least one field with the entered string). It is possible to combine multiple searches. For example, to display only guest connections from the browser, search for webclient guest.
If you click on an entry in the Endpoint column, you will see the page providing detailed information about the connection of the selected user (we have discussed this page previously). In turn, by clicking on the field in the Logged User column that contains TrueConf ID of the selected TrueConf Server user, you will open the corresponding profile page.
The absence of data about the authenticated user in the connection string indicates that this user has already left the meeting (e.g., if a guest participated in the conference from a browser and then closed the conference page).
It is possible to delete recordings made earlier than the selected date. To do it, click on the button and specify the number of days for storing information (180 days by default):
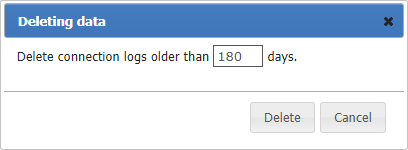
# Events that update device information
| Event | Variable Fields |
|---|---|
| Connecting or reconnecting device to the server |
|
| Conference end | Last Conf Name |
| Taking network test (by clicking a corresponding button in the client application) | Network Test |
| Authorization on the server | System information |
# File Storage
In this section you can setup storage settings for files your users are exchanging:
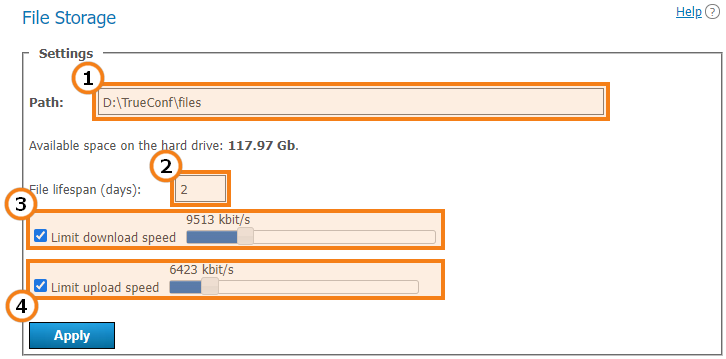
- Select a location of the files directory. You can use network paths.
In the TrueConf Server for Linux control panel, one cannot change the path to the file storage directory. However, it is possible to set up a symbolic link (symlink) as shown below.
2. File lifetime (specified in days), the period after which the files will be deleted automatically. The countdown starts when the file is uploaded on the server. The files are stored for 7 days by default. The value for lifetime ranges from 1 to 99999 days (almost 274 years which will be enough for any business task).
3. Use the slider to set maximum download speed limits to download the files from the server.
4. Use the slider to set maximum upload speed limits to upload the files to the server.
# How to use other folders on Linux with symlink
If you plan on storing many conference recordings or expect a large number of files to be sent in chats, you might find it convenient to change their storage path. For instance, you could move them to a larger SSD to avoid taking up space on the system storage. On Linux , you cannot change the path through the server control panel, but it is possible to use symbolic links (symlink).
To run the commands listed below, use the sudo program, or switch to the administrator mode by executing the su - command in the terminal and entering the root password.
To change the storage location for TrueConf Server for Linux, follow these steps:
Create a new directory for the required files. Below are the examples of console commands for working with new directories at the
/var/server/path:creating a directory for storing conference recordings:
mkdir -p /var/server/recordings
- creating a directory for storing files:
mkdir -p /var/server/files
2. Give the trueconf user owner permissions for the created directory.
- for recordings
chown -R trueconf:trueconf /var/server/recordings
- for files
chown -R trueconf:trueconf /var/server/files
3. If you need to keep the existing files, move them to the new directory:
- copying recordings
cp -RT /opt/trueconf/server/var/lib/recordings /var/server/recordings
- file copying
cp -RT /opt/trueconf/server/var/lib/files /var/server/files
4. Delete the directory that you want to replace with all its files since we will create a symbolic link instead:
- deleting the directory with recordings
rm -r /opt/trueconf/server/var/lib/recordings
- deleting the directory with files
rm -r /opt/trueconf/server/var/lib/files
5. Create a symbolic link to the new directory:
- for recordings
ln -s /var/server/recordings /opt/trueconf/server/var/lib/recordings
- for files
ln -s /var/server/files /opt/trueconf/server/var/lib/recordings
6. Restart the server web service:
systemctl restart trueconf-web
7. If you need to remove a symbolic link, use the following command:
unlink [symlink_path]
where [symlink_path] is the path to the directory created at step 2, for example, /var/server/recordings. Please note that this command does not delete the directory itself. To do this, run:
rm -r [symlink_path]
# Mounting a network storage on Linux
You can also create a symbolic link to any mounted directory, such as an external network storage.
To run the commands listed below, use the sudo program, or switch to the administrator mode by executing the su - command in the terminal and entering the root password.
For instance, to mount an external network storage accessible via the SMB protocol, take these steps:
- Install required tools on your system:
On Debian
apt-get install -y cifs-utils
2. Create a directory where you will mount the network storage (see step 1 in the section about creating symbolic links). For example, to mount the directory with chat files:
mkdir -p /var/server/files
3. Create the file credentials.ini with the data required to access the remote storage. It should include the following lines:
username=[login]
password=[password]
domain=[domain]
where:
[login]— login[password]— password[domain]— the domain to which the network storage belongs (this line is optional).
For example, with this command in the terminal:
echo -e 'username=[login]\npassword=[password]\ndomain=[domain]' > credentials.ini
The -e parameter of the echo command enables correct interpretation of special characters that are escaped with \. In the example above, this is the newline character \n.
4. Mount the network storage to the created directory using the credentials.ini file:
mount -t cifs -o credentials=[credentials_path] [remote_path] [local_path]
where:
[credentials_path]— the full path to thecredentials.inifile created during the previous step[remote_path]— the path to the mounted storage, for example,//10.100.2.120/files[local_path]— the path to the local directory used for mounting (see step 2), for example,/var/server/files.
You can now create a symbolic link to the mounted directory, as shown earlier.
To unmount a directory, run the following command (as administrator or using sudo):
umount [local_path]
where [local_path] is the path to the local directory for mounting (see step 2), for example, /var/server/files. After that, you can delete the directory with the command:
rm -r [local_path]
# Recordings
In this section, you can adjust the server settings for automatic conference recording.
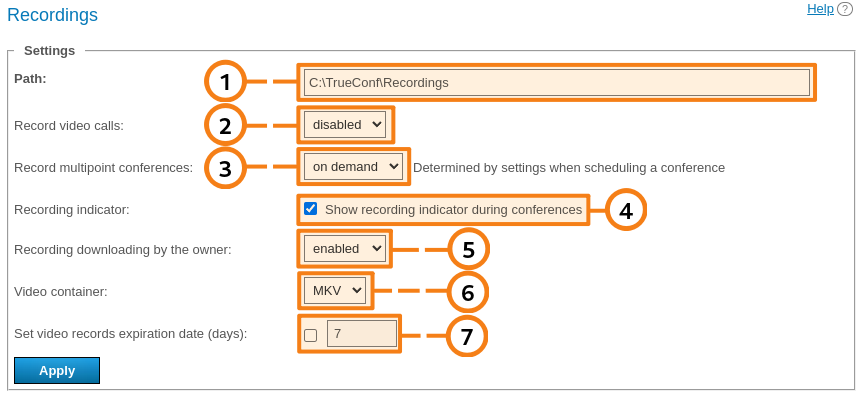
- The path to the folder where all recordings are saved. Default
Recordingsfolder is located in the server working folder. The list of recorded conferences displays the videos from the specified folder. If the path is redefined, the list is re-formed respectively. In this field, you can also specify network path if TrueConf Server service has the rights to place recordings in this directory.
In the TrueConf Server for Linux control panel, one cannot change the path to the directory with conference recordings. However, you can set up a symbolic link (symlink) as shown in the corresponding section.
2. Enable/disable point-to-point video call recording. This option is similar for all calls: either all are recorded, or none are recorded. Please note that if you enable this option, you will not able to use direct connection between users (to be recorded, all information between subscribers is transferred through the server).
3. There are three options to set up group conference recordings: either all are recorded, or none are recorded, or recording is set separately for each conference ("on demand" mode).
4. If a conference is recorded on the side of TrueConf Server, the participants will see the corresponding indicator in their client applications, browser or in the layout (in the case of SIP/H.323 connections). With this checkbox, the administrator can disable the display of this indicator.
5. Making it impossible for the conference owner to download meeting recordings stored on TrueConf Server. In this case the conference owner will see the list of recordings in the personal area or in the client application, but will be unable to download them.
6. The video format in which the recording files will be saved. To preview the conference recording, select the MP4 format in the control panel.
7. Time (in days) after which conference recordings should be deleted automatically. Click the checkbox next to the field to activate the text field. If you don’t check this box, recordings will be stored indefinitely (recordings are not deleted automatically).
Can the video recorded with TrueConf Server be played using third-party programs?
Yes, it can. In order to do it you will need to download and install a media player with VP8 video codec support, e.g. VLC (opens new window).
You can also upload any of your recordings to YouTube to share with your colleagues.
# Manage add-ons
# TrueConf Directory
In this section, you can configure integration of your TrueConf Server instance (a part of TrueConf Enterprise) with solution TrueConf Directory.
To do it, click on the Activate button. To disable integration, click on the Deactivate button.

In the large box below the table, the secret key will be generated.
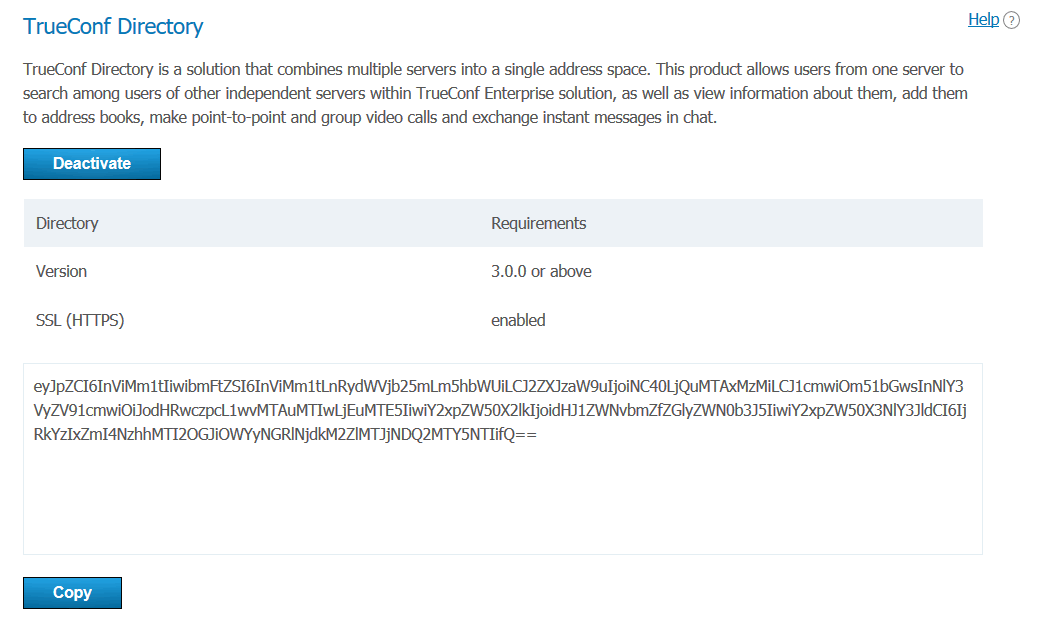
If you want to learn more about TrueConf Directory extension, as well as how to purchase and set it up, please contact us in any convenient way.
We demonstrated TrueConf Directory features at ISE 2019.
# Integration with DLP
If the Integration with DLP extension is activated in your TrueConf Server license, you will be able to configure connection to such a system and select the actions that should be performed when violations of information security rules are detected.
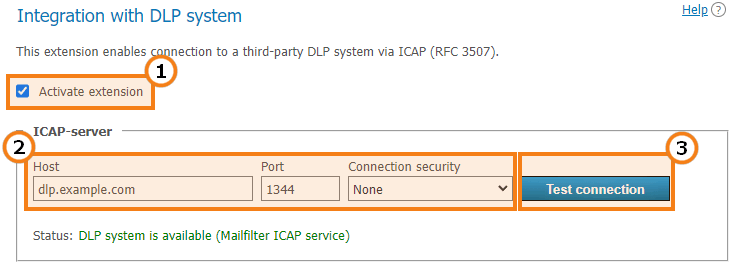
Extension activation. If the box is not marked and settings have not been saved with the Apply button, no checks will be performed.
DLP connection parameters: host (IP or FQDN without the
http: / https:prefix), port and connection type (cloud or secure TLS connection).System availability test. The test result will be displayed in the status line below.
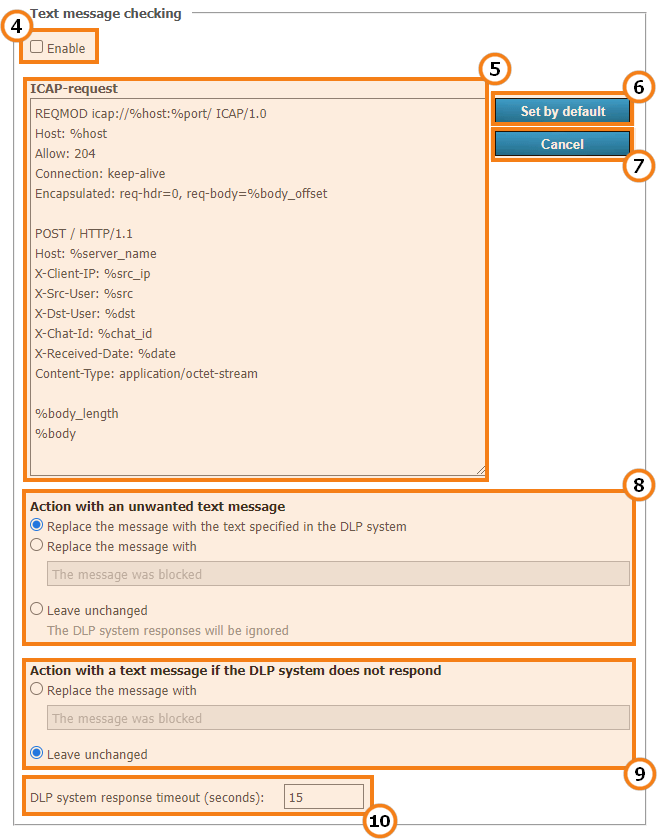
Activation of text message verification. If the box is not checked, and no settings have been saved with the Apply button, no verification will be available.
ICAP request containing the fields that should be sent to a DLP system. The request format will depend on the specific system. Here, we have listed the variables used in the template, These variables will be replaced with specific values when data is sent for analysis.
Reset the ICAP request to the default template.
Discard the last changes that were not saved with the Apply button.
Actions with a message marked as unwanted by the DLP system. It is possible to replace the message with a text selected on the side of the DLP system. One can also specify a custom text for the message or leave the initial message unchanged. In the last case, users will receive all messages, but the logs of the DLP system will include records of unwanted messages.
Actions with an unwanted message if there is no connection with the DLP system. For example, it is possible to enter the text “No connection with the security system” so that no messages can be sent to recipients until the problem is solved.
DLP response waiting time. If connection with the system is disrupted, the time period specified here will have to expire until TrueConf Server responds when the first message is sent. It will follow the settings from step 9 (attempts will be made to restore the connection). Then, connection availability will be tested in background mode, In this case messages will be sent or blocked almost instantaneously.

Activation of file verification. If the box is not checked, and no settings have been saved with the Apply button, verification will be unavailable. Please note that file analysis and response may take some time depending on the file size since the file will be first uploaded on TrueConf Server and then sent to the DLP system.
ICAP request containing the fields that should be sent to the DLP system.
Reset the ICAP request to the default template.
Discard the last changes that were not saved with the Apply button.
Actions with a file marked as unwanted by the DLP system. It is possible to replace this file with the text specified on the DLP system. One can also specify a custom text message or make no changes. In the last case users will receive all files, but the logs of the DLP system will include records of unwanted files.
Actions with an unwanted file in case there is no connection with the DLP system. For example, it is possible to enter this text “No connection with the security system” so that no files could be sent to recipients until the problem is solved.
DLP system response waiting time. The logic similar to the one used for messages is applied here (check step 10).
Don’t forget to click the Apply button to save changes.
# Variables in the templates of ICAP requests
%body— request content (text message from the chat)%body_length— request content length (measured in bytes)%body_offset— request content offset in the encapsulated section (measured in bytes)%chat_id— unique GUID of the chat%date— date in the ISO 8601 (opens new window) format%dst— the recipient’s full TrueConf ID presented asuser@server%dst_user— the recipient’s login (part of TrueConf ID up to the@character) with the domain specified asdomain\user%dst_user_no_domain— recipient’s login%host— the value taken from the Host field%port— the value taken from the Port field%server_name— the domain name of TrueConf Server%src— sender’s full TrueConf ID%src_user— sender’s login (part of TrueConf ID up to the@character) with the domain specified asdomain\user%src_user_no_domain— sender’s login%src_ip— sender’s IP address
# Mail plugins
This extension enables you to:
Control the web version of Microsoft Outlook plugin that will be downloaded from your server
Receive direct links for installing the Windows version of the Outlook add-on and Thunderbird plugin
Customize a template invitation to a conference.
This extension is offered for free (including TrueConf Server Free as well).
On the Plugins tab, you can:
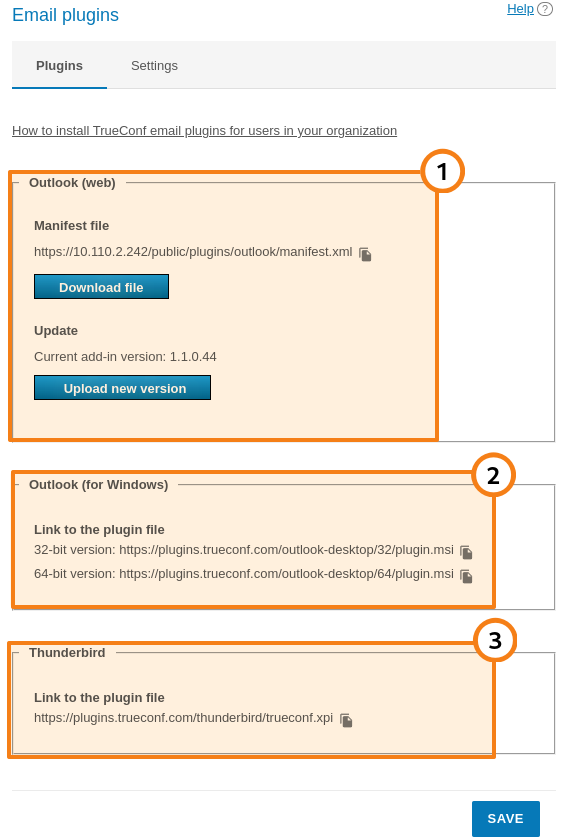
Download the xml file for installing the web version of the add-on (plugin) and update the current version on the server in the Outlook (web) section. The plugin installation link can be copied with the button
 and then distributed among the users of the corporate network (including the private network that does not have access to the Internet) so that these users could install the plugin directly from your TrueConf Server.
Copy the download link for the desktop version of the Outlook add-on with the button
in the Outlook (for Windows) section and share it among users. They will be able to download the plugin from our website via the Internet. You can also distribute the application with the help of group policies since it is provided as an msi package.
To learn more about installation and features of desktop and web versions of the MS Outlook add-on, check out our knowledge base.
3. Copy the installation link for the Thunderbird plugin with the button in the Thunderbird section and share this link among users.
On the Settings tab, you can change the default text of the description which is added when a new event is created with the help of any TrueConf mail plugins. Here, you can enable PIN code to be added in the description (providing that PIN was set previously):
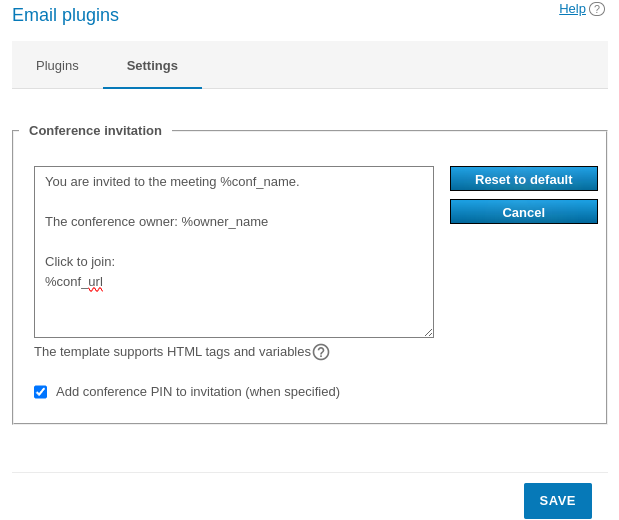
In the invitation template, one can use a group of constants similarly to the email templates available when configuring SMTP:
%conf_name— name of the conference%conf_id— ID of the conference, e.g.\c\df0a2adebe%owner_name— display name of the conference owner%conf_url— the link to the conference page, e.g.,:https://example.com/c/CIDServer administrator contacts parameters:
%admin_name— display name%admin_email— email address%admin_phone— phone number.