# Conference layout management
During a conference you can change its layout which is the arrangement of participants' video windows on the screen.
To do this, click the  button on the top control panel of the conference.
Here you can:
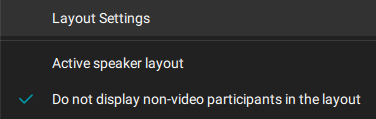
Navigate to the detailed Layout settings.
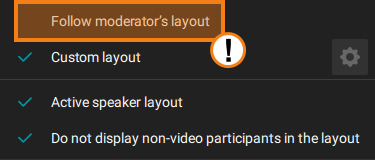
Activate the Active speaker layout checkbox, so that the participant who is currently speaking will become the priority in the video layout.
Activate the checkbox Do not display non-video participants in the layout, to hide participants who are not broadcasting their video.
After clicking Layout settings, a menu will open:
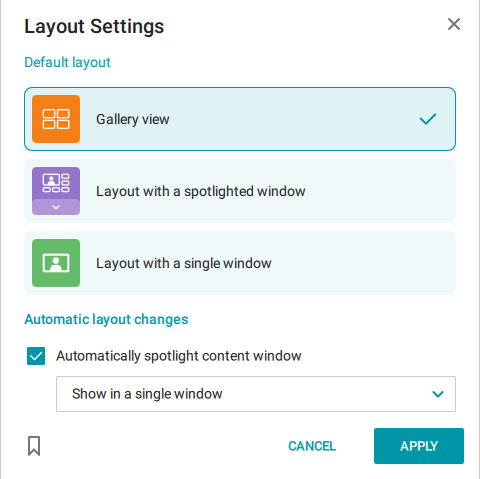
In this menu, you can select one of three video layouts, as well as configure Automatic layout changes, specifically how the content window will behave when its auto-enlargement is activated:
be displayed in a single video layout window, hiding the other participants;
moved to a separate application window;
to be displayed in the priority window of the video layout.
# Changing video layout for other meeting participants
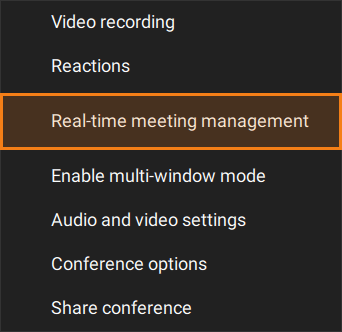
If you are the conference moderator, go to Real-time meeting management by clicking on the button  in the conference controls.
A real-time meeting management window will open. First and foremost, you will be prompted to select for which user you want to configure the video layout:
For everyone. The distribution list you create will be sent to all users in the conference without exception.
For SIP/H.323 devices and WebRTC. This option sends the broadcast exclusively to selected types of devices, which can be useful, for example, when streaming a conference that needs to be presented to an external audience.
Custom video layout. You independently select an individual user in the conference for whom you create the layout.
In this window, you can also view detailed information about a conference. Click the button  in the upper panel next to the conference name and select the Conference details option.
Regardless of the option you choose, the video layout settings window will open.
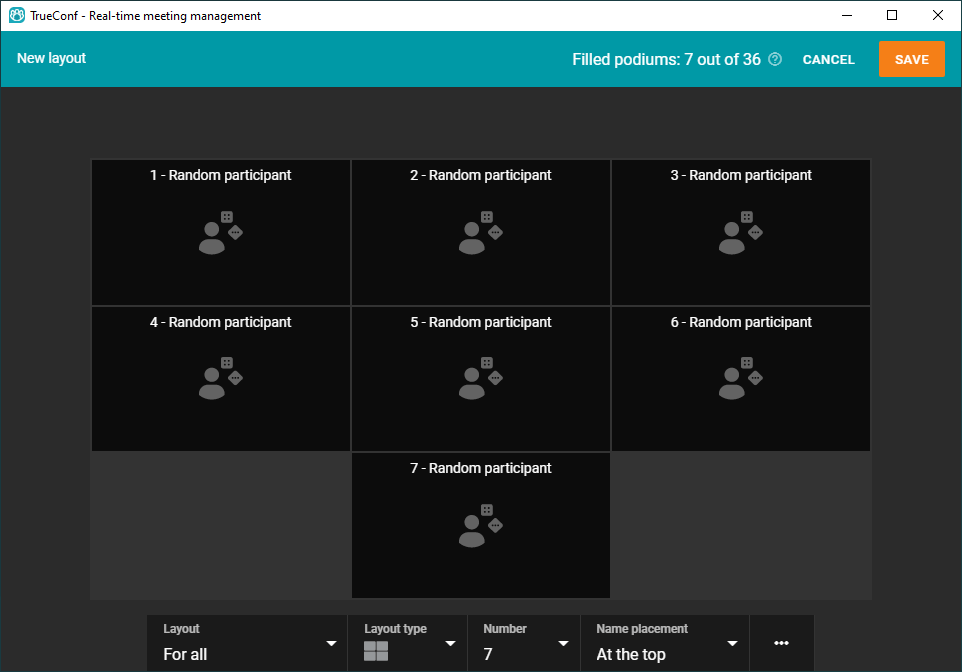
Here you will see:
The Layout item — here you can add another layout option in order to send different video layouts simultaneously to several individual users or types of devices. For example, you can create two layouts — one for a single user and another for all others.
The Layout type option allows you to select the logic by which windows will be distributed in the layout. If you hover over each of the layout type buttons, you will get a textual description of it.
The Number option allows you to choose how many custom windows will be in your video layout.
The Name placement option determines whether the name will be displayed and, if so, where it will appear (above or below the user's window).
The Additional button
 opens a set of additional options: Enable users to change the video layout, Auto-fill the video layout, Clear the video layout and Delete the video layout.
User windows — by clicking on each of them, you can choose the slot type (video window): pin to a participant, enable random filling, display the active speaker, pin to content, activate automatic participant switching at a set frequency.
If you are not currently participating in an active conference, the link to real-time meeting manager may still be available in the application scheduler (or in the personal area). However, the following requirements have to be met:
You are the operator added to the list of invited conference participants.
You are the conference owner.
# Adjusting your video layout of the ongoing meeting
You can always adjust your view of the current meeting.
If you change your video layout during the meeting, the view of other participants (both native and browser-based) will not change.
To change the order of video windows:
Press and hold the left mouse button on the pane you would like to relocate.
Drag the selected pane to another place on the screen.
Release the mouse button to switch the participants' panes.
To select a priority window, which will be displayed as the largest in the layout:
Double-click the left mouse button on the image you want to move to the center of the layout and make it large. You can also click on the button
 that will appear when you hover over the corresponding video window.
Other windows will be displayed as thumbnails. Double-click again on the larger window to return the video layout to its original position.
It is equally easy to select a window that needs to be spotlighted (enlarged). Double-click on any small window and it will be automatically spotlighted. It is also possible to drag-and-drop video windows when one of the video windows is spotlighted.
# Can meeting participants decline the locked video layout?
Yes, if the meeting owner selects Enable users to change layout in the real-time meeting manager.
In this case, the conference participants will receive notifications about the new video layout from the moderator and can choose to enable or decline it:
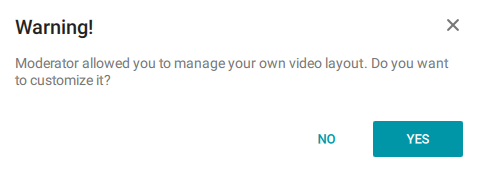
Even if the video layout from the moderator was declined, the user will still be able to enable it. The corresponding button will be available in the Layout settings section in the conference control panel.
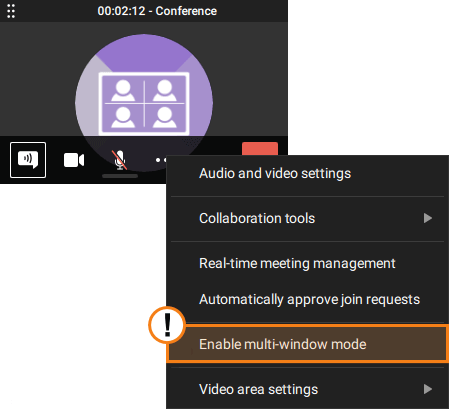
# Multi-window mode
During a conference, you can enable the multi-window mode. It will be useful if you work with multiple monitors: you manage your conference in the main window, while the video area switches to an additional window. There are two options to enable the multi-window mode:
Open conference controls, click on the button
and select Enable multi-window mode.The method described above can also be used to enable multi-window mode in the conference widget.
Once the above steps are complete, the application will split into several windows:
Video layout window
Main application window
Conference control widget.
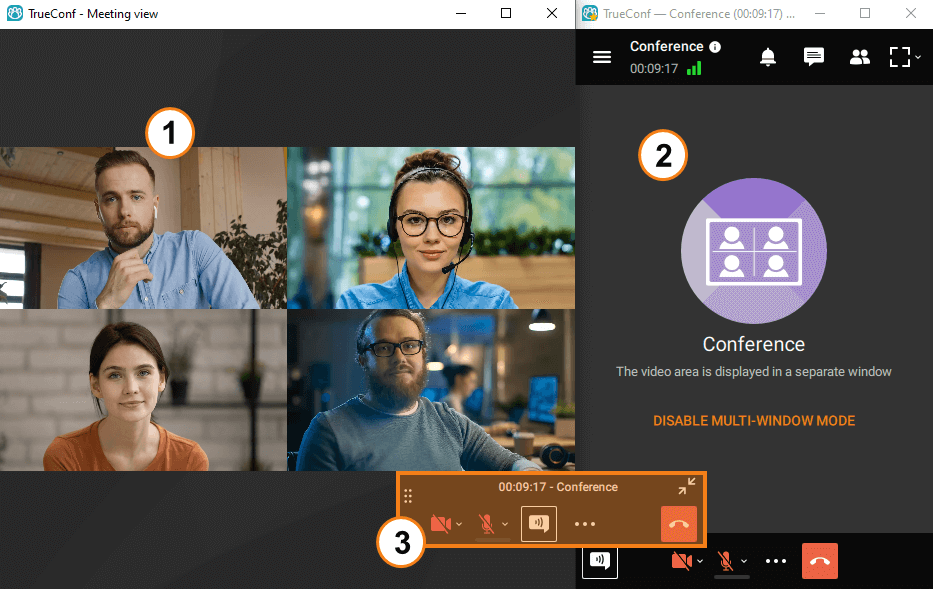
You can disable multi-window mode by clicking Enable multi-window mode in the main application window (item 2 in the image above).
# Vertical orientation of windows in video layouts
For point-to-point calls and conferences with layouts featuring identical windows and a priority window, vertical orientation is supported for participant windows.
If more than 50% of participants in a conference with a uniform video layout are transmitting a vertical camera feed, this layout will be applied to all participants, including those transmitting horizontal video.